Adhesives have been used in the automotive industry for years, and their use is expanding. However, to assume that adhesives are universally recommended for repairs by all the automakers would be wrong.
It’s always wise to stay current on the OEMs’ repair procedures and positions on using adhesives for repairs. We can’t assume that using the same method an automaker uses to assemble a vehicle is always the correct and recommended method to return a collision-damaged vehicle to repaired status.
OEM Info Imperative
Believe me, it isn’t rare for the auto manufacturer to recommend a completely different repair procedure from its assembly procedure. Does this make your repair look different from the opposite, undamaged portion of the car? Yes, and sometimes it’s very obvious. Does an assembled, rivet-bonded replacement frame rail look different from the factory spot-welded, undamaged rail on the opposite side? Yes. However, that doesn’t mean the repair was done incorrectly. On the contrary, if that rivet-bonded rail was replaced using the factory recommended procedure, it makes that repair correct even though it looks different from the factory assembled process.
This is a change from procedures we used to use to return the vehicle back to an undetectable condition. Making “invisible repairs” has been our goal since the beginning of the collision repair industry and is an indicator of craftsmanship, but what I’m talking about here is a significant change that requires knowing the recommended factory OEM repair procedures.
This means you’ll need to obtain those procedures from the automaker to avoid making a serious mistake. But don’t worry – if a manufacturer has a repair procedure, it will most likely be available on its website or from your local dealer or a vendor that sells access to that information. The nice thing is that it no longer takes days or weeks to obtain this information – most of it is now available within an hour. Some of this information is free, or if not, it’s available through a fee-based subscription. But as sophisticated as vehicles are getting these days, you shouldn’t be touching them without accessing this information.
Not All the Same
Thinking that all adhesives are the same is a common error. They’re different from one intended use to another, and not just from one adhesive manufacturer to another but within specific adhesive manufacturers’ adhesive product lines. Each type of adhesive may have a specific use on the automobile, and using one adhesive for all bonding jobs would be a serious mistake.
Consider that replacing a door panel requires the use of not just one but two adhesives. One of my technicians, whose dad works at another body shop, told me his pop recently had problems skinning a door. He paneled the door using door panel bonding adhesive but, upon installation, experienced a twist in the door that required some blocking and reverse pressure to rectify. It happens to most of us. However, a couple of softball-sized dents appeared in the area of the door intrusion beam when Dad twisted the door into position. Bad day! Door skins are never intended to be bonded directly to the intrusion beam, which is what happened. This is a no-no because it’s the site of anti-flutter flexible foam.
Leave the anti-flutter foam attached to the door intrusion beam and not the door skin when you remove the panel. Do this by using heat on the outside of the skin as you’re lifting off the damaged panel. When you’re ready to apply the new skin, cover the surface of the existing flexible foam on the intrusion beam with urethane adhesive, which is similar to windshield urethane but of a lower grade. This does two things:
1. It restores any torn or open cells in flexible anti-flutter foam to a waterproof status.
2. It enables the anti-flutter foam to physically function between the skin and intrusion beam, allowing the skin to flex, not flutter.
This method provides enough flex to prevent dents if a twist action becomes necessary.
More Is Better?
There are not many adhesive-only repairs. Few automakers recommend using only adhesives without any welding, riveting or other method of fastening in repairs involving panels or parts. The only exceptions are door panels and some floor parts made of laminated steel.
There are lots of people out there who are using adhesives for a vast amount of their work. Let me re-emphasize that unless this is recommended by the automaker, those are not correct repairs.
Many manufacturers will specify anchor welds in the corners of the parts. Also, rivets and spot welds are used in many places in conjunction with adhesives. Manufacturers like rivet bonding and weld bonding because they’re strong and quiet regarding noise vibration and harshness (NVH). Ford, for example, on its late model F-150, replaces the uniside (door ring) using the weld bonding process, both with squeeze type resistance spot welding and MIG welding in areas the spot welder arms can’t access. Care is taken to prevent adhesive from entering the future MIG plug weld site, and the spot welds are done through the adhesive.
Three Categories
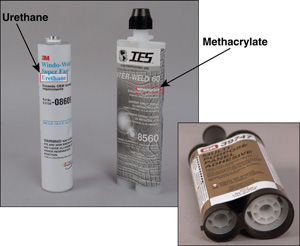
Adhesives fall under three basic categories: urethane, acrylic and epoxy-based (Photo 1).
Urethanes are typically one part and cure with moisture in the air, but there are also some two-part urethanes. Windshields and back glass, for example, use urethane for attachment. Urethane is relatively flexible and so is used where high strength combined with flexibility is a requirement.
Acrylics are two-part adhesives that cure in the presence of moisture. One of the advantages of acrylics is fast cure time.
Epoxy-based adhesives are slow, two-part and can have their cure rates sped up by force heating for faster assembly times.
It’s important to note that mixing tips are specific to each product. While different tips may physically fit on several different adhesive cartridges, they’re specific to one kind of adhesive. You can have a very long and very short mixing tip that will fit on one adhesive, but the wrong tip can promote failure of the adhesive because of improper curing.
Before attaching the tip to any two-part adhesive, always equalize the cartridge by dispensing adhesive from the uncapped cartridge until both sides of the cartridge are dispensing equally. Attach the mixing tip and dispense a bead at least as long as the length of the mixing tube on a rag.
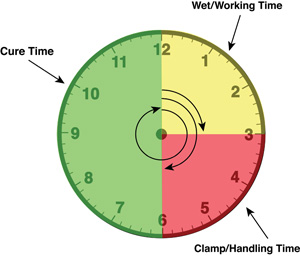
There are specific wet, clamp and cure times (Photo 2), but keep in mind they’re drastically affected by ambient temperature. For example, at 50 percent relative humidity and 70º F, cure time can be halved for every 20º F increase in temperature. Conversely, it can be doubled for every 20º F decrease in temperature. Bottom line: Temperature is an important consideration. After contact is made, it’s important to not pull the parts apart because the bond will be seriously compromised by air bubbles in the bond line. Always slide the parts to align if necessary.
The Weakest Link
Adhesive bonds are only as strong as the weakest link in the bond area. If the bond area isn’t properly repaired, the bond will fail, so carefully follow the instructions for the adhesive you’re using.
Some adhesives require priming of all bare metal areas (Photo 3) with an epoxy primer (dry time 30 minutes) prior to application. If all bare metal isn’t carefully covered, rust can creep under the adhesive and primer bond line.
Adhesives that don’t require a primer must themselves provide corrosion protection for the bare metal (Photo 4). With the advent of zinc-coated steel as a rust preventative, we started to see some adhesive failures in the factory bond areas. Upon disassembly of the damaged parts, it was discovered that the bonds failed because of the zinc degrading under the adhesive.
Zinc is the most reactive metal used in the automotive industry, with aluminum second. It’s sacrificial by nature and, when paint is chipped down to bare metal, the steel doesn’t rust because of the zinc. This is good and I like it.
However, zinc reacts to adhesive and begins to oxidize, breaking the bond to the metal. There’s your weak link! So it’s important that the zinc coating be thoroughly removed from the steel in the bond area to prevent this bond-breaking reaction. Be diligent and inspect carefully!
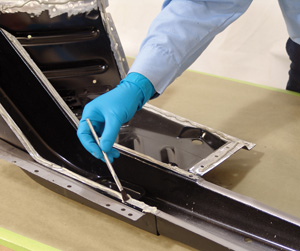
After removing the zinc from both the new and existing flange, lay out a bead of adhesive on the bare steel surfaces. Once the bead is dispensed, carefully spread the adhesive to ensure that all the bare steel is completely covered or else rust will form and, of course, weaken the bond.
I like to use an acid brush to spread the adhesive evenly. After the adhesive is smooth, evenly lay out another bead of adhesive on the existing part to ensure proper bondline thickness. Carefully assemble your parts together without lifting.
Nice Job!
Beautiful job! That extra time you took prefitting your parts just paid off. Way to go! And may your future adhesive jobs go just as smoothly.
For more information on adhesive bonding, enroll in I-CAR’s Adhesive Bonding Class ADH01.
Writer Mike West, a contributing editor to BodyShop Business, has been a shop owner for more than 30 years and a technician for more than 40 years. His shop in Seattle, Wash., has attained the I-CAR Gold Class distinction and the ASE Blue Seal of Excellence.