What’s cheaper? An airline ticket from Los Angeles to New York with a weekend stay at a five-star hotel including two front-row seats to a Broadway play or a gallon of epoxy primer and hardener?
If you said the epoxy primer and hardener, you’re correct.
Now look at just the plane flight. Is it cheaper than a gallon of epoxy primer?
What’s the point of all of this, you ask? We, as repairers, have to spend lots of money on these products – which are necessary to return a damaged vehicle to its preloss condition pertaining to corrosion protection.
And because most insurance companies are stressing repair versus replace, it’s important that we address the prime, featheredge and fill issue – and getting properly compensated for them.
Let’s first look at the basis for the paint time allowances by the three information providers. If you look in the paint section of the procedure times, all three database providers state that their paint times are based on a new and undamaged panel.
I repeat, a new and undamaged panel.
When a part is damaged due to an accident, the part needs to be repaired, and labor and materials are applied to the part to reach the same level as the new, undamaged part that the paint times are based upon. Let’s take a look at what’s included by all three information providers in the paint section for a new and undamaged part.
ADP’s 2000 Database Reference Manual states that included items are as follows: move the car, review the estimate, get the paint code, order the paint, get paint, gather materials, equipment and tools, clean equipment and materials, degrease vehicle, prepare to sand (whatever that means) mix and apply sealer, guide coat application for welded panel (again whatever that means), block sand for welded panels, water wash and clean panel with solvent, blow dry clean panels, clean booth, protect exterior of vehicle from overspray, mix, apply and flash, tack wipe, mix color, spray test panel (compare to vehicle) initial tint, spray test panel and compare to vehicle, apply color, inspect repair, clean gun. For two-stage paint add the following: gather additional materials, tack wipe between the color and clearcoat operation, mix, apply and flash clear and clean clearcoat gun.
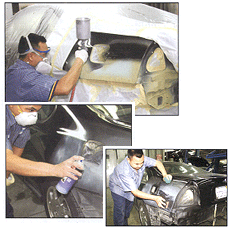
Mitchell states in its P-pages that the following are included when painting a new and undamaged two-stage part: solvent wash, scuff panel and clean, mask adjacent panels up to 36 inches or substitute with cover vehicle (bag) complete, prime or seal as required, final sanding and clean, mix materials, adjust spray equipment, apply color, clean equipment, mix clear, clean and tack surface, apply clear, clean clear equipment.
In its paint operations for a new and undamaged part, CCC Pathway’s basic color coat application includes: back tape small openings, clean component, clean sprayer, color coat application, initial dry sand, light buff (if recommended by paint manufacturer), load sprayer, mask adjacent panels (3-foot perimeter), mask glass openings, mask/protect grille openings (overspray), mix paint, prime coat-sealer application, primer/sealer final clean, primer/sealer final sand, remove masking, retrieve accurate color information including paint chip.
As for the paint manufacturers’ recommended procedures for refinishing a new and undamaged part, I’m going to generalize.
The paint companies want the new panel scuffed with a Scotch Brite pad (some recommend a cleanser with the pad while others recommend 600-grit to 1,000-grit wet or dry sandpaper). The next step is to apply some sort of primer/sealer – either wet-on-wet or allow an appropriate flash time. The final two steps are to apply the basecoat followed by a clearcoat. These procedures are what’s outlined by the information providers for refinishing a new, undamaged part.
Let’s now turn our attention to the procedures for a repaired panel. A repaired panel for demonstration purposes is one that’s been damaged, the paint removed to bare metal, the metal straightened, the plastic filler applied and the panel finish sanded with 150-grit sandpaper. With the repairs completed, the vehicle is moved to the paint department.
Let’s look at the steps needed to get the repaired panel to the same level where a new, undamaged panel is ready for paint prep.
Step 1: Sand the repaired panel with 220-grit DA, followed by 320-grit DA.
Step 2: Mask off vehicle for primer application.
Step 3: Apply one or two light coats of epoxy, 2K self-etch or a wash primer to all bare metal. This primer will reproduce the OEM-applied E-coat primer. Two technical notes: First, these primers do not have good build properties, so a polyurethane primer is needed. Second: Toyota states in a service bulletin that the epoxy primer is applied first, followed by the plastic filler.
Step 4: Apply polyurethane primer to total repaired area.
Step 5: Apply a guide coat (a contrasting color to the primer) to the primered area.
Step 6: Sand primered area with 600- to 800-grit sandpaper using a “longboard.” Note: Any low areas will still show guide coat color.
Step 7: Re-prime repaired area if necessary and re-sand.
Step 8: Sand with 400 wet and repair any imperfections as recommended by the paint manufacturer.
Step 9: Sand with 1,000-grit wet.
Step 10: Apply primer sealer.
Step 11: Apply basecoat.
Step 12: Apply clearcoat.
Steps 1 through 12 all need labor and/or materials applied to them. Step 1 is accounted for when the repair option is selected in the estimating program, as well as steps 9 through 12.
But what about steps 2 through 8? These steps require both labor and materials, but the fact of the matter is that most shops aren’t being compensated for these steps (which can cost us hundreds of dollars per repair)!
The reasons for not being compensated are threefold:
These steps aren’t outlined by the information providers and for the life of me, I cannot understand why. Well, I can understand why, but I don’t agree with their explanation (If it’s in print, shops use it as a negotiating tool. Not being in print, insurance companies can say that it must be included.) I truly believe that if the information providers would state generic procedures for prime, featheredge and fill, there would be less confusion in the marketplace.
Many in the insurance industry think that steps 2 through 8 are included with step 1. This premise is totally wrong, and we as an industry need to address this point. Most insurance companies are stressing repair versus replace, so the need to address the prime, featheredge and fill issue is paramount. There’s no legitimate reason to ignore these procedures.
The repair industry needs to get off its backside and start asking for the steps on its estimates. We as repairers need to understand the procedures and be able to explain these steps intelligently. Instead of saying that we need it, we must be able to explain in detail why the steps are necessary and why we need to be compensated for them.
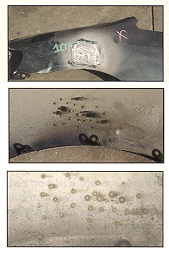
Another item I want to address is the backside of the repaired panel. The copper studs that are attached to the damaged sheet metal with a stud gun produce a corrosion hot spot on the backside of the repaired panel. The E-coat is burned off, and uncoated sheet metal is exposed to the atmosphere.
I took a fender, affixed a number of studs to it and then photographed the backside of the fender. To my amazement, corrosion was visible within a couple of hours and tripled in size within 21 days (see photos below).
The minimum procedures needed to address this situation are to R&I any parts for access, sand, mask and apply either an epoxy primer, a self-etch primer or a wash primer. The panel should be top coated, but this would probably be a luxury step in today’s environment. I’ve found that the self-etch primer in a spray can works real well for this application.
One final thought…
With the cost of materials skyrocketing, we need to address the different areas in the repair process that are not included items and come to an agreement with the different facets of our industry that these items and procedures are necessary for a proper repair. There’s no legitimate reason for us not to be including a separate line for each of these items, along with cost and labor (when applicable).
Contributing Editor Toby Chess has more than 30 years of industry experience. Chess is an ASE Master Certified Technician, an Accredited Automotive Manager, an I-CAR instructor, a stud, the Los Angeles I-CAR Chairman, a stud, a technical presenter for CIC and let’s not forget, a stud. He can be reached at [email protected].
Comments? Fax them to (330) 670-0874 or e-mail them to BSB Editor Georgina K. Carson at [email protected].

