It goes without saying that the collision repair industry is in a state of constant change. I can attest to this fact because I’m an I-CAR instructor and have 44 years of daily hands-on experience repairing all aspects of collision-damaged automobiles. The only true constant in our industry is change. Those who don’t want to adapt to change and figure out how to best meet the challenges head on will either fall behind or be constantly trying to catch up to the onslaught
of competition.
A Declining Industry
We’re in a declining industry. That in itself can be hard to
face, but it’s true. Consider that in 1969, there were about 100,000 body shops in the United States. The EPA, in its latest census for the new VOC rule published in September 2007, identified 36,000 collision repair shops. Other sources put the number at somewhere between 40,000 and 50,000. We’ve got twice as many cars on the road as we had in 1970 but the same number of accidents. In 1970, about 4 percent of all wrecks were total losses. Today, 20 percent of all accidents result in a total loss.
It’s being constantly stated that we’re in a situation of oversupply, where there are too many shops for a declining amount of work. This is a designed and planned state of affairs. The National Highway Traffic Safety Administration (NHTSA) has set a goal of 30 percent fewer accidents over a 20-year period, and this goal aligns with those of other motoring nations around the world. And it’s happening. Laws, insurance rates, road designs, collision avoidance systems and better handling vehicles are making collisions less frequent, and that trend is going to continue.
Why Repair Plastics?
In the face of what you just read, it would seem to be a wise strategy to look for repair opportunities everywhere you can. Glass work, airbags, steering and suspension, aluminum repair, air conditioning and, of course, plastic repair are all processes you can do.
I do these processes in my shop and they keep me busy. I recently heard a shop owner state that those repairs require a different “skill set” from what his crew is used to. So…what’s a “skill set”? I would say that it’s a certain operation a technician repeats often enough to reach a “comfort zone” and become competent at it. Many people resist leaving their comfort zone, but given a choice of developing a new skill set or sitting in a rocking chair drawing unemployment, they’ll venture out of their comfort zone to test the waters. The most valued technicians are those who can repair anything and repair it correctly, once. This also helps reduce cycle time and reduce severity.
An entire industry has risen out of what we throw away. Yeah, that’s right, remanufactured bumper covers. How did this happen? Most likely, someone ventured out of his comfort zone and tried to repair a bumper cover without studying or researching the repair process for a successful repair, did a “cobbled up” job that failed and vowed, “Never again!” He started throwing away repairable covers that were then salvaged and repaired by someone with less skill but more knowledge than he had. These covers were then sold back to him as remanufactured or reconditioned, while he whined about the unknown primer, pits, scratches and waves in the cover he just bought.
Does this make sense to you? The bottom line is that many plastic parts are repairable, especially bumper covers, which are some of the most commonly damaged parts on an automobile.
Properly performed repair makes sense, too, when it comes to painting. If you can repair a bumper cover, chances are the damage will be localized. That means you’ll be able to blend the color away from adjacent panels if possible, whereas replacing a cover requires complete painting of the part as well as the inherent color match and possible blending of adjacent panels that may be necessary.
One of the most common remarks I hear from adjusters when I’m teaching I-CAR’s plastic repair courses is that shops say they can’t guarantee a bumper cover repair when it’s requested by the adjuster. I can tell you that I’ve never had a plastic repair fail. I’ve had paint adhesion failure on new plastic parts, but never a repair or paint failure on a repaired plastic part. Does this mean it’s simple? No, it isn’t, but it isn’t that difficult, either. You definitely need to thoroughly understand the process mentally before you begin any physical repair. “But that’s a different ‘skill set’ from what I’m used to!” you cry. Hang on and let me explain a few things to you, and maybe the clouds will lift and a new dawn will arise.
Identify Before Repairing
Now don’t get all uptight and
nervous. This isn’t much different from working with aluminum, magnesium or steel. You need to know what material you’re working on before you can develop a repair plan.
Plan? What’s that? OK, let’s get serious. For the purposes of this article, we’re going to discuss the repair of a bumper cover, since that’s the most commonly damaged plastic part on
a vehicle.
Bumper covers are made of several plastics, all of which fall into two categories: thermoset and thermoplastic. It’s important to know which type you have to determine how to proceed with the repair.
Thermoset plastics can be thought of as a chemically catalyzed process. Part A and Part B are mixed together and injected into a mold. Once set, the part won’t melt with heat…it’s set.
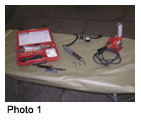
Thermoplastics are dumped into a hopper in pellet form, melted by a heat source and then injected into a mold. Once cooled and set, the part can be melted by a heat source like a plastic welder or a heat gun (photo 1).
Some common plastics falling into these categories that are used in bumper covers are found in the chart located on the next page. This chart covers nearly all the bumper cover types used in the automotive world today.
The vast majority of all parts are thermoplastics because they’re better suited to large volume runs of parts. The molding process includes some waste that’s trimmed from the part, which is readily recyclable and thus makes thermoplastics environmentally friendly and cost-efficient.
Thermosets are more suited to low-volume, large parts than high production runs. Tooling costs are much higher for thermoplastics than thermosets, so setup for smaller runs is cost-effective. Trim waste cannot be readily recycled and is usually landfilled.
The identification process is only necessary to allow yourself more repair options. You can repair bumper covers without identifying the plastic, but you’ll be relegated to one repair option only, which may not always be the best. You’re going to need to partially identify the plastic to successfully prime and paint it anyway. In this case, knowledge is truly power…the power to avoid failure.
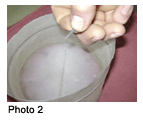
If the symbols are readily readable on the back of the part, compare them with the previous chart. I’m familiar enough with the repair process now that I’m really only interested in one thing: identifying if the part is an olefin. I can do this in most cases by a float test. Most olefin bumper covers are lighter than water. Cut a sliver of plastic from the backside of the cover and make sure it’s free of dirt, paint and undercoater. Place it in a cup of water. If it floats, it’s olefin or TPO, TEO, PP + EPDM (photo 2). This covers 80 percent of the bumper covers you’ll repair. Another 15 percent are urethane (that bumper cover on that big Lincoln or Caddy hearse you fixed was probably urethane). Cut a sliver, clean it and drop it in water. Aha, it sank like a rock…it’s urethane, just like you thought. That still leaves 5 percent. And about 4 percent of that is going to be xenoy/polycarbonate, which you can find on some Mercedes and older Ford products. It’s very rigid and doesn’t float, but does melt with an airless welder.
As you can see, identification of bumper cover plastic isn’t all that difficult. I can do it all in one sentence: If a sliver floats, it’s a polyolefin; if a sliver sinks and it’s low production, it’s urethane; if it’s rigid, a sliver sinks and it’s on a Mercedes or older model Ford product, it’s xenoy/polycarbonate. I just identified 99 percent of all bumper covers in one sentence.
The Process
Step 1: Identify plastic type. I’ve identified our bumper cover repair as a polyolefin by using the float test method. Since 80 percent of all automotive bumper covers are this plastic type, it makes a good typical repair demonstration. I’ll repair the two damages exhibited using two different methods: (a) airless welder and (b) chemical bonding.
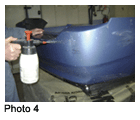
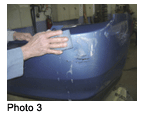
Step 2: It’s gotta be clean. The first step after identifying the plastic type is to thoroughly clean the entire part, specifically both sides of the repair area. This should be done with hot, soapy water (or a water-based cleaner) and then dried (photo 3). This will remove water-soluble contaminants. Then, clean the part again, using a wax and grease remover, to remove any road tar or solvent-soluble contaminants (photo 4).
Step 3: It’s gotta be straight and aligned. Most cuts, tears and gouges include some distortion of the surrounding plastic bumper cover. Getting it to align to the edges of the tear or cut is crucial to the success of the final repair. But this is doable, so don’t get all worked up about it. It’s
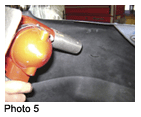
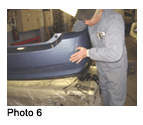
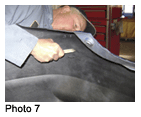
going to look a whole lot better in a few minutes. Remember, our polyolefin-type (TPO) bumper cover is a thermoplastic. Heat was used in its initial molding and formation. So, this plastic does have a memory. In other words, with the application of some heat, the distorted area will want to return to its original shape (photo 5). Where the distortion is deep and significant, you’ll need to physically reshape the distorted area while the plastic is warm (photo 6). Take your time reheating as necessary and using the appropriate tool to bring up deep low spots and gouges. A hammer handle or glass
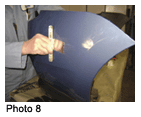
bone works well (photo 7). Once the sides of the cut or tear align, hold the opposing sides in alignment with aluminum repair tape applied to the outer or painted surface side (photo 8). This will help hold the opposing sides of the tear in alignment while you repair the tear.
Step 4: Proper abrasion means adhesion. Probably the most common error when preparing a bumper cover or any other plastic part for welding or adhesives is the improper abrading or sanding of the
actual repair area. I know. You’re thinking, “Now he’s gonna tell me how to sand a part just like I learned on day one!” Take a deep breath and bear with me, though, because you may learn why you’ve had problems with adhesion in the repair area and feathering of repair materials and fillers in the past.
Consider this: air tools have low torque at low speeds. They stall or stop easily when operated at low speed. So naturally, you add more trigger and spin them up. Now, you think you’re getting somewhere, or at least the average technician does. We’re removing paint all right but we’re also smearing the plastic. Why? Because the too-high speed that the air tool needs to properly operate is creating heat on the
cutting/sanding surface, causing it to melt. This surface is extremely poor for adhesion and will lead to adhesion failure of your repair materials in the affected area.
Because electric tools have a heavy armature, they have much more torque at low speeds. The low speeds adequately rough up the surface without overheating, melting and smearing it the way air tools do. I use a variable speed angle drill, which I keep in its own case along with the adhesive discs I use for this
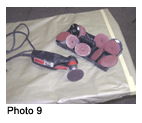
operation (photo 9). I use 36 grit, but you can use finer (but not finer than 80 grit). What’s important here is to provide a good tooth and large bond area. Think of this: If I sand two square inches of surface area with 80 grit, I can double the adhesive area of that two square inches by sanding it with 36 grit. How is this possible? Well, it’s simple. You’ve got the same amount of flat surface area, but the scratch or tooth of the 36 grit is going to be at least twice as deep and wide as the 80 grit.
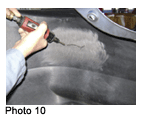
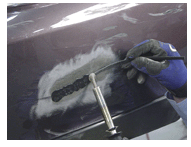
Step 5: Bevel it to lock in repair. I like to bevel deeply into the tear with a rotary file in a die grinder (photo 10). With the tear held firmly in place with aluminum body repair tape on the front or outside of the tear, bevel deeply into the tear at an angle of about 30 degrees. Then, sand the bevel area with your electric sander. Feather the bevel out one to one-and-a-half inches on each side of the tear.
Two Tear Repair Methods
In the following steps, I’ll cover two different methods of repairing tears. The first method will employ an airless welder and reinforced, hot-melt adhesive. The second method will use a two-part chemical bonding process. Try both and determine which you personally prefer. A note here about cleanliness for whichever method you use: Remove all sanding dust, preferably by vacuum. If using the two-part chemical bonding
process, some adhesive manufacturers require plastic cleaners to be used before applying the two-part

adhesive and some require that no additional cleaners be used. Always follow the adhesive maker’s recommendations.
Step 6: Repairing a tear using reinforced hot-melt process. Thermoplastic polyolefins can be welded, but the problem is choosing the correct filler rod to weld them with. This is problematic because TPOs are commonly blended with other plastics to achieve a certain characteristic. Each
manufacturer has its own preference, and there are so many different blends on the market that getting the correct filler rod is difficult. But universal reinforced hot-melt adhesive makes a useable, flexible and durable alternative.
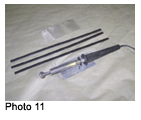
You’ll need an airless welder (a good investment), stainless steel reinforcing mesh and universal reinforced hot-melt adhesive (photo 11). Cut a strip of reinforcing screen that will bridge a minimum of an inch on each side of the tear extending at least a half inch to one inch beyond each
end. With your welder set at the proper temperature as indicated on the thermostat for hot-melt adhesive, apply a layer of hot-melt rod over the repair area extending slightly beyond where your reinforcing screen will lie. Make sure the rod is hot when it’s applied to the surface. A good way to do this is to heat the rod with the shoe of the welder, then flip the rod over while it’s hot and work it onto the surface of the repair area. Notice I said “onto,” not into. Don’t try to melt the adhesive into the TPO because you’ll fail. Cover about one to one-and-a-half inches at a time until the area is covered, then melt the
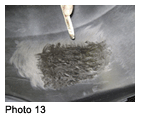
reinforcing screen into the initial layer of material (photo 12). It’s easy. When it’s firmly attached, apply another layer of hot-melt rod over the screen, completely sealing it into the repair area. Normally, this will complete your backside repair since it isn’t visible (photo 13).
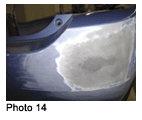
Step 7: Let’s do the front side with hot melt. Prepare the outer or front side the same way you did the back. Bevel the crack or tear down into the repair material on the back side and feather
the bevel out with your electric sander. You’ll apply the hot-melt adhesive the same way you did on the back side, with one difference. If you concentrate and feather the material into the surface and leave no low spots, you’ll be able to sand the repair area to a satisfactory finish for primer surfacer. Sand carefully using 80 grit on a block. Sand the repair area with 120 grit or finer to finish. Featheredge and sand the surrounding area with the appropriate grit per your paint supplier’s recommendations (photo 14). If you end up with low spots in your repair area, you can apply a glaze coat of two-part flexible repair adhesive.
Step 6a: Repairing a tear using the two-part chemical (adhesive) bond process. Several different repair mate-rials are available for bumper cover repair: epoxies, urethanes and acrylics. Epoxy is easy to use and sand, and in most cases is strong enough for almost all repairs. Where extraordinary strength in the repair area may be an issue, a urethane may be the right choice. It’s hard to sand and feather urethane, compared with epoxy. In effect, all these systems are thermoset plastics by nature. Some of these systems require adhesion promoter before applying the two-part material, others contain adhesion promoters. Follow the manufacturer’s specific recommendations to ensure success. Deviation can result in a lack of adhesion and a repair failure.
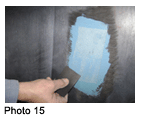
As before, your repair area is beveled in the tear area, the bevel featheredged by an electric sander and the entire contact area sanded as previously described. Thoroughly vacuum and clean as recommended. With your aluminum body repair tape holding the tear in alignment, cut an appropriate-sized reinforcing patch from either tape or fiberglass cloth. Mix the two-part adhesive thoroughly and apply an initial layer. Make sure the sanded/abraded surface is completely “wetted” with the material. Apply the reinforcing material (photo 15). While the adhesive is still wet, apply an additional layer of two-part adhesive to the reinforcement, completely sealing it in.
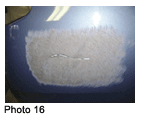
Step 7a: Let’s do the front side using two-part. After the backside has cured completely, begin repairs on the front. Bevel the tear or crack down to the repair material. This will be the root bond of your adhesive (photo 16). After vacuuming and following manufacturer’s recommendations for cleaning and adhesion promoters, mix and apply a layer of two-part adhesive. Once again, try to avoid low spots and feather the material into the surrounding TPO.
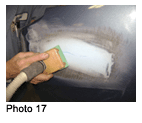
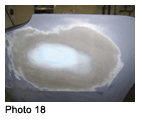
After cure has taken place, sand the adhesive with 80 grit, finishing up with 120 grit (photo 17). Sand the surrounding repair area with the appropriate grit as per paint manufacturer’s recommendations (photo 18).
For more information regarding the repair of automotive plastics, I recommend enrolling in I-CAR’s Plastic Repair Series PLA01 and PLA02 or reading “How to Repair Plastic Bodywork” by Kurt Lammon (Whitehorse Press). Call (800) 531-1133.
Writer Mike West, a contributing editor to BodyShop Business, has been a shop owner for more than 30 years and a technician for more than 40 years. His shop in Seattle, Wash., has attained the I-CAR Gold Class distinction and the ASE Blue Seal of Excellence.
| Thermoplastics | ||
| Type | Symbols | Characteristics |
| Thermoplastic Polyolefin | TEO, TPO PP + EPDM |
Semi-rigid, melts easily with welder, floats on water |
| Xenoy/Polycarbonate | PC + PBT | Rigid but melts with welder, sinks in water |
| Thermoset Plastics | ||
| Type | Symbols | Characteristics |
| Polyurethane | PUR, RIM, RRIM | Flexible, sinks in water, smokes and bubbles when overheated with welder |


