 According to the most recent data gathered from BodyShop Business readers, 89 percent of all collision repairs cost less than $3,000. The 11 percent that exceed $3,000 frequently need to be securely tied down, carefully measured and exactly pulled back into alignment.
Although most vehicles on the road today have no “frame,” the heavy duty equipment we’ll examine in this story is often called frame racks or benches – even though some of the equipment has no metal rack or deck and uses the shop floor as a base.
Remember When…
I’ve been around so long I remember when these false frame devices first appeared. As a result of the gas embargo and the resulting shortage of supply in 1973, frightened American drivers lined up at service station lots to buy their gas. Gas mileage, formerly of little concern in this country, suddenly became a big deal.
The first casualty was big V8 engines that had lots of horsepower and torque but sucked up gas at single-digit rates. The second casualty, as American drivers sought to buy more fuel efficient vehicles, was the perimeter frame that was as heavy as a bridge girder! The gasoline required to haul around the extra weight was scarce and expensive. The third casualty was the heavy gauge sheet metal used for most body panels.
At the time, I wrote several articles about those new $25,000 frame machines used to quickly and correctly repair unicoupe cars. (A unicoupe describes a three sheetmetal box car. The first unit-body car was the 1937 Chrysler Airflow; the panels were welded together rather than bolted together, hence the term unibody). This new method of car construction required new equipment to repair collision damage.
Birth of the Modern Shop
I trace the advent of modern body shops to the late ’70s-early ’80s, when progressive shops purchased their first new style “frame” racks. In an industry where the most expensive piece of equipment was often the $10,000, 24-foot-long fireproof box used to paint cars (the spraybooth), the $25,000 investment to repair a very small percentage of the cars on the road was a huge change.
I contend the modern body shop was born when it made this investment in a new style frame machine and had lease payments to make each month. Shops learned to sell the consumer on their ability to do the job right while the competitor down the road was still trying to repair the unicoupe cars with a tree stump, a log chain and a tape measure.
Once these shops saw how well marketing their new investment to customers went, they then learned to sell all the shop skills during the estimating process. And once they saw how quickly they could correctly repair the frameless vehicles with the new equipment, their future path to success was clear.
MPH
While most people think MPH stands for miles-per-hour, in this case it stands for measure-pull-hold, the three things necessary to repair a sheetmetal box vehicle. What little measurement was done in repairing full-frame automobiles was done with a tape measure, a tram gauge or hanging frame gauges – none of which was fast or accurate enough to correctly repair a car with suspension hung directly from the sheet metal. Pulling out damage on full-frame cars was usually done with a single-post pivoting arm or tower using 10 or 20 tons of hydraulic force – too much force and not enough angles to repair a unibody car. Full frame cars were easily held down by looping a chain over the frame and securing it to any handy immovable anchor. Unicoupe cars have no frame and need an anchor system that grabs the pinchwelds and holds the car steady both front to back and side to side, becoming a false frame.
It’s 32 years later (the first high production American unicoupe was the 1979 GM X-Body Citation), and most shops now have a method to measure, pull and hold a unibody vehicle. If your shop is looking to acquire new equipment or update what you already have, the following information should be helpful. We’ll start where the tech has to start: holding the car steady. Then, we’ll look at the ways to measure the pick-up or control points and then the methods to pull the body back into specification. Finally, we’ll look at some of the bells, whistles and accessories.
Hold It Steady
Unlike on a full-frame auto, there’s no good place to loop or fasten chains to tie down the frameless unicoupe car. The anchors and clamps on today’s equipment are extremely rigid and easily attached. As old-time metal techs can attest, when using chains to tie down a car, the first few cycles of the hydraulic pulling ram were spent simply taking the slack out of the chains. Rigid mounts to either the shop floor or the deck of the machine now hold the vehicle perfectly steady, and the first stroke of the ram moves metal, not slack.
The various pinchweld clamp designs all focus on speed of attachment along with a firm grip. When properly mounted, the four clamps also establish datum or centerline of the vehicle. Some brands use hardened bolts, some spin nuts onto studs, some use wedges to quickly tighten the clamp to the pinchweld on the rocker panel. Some anchor clamps are designed to fasten directly to the underbody control points. In either case, the vehicle is held firmly in place and resists forward, backward or sideways motion.
Each equipment manufacturer has a clamp design that will quickly fit most vehicles. Several European and Japanese autos require special clamps or adaptors to ensure the clamps anchor the car at the strongest points, and most manufacturers offer a complete range of adapters to fit any vehicle brand.
Pickup trucks with perimeter frames are accommodated on most units with fixtures or clamps that grab the frame rail, not the body. The new Ford F-150 requires both frame and sheetmetal clamps to hold the body assembly steady during pulling. Several brands have anchor clamps that are easily height adjustable by simply sliding pins into the vertical posts at set intervals. Some brands have a center lift that will raise the vehicle and lower it onto the open jaws of the clamps.
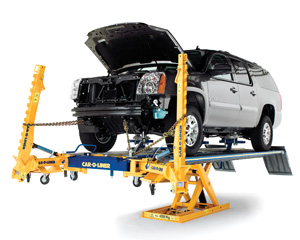
Rack vs. Bench
I had some trouble getting a consistent definition of the difference between a “rack” and a “bench.” It appears that in most cases, a rack is driven upon; it has a wide metal deck work area with holes in it that extends beyond the car on all sides. A bench may have drive-on ramps under the wheels or may just be a sturdy metal rectangle that creates the false frame required to hold unibody cars in place. In either case, it doesn’t extend much beyond the width of the vehicle. In general, a bench is located inside the wheels, and a rack extends outside the wheels. And, of course, those systems that clamp directly to the shop floor with rails or pots aren’t elevated at all.
This brings up the issue of working height. A typical rack might tilt to allow the car to be driven or pulled on it, then swivel perpendicular to the floor. At that point, the deck is about 30 inches above the shop floor.
Climbing on and off the rack to make repairs can be difficult for an old guy like me. Many frame equipment manufacturers offer a lifting system that will raise or lower the car to a comfortable working height, whether through scissor lifts or hydraulic cylinders. Remember that the American Lift Institute says a metal tech of any stripe could be 20 percent more productive just by positioning the car at a convenient elevation.
Anchor Firmly
In researching this story, I found equipment as short as 10 feet long and as long as 60 feet (semi trailers). Typical offerings are 15, 17, 18, 20 and 24 feet in length, plus the added length of the pulling towers when they’re extended fore and aft. In any case, the shop will need to dedicate at least one work stall full-time to the device, which brings up the argument that using the shop floor as an anchor enables the use of that stall for other purposes when heavy pulling isn’t required.
Anchor pots drilled into the floor were the industry standard for many years, and most shops still have some scattered around. To function most effectively, the pots should be installed in the exact pattern the equipment manufacturer suggests. Making up your own pattern of anchor pots is seldom a good idea.
Be sure to pour the cement floor first, then drill holes with a 3-1/2 inch concrete hole-saw. The reason you don’t pour the floor around the anchor pots is they don’t have enough surface contact to prevent them from being pulled out of the floor by 10 tons of hydraulic force. Drilled anchor pots have a wedge in the bottom that spreads the force over about a 6-foot radius, making them much harder to dislodge.
In-floor or floor-level rail systems offer the advantage of attaching chains or anchors at any point around the car, not just where the pots are located. And yes, you can stretch a chain between any two pots and anchor onto the chain, but we’re back to pulling slack out before metal moves. To keep the anchor rails from filling with shop dust and dirt, they either use clean-out holes along the channel or offer plastic covers that snap on or over the rails. Rails made from high strength aluminum won’t rust.
However you elect to hold the vehicle, it must be anchored firmly to something before pulling begins. Any movement that allows the car to shift, swing or recoil will make the repair less accurate and, most importantly, take more time to complete.
Old School Measuring
Now that the unicoupe car is locked down firmly, fast and accurate repair requires exact measurement. This was where much of the fervor was located when this style of auto construction was first introduced to American body shops. Full frame vehicles were relatively easy to repair because the suspension was attached to the frame and could be shimmed into alignment. Unibody vehicles have the suspension hung from the sheetmetal and must be restored to very exact specifications to drive correctly.
Many shops still use tram gauges, which are just straight bars with adjustable pointers 90 degrees at either end. They’re still useful in checking damage from side to side or cross measuring across distances underhood. All they really tell you is if one distance is the same as another by comparative measure.
Some tram gauge models are analog with a sliding tape measure or pointers that move along a fixed tape, and some models display the distance between pointers digitally. Damage to framed vehicles was often diagnosed using self-centering, hanging frame gauges. In sets of three, four or five gauges, they were hung underneath the frame and the technician visually sighted down the center pins looking for alignment. If the frame was straight, you saw only one pin with the others exactly behind it. If the frame was bent or twisted, one or more of the center pins was sticking out, indicating a pull was required to bring the frame back into spec. Neither measuring device was accurate enough to quickly fix unibody cars. Note that I didn’t say it wasn’t possible, just that it was time consuming.
Back in the day, I did say you couldn’t repair a unicoupe car with just hanging gauges and a tram gauge. It wasn’t long before a couple of talented frame techs showed me they could indeed get the sheetmetal back into place without employing elaborate measuring equipment. All that was required was a lot of talent and lots of time to keep pulling and cross-checking, pulling and checking, etc.
Modern Measuring
Today, it’s much faster and way more accurate to use something more sophisticated to measure the vehicle. Dedicated fixtures, universal fixtures or electronic measuring will all serve to restore the car to exact factory specifications.
Dedicated fixtures are much like the jig that was used to weld the car together at the factory. While undeniably accurate, they may require you to remove the suspension or the engine sou you can attach them directly to those control points. It’s my understanding that both BMW and Mercedes-Benz prefer that repairs be done using dedicated fixture sets specifically for each model body type. Typically, the equipment manufacturer will have a library of fixtures that the shop can rent to repair specific models.
Universal fixtures are constructed using an assortment of pipes, joints, bars, bridges and pins. From a center holding frame, the individual fixtures are assembled and fit together to reach the pick-up or control points on virtually any car. Much like a giant Tinker-Toy set, this style of measurement is quite accurate and doesn’t require renting or buying a different fixture for each new model under repair. The trick is in having the right set of directions to locate the width, height and length of all the body measuring points.
Electronic measurement is done with either line-of-sight lasers or sonic senders. In either case, the measurement points are located with targets and often displayed on a computer screen. It has the advantage of providing both before and after repair printouts. In today’s society, being able to prove, in writing, that your shop brought the vehicle back to factory specs is valuable. I had one vendor describe its electronic measuring advantage as the difference between X-rays and MRIs.
All three of these measurement styles will locate the key component areas that will ensure the vehicle drives and acts like the manufacturer intended. Both electronic systems and universal fixture systems offer the opportunity to measure and locate upper body points as well as the critical underbody areas.
Finding the correct specifications is the key to any measurement system. Dedicated fixtures take away that problem; the jig is rigid and exact. Simply pull the car back until the pin fits the locating point. Universal and electronic systems need an extensive, and expensive, database of correct vehicle specifications.
The OEM certainly knows what and where to measure and will make that data available to their authorized dealers, but not necessarily to independent body shops. The major players in the structural repair equipment market measure and publish their own specs designed to match their measuring devices. This is a huge expense and is much like the color documentation paint companies create. It’s fairly easy for a chemical company to brew up workable clearcoats and primers (assuming they can acquire suitable raw materials), but color formulation, documentation and alternate formulas cost millions of dollars. Whatever brand or type of frame repair equipment you select, the support after the sale is an important component.
Time to Pull
With the vehicle locked down and the damage identified, it’s time to pull it back into spec. Most equipment uses 10-ton hydraulics to create the pulling force. Unlike full frame cars of yesteryear, which could require as much as 20 tons to straighten, sheetmetal cars need much less force (5 to 7 tons should move almost anything). But they do need low-pressure, simultaneous pulls to quickly make the repair. Whether the force comes from rams and chains (vector pulling,) a pivoting arm (original Dozer) a floor post or a pulling tower, the ability to pull steadily at precise angles makes the difference.
Each equipment manufacturer is confident it has the best solution and was quick to point out to me the failing of the other guy’s methods. Certainly, the more directions the tech can pull at one time, the faster the damage will come out of the sheetmetal. So a rack with three towers will go more directions than a bench with one arm, and four hydraulic rams and chains in a floor rail system will spread the force more evenly than two floor posts, and so on.
Like so many things in life, money plays a big part. Can’t afford a 24-foot rack with five towers but can afford more than a one-armed bandit and six floor pots? Look for the best solution to match your budget and consider the following about pulling devices:
• Pivoting arms have less force the higher up the arm you go, and the angle of the pull may change as the arm moves back.
• Floor posts can get really top-heavy if you have to add an extension to reach upper body pulls and may not go lower than 8 inches from the floor.
• Towers can pull in straight lines but may require Herculean effort to move and adjust.
• The length of one continuous pull (not stopping to retract the ram) varies considerably by brand.
The first hydraulic ram was invented in the late 1700s. Using hydraulic rams to generate force in body repair goes back more than 60 years. How big the ram is in capacity (2, 4, 10, 12, 15, 20, 50 tons) and stroke (2-inch, 6-inch, 10-inch), how the pump operates (hand, air, electric, remote control), and how large the reservoir of hydraulic fluid is all have a bearing on cost, speed and efficiency. In all cases, the dirt generated during collision repair is really hard on the seals. Regular cleaning and maintenance will help all the hydraulics in your shop perform better and last longer.
Bells & Whistles
Options abound for this type of equipment: towers that rotate, pivot and tilt. Lifting devices that use hydraulics, blow-up airbags, scissors
or jacks. Chains, clamps, adaptors, hooks and reach-around-bends of every possible stripe.
Because so much of this equipment has been designed by seasoned and experienced body techs, it’s unlikely that you’ll ever have to make any sort of clamp or adaptor. Some other tech has already done it and sold the design to the equipment company!
As with any equipment in a collision repair facility, the most important part is the technician operating it. The cheapest equipment in the world will work fine with a skilled operator; the most expensive equipment possible won’t work at all with a poorly trained operator. Training on structural repair is an absolute necessity. Only one manufacturer I spoke with has a dedicated training facility. Everyone offered training in the field, either in your shop or one nearby. Make sure that your purchase agreement includes hands-on training for your current frame techs and the opportunity to update those techs in the future. Also, look for the opportunity to train a new hire on your expensive and complicated investment.
Several of my interviewees spoke about where their equipment was manufactured. Like so many other things these days, structural repair is a global business. Cars are severely collision damaged in all developed countries, not just the U.S. My thought is that the quality control the manufacturer exercises is more important than the location of its plant, but I’m not the buyer. I would concern myself with the set-up time of each style of equipment. I was offered a low of 15 minutes and a high of 45 minutes to get the car mounted on clamps and set up for measurement. Of course, the actual pulling and metal relief to affect repair are a function of the severity and the tech’s skill.
The severity issue brings us back to having a bench or rack that occupies a work stall every day or a portable system that disassembles and frees the stall for other work. While I would advocate that every car in every collision should be measured, the insurers are unlikely to agree. A careful assessment about what portions of your customers’ vehicles are hit so hard they’ll require control point measurement is the first step. If you already have structural repair equipment and are shopping for more, make sure you have the work to support the investment. In many shops, they bought the second frame machine because the first one always had a car parked on it waiting for parts. Acquire all the parts before repair begins!
Speed Is the Key
Shop cost for this equipment varied greatly from a low of about $10,000 for a floor post and rails to a median of about $30,000 for a workable bench/rack to a high of about $75,000 for a system that pulled from every direction and provided printed proof of repair. You can buy just the measurement system ($5,000 to $25,000) or compatible wheel alignment equipment ($8,000 to $15,000) or just the rack/bench with one pulling tower/arm ($20,000). Calculate payback for your shop. All the new equipment is fast, but how much faster it will make the work go through your shop is the key.
If you have annual sales of $700,000 (average shop in the U.S.) and 11 percent of your work requires structural repair, then $77,000 worth of work is at stake. If 50 percent of that is labor ($38,500), you can calculate your savings with newer, faster equipment based on the time it will save you. A good percentage of the remaining lighter hit work could use some pulling, if not the full-boat measure, pull and hold. Visit a shop that’s using the equipment you’re considering and ask the tech, not just the owner, how it works for him or her.
All the equipment I investigated for this story can do a great job. Insurers would be wise to consider the increased ability of the new stuff when setting total loss thresholds. Much of the best new equipment can quickly repair vehicles hit very hard; it’s a shame to total them out based on some percent-of-value formula when the latest equipment can restore them to pre-accident condition.
If reading this story reminded you why you purchased the structural repair equipment already in your shop, let this be a nudge to repaint, replace and repair your existing investment. As always, speed is key to profitable repair. Make sure your shop’s output is not just accurate but quick.
Check out this handy list of frame machines and their specs.
Mark Clark is a well-known industry speaker and consultant. He’s celebrating his 23rd year as a contributing editor to BSB.


