 Every modern vehicle manufactured today is engineered with many different types of high strength steel. These specialty steels help reduce vehicle weight, allowing the vehicle to achieve better fuel economy and superior structural integrity.
A Brief History
The bodies of older vehicles were constructed with cold-rolled mild steel. This type of steel is usually thicker, softer and heavier than the lighter, high strength steel used in today’s vehicles.
Cold-rolled sheet panels could be easily cut and sectioned, and it was easy to weld them with a MIG welder and, on the really old cars, an oxyacetylene torch.
Heat could also be used to relieve some stress in bent or mangled sheet metal without sacrificing strength. However, this is not the case now; excessive heat could ruin the overall performance of these specialty steels, causing them to potentially fail during a collision.
Vehicle Construction
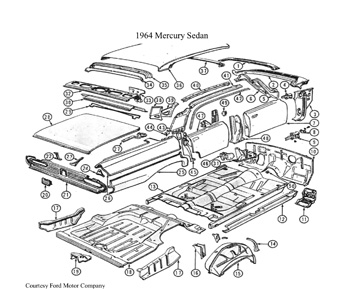
Vehicle construction plays a huge part in how a vehicle gets repaired. For example, older vehicles had many subassemblies when being manufactured. The entire side of the vehicle could have many parts welded together to form what we now refer to as a “side panel.”
The cowl panel and “A” post were single components welded together as if they were one. The “B” post was welded to the floor and rocker at the bottom and to the roof at the top. The rocker was welded to the floor and connected to the “B” post. This method made it somewhat easy to replace these parts when they were mangled beyond repair in an accident because there was a natural break-off point in replacing the component they made up.
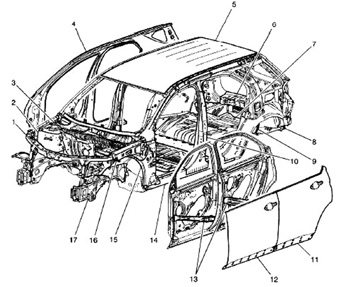
This is not the case with modern vehicles. They’re usually constructed with an entire single side panel, which includes many of the smaller subassemblies that were found in the construction of older vehicles. These single side panels make for easier assembly of the vehicle at the factory and, when produced from high strength steel, make the body more rigid for better crashworthiness. Because of this, it’s more difficult to repair or replace parts of these panels when they’ve been damaged in a severe accident.
OEM Guidelines
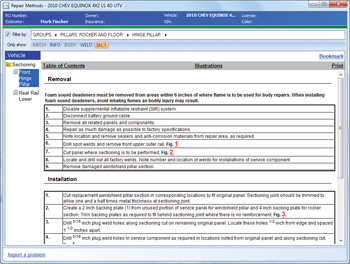
Each manufacturer has specific guidelines and instructions on how to properly replace these components. This process is referred to as body sectioning. Information providers like CCC Information Services now have this information consolidated and formatted consistently for quick and easy access. CCC ONE Repair Methods offers a unique solution by embedding the OEM procedures within the estimating database at the subgroup level, allowing estimators to quickly identify and access the available procedures as the estimate is being written.
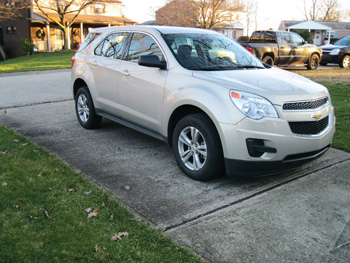
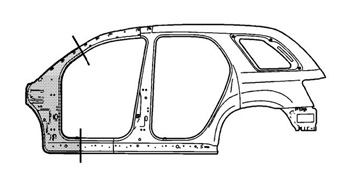
Let’s look at General Motors’ procedure for sectioning the front hinge pillar on a 2010-11 Chevrolet Equinox – GMC Terrain.
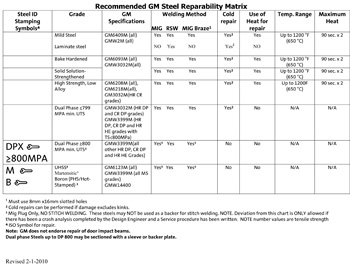
This article also features the “Recommended GM Steel Reparability Matrix,” (see graphic) which covers the grade of the metal, GM specifications, welding methods, cold and/or heat repairability, temperature ranges and maximum heat allowed for a repair. It’s important to follow these procedures in order to produce a quality, safe repair.
Note: the 2010-11 Equinox/Terrain front hinge pillar sectioning procedure is courtesy of General Motors and can be found at: bit.ly/GMsectioning.
The Steel Reparability Matrix is also courtesy of GM and can be found at: bit.ly/GMsteel.
Steel ID in Modern Vehicles
The A-pillar and roof rail reinforcement use dual phase steel. The 2010-11 Chevrolet Equinox and GMC Terrain utilize UHSS and dual phase steel. Here is an explanation of these steels and others:
High strength steel (HSS). High strength steel is much stronger than low carbon steel or mild steel because of heat treatment. It has yield strength of up to 60,000 psi and experiences an increase in stress, exceeding this yield strength, when deformed during a collision. Some of the same properties that give HSS its strength can also pose some unique challenges. When high strength steel is deformed on impact, it’s more difficult to restore than mild steel.
Ultra high strength steel (UHSS). Ultra high strength steel is even stronger than HSS and is able to withstand stresses of up to 110,000 psi. When UHSS is damaged or bent, the usual recommendation is that it be replaced.
Boron steel. Boron steel is considered the “most ultra” of the ultra high strength steels. It has extremely high strength, with a yield strength of 196,000 to 203,000 psi. It can’t be straightened because of the extremely high heat used in manufacturing it. If straightening is attempted, it will more than likely crack. The only solution is to replace the part if damaged. Boron steel, on the other hand, is relatively easy to weld.
Dual phase steel (DPS). Dual phase steel is a high strength steel with properties that can be “tuned” for different strength levels and processing methods. DPS is less expensive to manufacture than other advanced high strength steels. Also, it’s easier to fabricate, especially in regard to welding, has excellent shock absorbing characteristics, and a yield strength of up to 116,000 psi.
Mild steel (MS). Also known as low-carbon steel, mild steel has a low level of carbon and is relatively soft, making it easy to repair. It can be safely welded or heat shrunk and cold worked without seriously affecting its strength. It has yield strength of up to 30,000 psi.
Hot-rolled steel. Hot-rolled steel is manufactured by rolling it at temperatures exceeding 1,472° F. It usually has a standard manufacturing thickness range of 1/16- to 5/16-inch (1.6 to 7.9 mm) and is primarily used for parts such as frames and cross members. This type of steel is quite rigid but relatively thick and heavy.
Cold-rolled sheet metal. Cold-rolled sheet metal is hot-rolled sheet metal that has been acid rinsed, cold rolled thin and annealed (reheated and then cooled in a controlled environment to strengthen the metal and prevent it from becoming brittle). It has a dependable thickness accuracy, surface quality and better workability than hot-rolled steel.
Sectioning Procedure
Equinox/Terrain front hinge pillar body sectioning removal procedure.
NOTE: Section in specified areas only. Sectioning outside of these areas may compromise the structural integrity of the vehicle. The door frame can be replaced at factory seams but requires removal of the windshield and roof. The sectioning procedures have been developed as a more cost-effective alternative to complete replacement. The specific area to be sectioned is determined by the extent of the damage to the vehicle.
1. Disable the supplemental inflatable restraint (SIR) system. Refer to SIR Disabling and Enabling.
2. Disconnect the negative battery cable. Refer to Battery Negative Cable Disconnection and Connection.
3. Remove all related panels and components.
4. Repair as much of the damage as possible to factory specifications. Refer to Dimensions – Body.
WARNING: Foam sound deadeners must be removed from areas within 152.4 mm (6 in.) of where flame is to be used for body repairs. When reinstalling foam sound deadeners, avoid inhaling fumes as bodily injury may result.
5. Note the location and remove the sealers and anti-corrosion materials from the repair area, as necessary. Refer to Anti-Corrosion Treatment and Repair.
6. Drill spot welds and remove the front upper outer rail. NOTE: Do NOT damage any inner panels or
reinforcements.
7. Cut the panel where sectioning is to be performed.
8. Locate and drill out all factory welds. Note the number and location of the welds for installations of the
service part.
9. Remove the damaged windshield pillar section.
Installation Procedure
1. Cut the replacement windshield pillar section in corresponding locations to fit the original panel. The sectioning joint should be trimmed to allow 1-1/2 times the metal thickness at the sectioning joint.
2. Create a 50-mm (2-in.) backing plate (1) from the unused portion of the service part. Trim the backing plate as necessary to fit behind the sectioning joint where there is no reinforcement.
3. Drill 8-mm (5/16-in.) plug weld holes along the sectioning cut on the remaining original part. Locate these holes 13 mm (1/2 in) from the edge and spaced 40 mm (1-1/2 in.) apart.
NOTE: In any area damaged beyond recognition, or if structural weld-thru adhesive is present, space the plug weld holes 40 mm (1-1/2 in.) apart.
4. Drill 8-mm (5/16-in.) plug weld holes in the service part as necessary in the locations noted from the original panel and along the sectioning cut.
5. Prepare all mating surfaces, as necessary.
6. Apply GM-approved weld-through coating or equivalent to all mating surfaces. Refer to Anti-Corrosion Treatment and Repair.
7. Fit the backing plate (2) halfway into the sectioning joint, clamp and plug weld to the vehicle.
8. Position the service part.
9. Plug weld accordingly.
NOTE: To create a solid weld with minimum heat distortion, make 25-mm (1-in.) stitch welds along the
seam with 25-mm (1-in.) gaps between. Then go back and complete the stitch weld.
10. Stitch weld the sectioning joint.
11. Clean and prepare all welded surfaces.
12. Install the front upper outer rail.
13. Apply the sealers and anti-corrosion materials to the repair area, as necessary. Refer to Anti-Corrosion Treatment and Repair.
14. Paint the repair area. Refer to Basecoat/Clearcoat Paint Systems.
15. Install all related panels and components.
16. Connect the negative battery cable.
17. Enable the SIR system. Refer to SIR Disabling and Enabling.
John D. Lyman, Sr. has been the collision repair instructor at the Forbes Road Career & Technology Center in Monroeville, Pa., since 1991. He has worked in the collision repair industry since 1974, is ASE- and PPG-certified and holds a master’s degree in education. He can be reached at [email protected].


