Because car manufacturers have added more style and shape to their vehicles, the extra time it takes to re-shape and repair a damaged outer panel on a car door cuts into profits. Beating, banging, aligning, grinding, filling, sanding, re-filling, feathering, priming — plus the materials and labor — make this an expensive repair. And when you take into account the dirt and overall mess of plastic work, it’s obvious an alternative would be in the best interests of the technician, the shop and the car owner. I’m not saying doors can’t be straightened to look good. I’ve been banging metal and feathering edges all my life, and I know it can be done. What I’m saying is there’s an alternative that’s cleaner, could possibly take less time and, in my opinion, is a better repair.
Insurance companies and customers both want downtime on a damaged vehicle to be as short as possible, and the driving public deserves the best type of repairs on their cars. Repairs must be as durable as they are beautiful. This is why I think replacing a door skin vs. repairing it is a better all-around repair. Why? Because a replacement is an undamaged, clean, level piece of metal with no ripples or paint build-up to cause potential problems. It’s a win/win situation for the bodyman and the paintline technicians.
Years ago, I would’ve preferred to repair a panel because I didn’t have to fish wires through that little hole in the front of the door, remove the door glass and all the moldings surrounding it or take off the door handles. I just straightened the panel and shipped it. I got accustomed to the primer fumes, the plastic dust and the cheese grater garbage around my feet. They were a part of the repair. Of course, longer drying times for all these materials meant that my bay was tied up. And even though I took precautions, I always prayed that nothing would lift at the featheredges or that the plastic wouldn’t get pinholes, slowing down my completion time.
Lately though, I’ve enjoyed the opportunity to replace the outer skins of the damaged doors assigned to me. The work is cleaner, the repair is better and I really feel that my "cycle" time on these replacements is a lot faster than if I were to repair them. Through practice and patience, I’ve developed my skills to the point I actually make decent money on skin replacement. And I’m not sitting in a cloud of dirty air.
Tools Are the Key
Though replacing the outer skin is a quality repair, the job still must be done in a timely, cost-effective manner. But if every move is calculated and all the tools and materials are within arm’s reach, the procedure shouldn’t take long. I’ve invested a good bit of money for just the right tools to make my skin work go smoother and faster.
First, I have two roll carts — one with all the tools needed for the average assembly/disassembly work, such as sockets, air ratchets, screwdrivers, etc. The second cart holds all the repair-specific tools, including a small electric grinder with a grinding stone wheel, an air chisel with a large flat tip, another air chisel with a spot-weld cutting tip (yes, I have two air chisels; remember, think production), a spottle spot-weld drill tool, a long flat screwdriver or pry bar, two air drills (one with a 1/8-inch drill bit and one with a 1/4-inch bit for the places the spottle can’t go). Also on my cart are almost every vise grip I have, so I can grab just the right one when I need it — no walking back to my box. I also have two or three wooden paint sticks, so when I clamp the panels together, I leave no visible marks on the outer panel (repairing them is a real time killer), a small air grinder, a 9-inch rubber sanding block, a door-skin hammer (a great tool) and a regular body hammer with an angled flat end. Finally, I have the door skin adhesive and a couple additional mixing tips.
I also purchased a door/bumper holder that’s built with padded arms to securely and safely hold the door in any position while I work to install and/or remove it. It cost about $250 to $350 and was worth the investment.
My safety equipment includes a pair of safety glasses, safety goggles, a dust/particle mask, hearing protection, anti-vibration work gloves and a pair of rubber or latex protective gloves.
Let’s Skin a Door
This is how I attack a door-skin job. First, I inspect the door to see if the frame is damaged or out of alignment. Assuming this repair is limited to the door itself and no major structural damage is involved, such as a crushed hinge pillar, I continue. I position my door holder under the door and secure it. The big advantage to this is that the door is held at the exact height at which it’s sitting on the car. After I replace the door skin, the door holder will already have the height adjustment set. It’s one less alignment situation to worry about.
Next, I begin to disassemble the door, removing the inner trim panel, moldings, outer door handle, mirror (if applicable), door glass, rubber channels and trim, and anything else that must be removed or saved prior to door removal. I disconnect all the wires and push them through the access hole. The door should basically be a shell before removing it. (Locks and window regulator assemblies can remain if they aren’t in the way.)
Before removing the door from the hinges, I check to see if the lines are good. If there’s any inner frame damage, I’ll work it out until the edges are lined up with the adjacent panel. If it’s in the front of the door, a good slide hammer shot will bring it back into alignment. The back and the bottom line up well if you use a block of wood as a buffer and a hammer. Sometimes the wood will cause less damage to the metal and allow for a quicker repair.
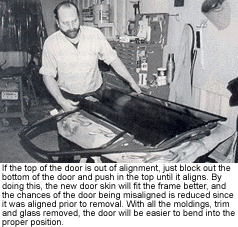
If the top of the door is out of alignment, just block out the bottom of the door and push in the top until it aligns. By doing this, the new door skin will fit the frame better, and the chances of the door being misaligned is reduced since it was aligned prior to removal. With all the moldings, trim and glass removed, the door will be easier to bend into the proper position.
After the door is removed from the hinges, disconnect the battery and cover the opening to prevent dust from entering the vehicle interior. The car owner and the detailer will both appreciate it.
Next, I place the door on a worktable, put on my safety outfit (glasses, dust mask, ear protection and gloves) and drill out the spot welds that are usually in and around the window channel. The spottle comes in handy here, but I have the other drills ready just in case. (Remember, think production.)
When drilling is completed, I grab my goggles and my grinder with the grinding stone wheel. I used to use 36-grit grinding discs, but they wore out quickly and took forever to cut through the sheet metal. The stone wheel cuts your labor time considerably, and one stone wheel can usually do from four to seven skins. Before, I’d use two grinding discs to do one skin. (Just imagine the time you save not changing the discs.) And with a stone wheel, the job will be finished before you’re done tightening the disc to the grinder (well almost).
I hold the grinder at a 45-degree angle toward the door frame for the first two passes, and then I reverse and hold it 45 degrees away from the door frame. My final passes are at a 90-degree angle. The first two moves make the final pass easier to cut through and show the separation faster without cutting into the frame metal. Since most of the skins today are glued on, it’s easy to see the progress of the skin separating from the frame.
If the folded edge doesn’t easily lift up by itself from the force of the grinding stone wheel, grab the end of the folded edge and pull until it comes away from the frame. Use pliers or vise grips because the metal is hot from grinding. By doing this, you’ll only be grinding enough metal to separate, and you won’t be gouging the frame. If you take off too much metal, there might not be a place for the new skin to fold over and hold to the shell.
Keep in mind that grinding sparks can damage nearby glass and finishes, so protect all adjacent areas that could be affected. Sparks could be a real profit killer.
When edge grinding is completed, I run the large, flat chisel bit between the old door skin and the frame to separate the glue holding it together. When that’s complete, I lift the skin from the bottom of the door and get my chisel into the adhesive that’s holding the panel to the steel safety beam. Then I work my way up to the glass channel area.
Always check for reinforcement panels since some manufacturers fail to install them on new skins. Sometimes they’re at the top and are used to help hold belt moldings; sometimes they’re inserts for the outer door handle. Don’t throw away the old damaged door skin until this situation is checked out. Your shop manager will thank you.
Many times I’ve heated the outer portion of the damaged skin where the inner reinforcement is located so the adhesive holding it loosens up and I don’t have to chisel it out. The less damage I create, the less work I have to do.
Once the damaged skin is removed, I can easily make any corrections to the frame. A little hammer-and-dolly work and voilà — success! And remember, since you already aligned the door to the opening prior to removal, the odds are good that the door will fit when you re-install it.
Installing the New Skin
OK, the old skin is off, the frame is basically aligned, and any and all reinforcements have been transferred. First, I check to see if the holes I drilled to remove the spot welds can be used to re-weld the new panel on. If not, I use a hole puncher to add enough holes to replicate the total the factory used. I then prepare the areas to be welded by grinding them flat and clean and applying weld-through primer.
Next, I turn my attention to the new door skin. I run my small air grinder across all the edges of the skin that will bend and fold over the door frame. By doing this, I make the hammering process easier and reduce the chances of distortion and damage. This trick really works. When I forget to do this, the rest of the job is much harder.
After the edge grinding is complete, I pre-fit the panel to make sure it fits nicely to the frame. I lay it flat on the frame and make sure all the edges overlap and all the shapes line up nice and easy. This is to ensure that when the adhesive is applied, the fit doesn’t need much (if any) work to look good.
Next, I take off the skin and put on my rubber or latex gloves prior to using the adhesive. Some door-skin adhesives on the market today contain isocyanates, which can cause respiratory and/or other physical problems, so make sure your skin doesn’t come into contact with the adhesive and the work area is well-ventilated.
Most door-skin adhesives are two-part products that mix together for maximum adhesion and have a good amount of working time. I usually apply a 1/4-inch bead all around the frame of the door — everywhere the factory had applied it. I also apply a small amount to where the factory glued the panel to the steel safety beam.
I usually start at the top of the door and install the skin, slowly lowering it onto the rest of the door until it drops into place. You might need a putty knife to make sure the bottom of the door skin overlaps correctly and makes contact with the adhesive. Then I check that all the shaped areas are mated correctly and the skin sits evenly all around the frame. With the vise grips, I clamp the bottom of the door first using my two welding clamps and place the wooden paint sticks on the skin before clamping so the vise grips don’t cause any damage. A light grip is all that’s needed. I work my way up from there.
If a molding goes on this particular car, I’ll place vise grips at the area covered by the molding. I still use a piece of the wooden paint stick on the outer part to prevent damage, and I make sure that any holes going through the frame and the door skin (such as the belt moldings) are aligned.
The next step is to clamp the area of the window opening and the area above the opening. Again, I use the wooden paint sticks to prevent damage.
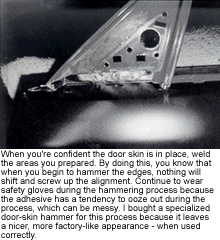
When I’m confident the door skin is in place, I weld the areas I prepared. By doing this, I know that when I begin to hammer the edges, nothing will shift and screw up my alignment. I continue to wear my safety gloves during the hammering process because the adhesive has a tendency to ooze out during the process, which can be messy. I bought a specialized door-skin hammer for this process because it leaves a nicer, more factory-like appearance — when used correctly.
The large rubber sanding block is great for supporting the hammer blows without causing damage the way a metal dolly would. And the extra body hammer with the flat angle head gets into the tiny areas that the door-skin hammer can’t get into.
I start at the top of the door and work my way down one side and then the other. I do the bottom edge last.
The trick of hammering to fold and prevent damage is to work the fold slowly and evenly. Using the door skin hammer, I proceed to bend the edge at its very base. Use a light reflecting off the grinded edge to guide you so you keep a straight edge line.
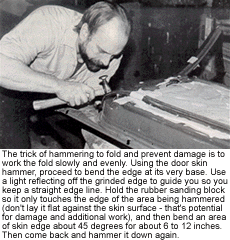
Hold the rubber sanding block so it only touches the edge of the area being hammered (don’t lay it flat against the skin surface — that’s potential for damage and additional work), and then bend an area of skin edge about 45 degrees for about 6 to 12 inches. Then come back and hammer it down again. Do it gently — almost as if the weight of the hammer head, not the force of your wrist, was doing the bending. Keep looking at the grinded edge to ensure it’s straight. Adjust your rubber sanding block and hammer blows to keep that edge straight while folding and flattening the outer skin to the frame. That’s important. If that edge is straight, then the odds are good there will be few if any waves around that outer edge.
Work your way around the door, using vise grips to ensure total contact with the two panels. Again, use the wooden paint sticks to prevent damage. The folded edges should fall directly into the same areas the old skin was in. That can be seen when the new skin comes up to the paint line on the frame where the old skin was. This shows the skin is lining up nicely.
Make sure the folded area is as flat as possible against the frame, and use the door-skin hammer as much as possible because it leaves a flatter, even finish — much like at the factory. When the hammering is done, remove any excess door-skin adhesive with the appropriate solvent.
Now comes the moment of truth. Re-install the door to the vehicle, and make sure the weatherstrip is on. Check that the door opens and closes nicely and the lines are good. Make any needed adjustments, and remove the door for any inside frame cosmetics and painting. After edging in the door, install it and send it to paintline. Assemble it after painting.
That’s it!
Other Considerations
• Sometimes hammer marks or small waves appear on the skin. Try using a metal file to level them out. After filing, I finish the area with 180-grit paper and prime.
• Sometimes it can’t be helped, and the outer area gets irregularities that need a little extra work. All right, so it needs filler. Fill and finish, and then try to figure out why the damage occurred and what can be done next time to avoid it.
• There’s a door-skin tool resembling a can opener that flattens the edges while a tool is turned with a ratchet. I have that tool and it works fine, but I prefer the old hammering method. If the tool works for you, however, use it. The objective here is quality and production.
Replacing vs. Straightening
There’s a place for both skinning and straightening in body shops today. I prefer door-skin replacement. I should also mention that I prefer doing the entire door skin rather than sectioning it. Unless it’s to be welded at the belt lines, I’ll go all the way around with it. I feel it’s a more professional job and looks better. But that’s a decision you and your boss can make.
In case you’re curious, using my techniques, I’ve been able to take a skin from start to finish (hung after I edged it in) in less than four hours. And I installed one door skin one hour after it was placed in my bay — and I’m no spring chicken.
Besides possibly saving time — once you’ve developed your skills — giving the door a new skin also creates a better repair. And that’s what it’s all about: producing profitable, quality work.
Writer Henry Netter, a contributing editor to BodyShop Business, has worked in the collision repair industry for more than 36 years, is an ASE Master Certified Collision/Refinish Technician and works at Auto Tech Collision in Philadelphia as the senior repair technician.
Special thanks to Marhofer Collision Center in Stow, Ohio, and technician Kerry Walker for providing the photos.


