“Good judgment is the result of experience. Experience is the result of bad judgment.”
I’m not too proud to admit, I have lots of experience – especially when it comes to Squeeze Type Resistance Spot Welding (STRSW). I’ve been the not-so-proud owner of four spot welders because I’m cheap. Though I wanted all the benefits of a top-quality welder, I didn’t want to pay for top quality.
That said, my comments will be coming strictly from the practical side – what I’ve actually experienced, pro and con, when using STRSW in the everyday repair of collision-damaged automobiles. I’ll also examine and debunk a few perceived disadvantages of STRSW, discuss what you should do before you buy and take a look at common mistakes. If you’re still with me after all that, I’ll give you a few tips for properly performing STRSW.
Debunking Perceived Disadvantages of STRSW
It’s new and different – Actually, it’s not new. I have a collision repair manual copyrighted in 1939 with a full chapter devoted to spot welding. It is, however, different. But so what? It makes our jobs easier and healthier. Is there anyone out there who really likes plug welding the wheel opening of a quarter panel and all the attendant finish grinding that’s necessary to clean it up? STRSW makes a tough job, like a quarter panel wheelhouse, a pleasure to do. It’s easy, and the final product looks like a “factory finished” job. No grinding needed.
It requires more set-up time – Yes, that’s true. Initially, you’ll have to spend between a half hour to an hour reading and learning about all the controls. After you understand the settings, you’ll then have to set the spot gun for each job, which may require changing the arms and tips to accommodate each job configuration. And this can take five to 10 minutes.
But the time you spend up front is nothing compared to grinding and dressing 30 welds. STRSW also inhibits the corrosion process because zinc coatings liquefy and flow around the weld nugget – as compared to more intrusive plug welding. Still, I’m afraid the initial tendency is to avoid spending five minutes of set-up time and to just grab the MIG gun and jump into the job – creating for yourself 30 minutes of grind time and inherent corrosion problems.
A spot gun is more awkward to use than a MIG welder – Yeah. But a little more effort on the front end of the job saves a lot of effort on the back end. Most good spot welders have a counter-support system, which acts as a counter-balance to the weight of the spot weld gun. Once you learn how to properly use the counter-balance/support system, your physical effort will be far less taxing.
You need access to both sides of the metal to perform STRSW – Yeah again. But so what? The factory used both sides. You can use a resistance spot welder everywhere on the outer skins, just like the factory. Therefore, you’re restoring the car with a factory appearance, less corrosion problems and far less work (a time savings).
Before You Buy
There’s a reason that I’ve owned four spot welders, and that reason has a lot to do with experience. That brings me back to the quotation about how experience is the result of bad judgment. And oh man. Bad judgment can cost you.
My point here is, test any potential purchase before you buy it. Would this include a reference or two supplied by the spot welder rep or, better yet, a fellow shop owner? Yes.
Also keep in mind that real-life conditions are different from a trade show floor. The trade show floor is a carpeted paradise, where clean pieces of sheet metal – cut in 3-inch squares – are welded together under ideal conditions by a qualified factory rep. And the rep operates the demonstration machine well within its recommended limits.
We, however, work in the real world. And in our world, there’s more potential for duty cycle abuse and overheating. I talked to one rep (who used to be a tech in my shop), and he said he’d been to a shop where a tech had actually melted the welder’s handles!
You also need to consider how accessible the machine will be. Ask for a demonstration or, at least, question the rep on the machine’s versatility. Can it reach all the areas on a vehicle? Better yet, what areas can it reach? Is the only way for a welder to reach a radiator core support (structural) by employing single-sided spot welding? Ask the important questions to find out if the welder is right for you.
Also, what kind of after-purchase support is available? Will the machine be readily repairable in a locale near you? And what’s the turnaround time?
Last, but not least, is training available? This is truly important because using STRSW equipment is much more than pushing a switch.
The Most Common STRSW Mistake
Exceeding the duty cycle is the most common mistake. The duty cycle is the actual amount of time the welder can be welding, compared to a given length of time. For example, a machine with a 5 percent duty cycle will perform 180 welding seconds in an hour.
.05 x 60 seconds x 60 minutes = 180 welding seconds in an hour.
That doesn’t seem like much, but at .3 of a second per spot weld, that’s actually 31/3 welds per weld second, 600 welds multiplied by a four-second cycle between each weld, or 2,400 seconds divided by 60 = 40 minutes. All before you need to let a machine with a 5 percent duty cycle cool off.
This low duty cycle lends itself easily to collision repair because there are far less than 600 welds on the average quarter panel. The problem arises when the tech doesn’t allow enough time between welds. As a spot welder’s components heat up, its welding power can dissipate. This is why cycle time between welds is important. We’re talking in the six- to eight-second range here – as compared to punching a hole, MIG welding, burning up the surrounding paint, burning yourself, carefully grinding down the weld, polishing the weld with fine abrasive and feather edging the burn area. Undoubtedly, making a MIG plug weld takes a hell of a lot longer than six to eight seconds.
Human nature being what it is, there’s still a tendency to rush and to reduce that six to eight seconds per weld to under a second. What this does – besides speeding things up – is compromise the integrity of the job. When a spot welder becomes overheated, it can still perform – but the welds will pop apart upon performing a test.
Thus, my “good judgment” has been gained by purchasing successively heavier-duty machines – until I finally bought one with sufficient transformer power and duty cycle. Price was the main contributing factor (I’m cheap). I kept hoping (bad judgment) the lighter duty and cheaper machines would fill my needs, all the time demanding a superior outcome. This was unrealistic – and costly. The machine I use now is a 220-volt, three-phase machine of the highest power. I’m completely pleased with it. Expensive? Oh yeah, but when I add up the cost of its predecessors, I ended up paying about 1.5 times more than if I’d simply bought the proper machine in the first place.
Another common mistake is setting the weld timer for too long of a weld interval setting. The timer setting varies from .1 to .7 seconds. Generally, the current setting is set at the maximum (100 percent) and the timer at the shortest time effectively possible. Exceeding the time required to produce a strong weld will mushroom the welding tips. And when the tips distort, they become too large to provide enough resistance to produce a strong weld. Keep the timer set to the shortest effective time and the gun tips dressed to the manufacturer’s recommended diameter.
Performing Spot Welds
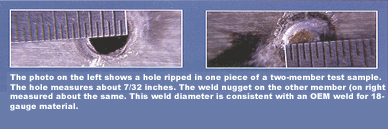
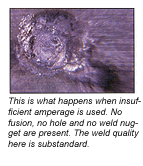
Prior to welding on a car, perform a test to determine the effectiveness of the welder settings. If the welder is set correctly, a slight dent will appear in the center of the finished weld, indicating a good weld. Too deep of a dent indicates too much pressure or too much weld time and will result in a weak weld. Porosity, holes and “throw out” indicate too little pressure between tips.
When it comes to testing spot welds:
Perform your spot weld on metal that’s similar to what the vehicle’s made from. Use the old panel if possible.
Warm up the machine by first performing a dozen or so welds.
Weld two coupons (sheets) prepared the same way as the vehicle and the new part (bare metal at contact points, weld through primer at any bare spots in between the coupons). Use the same power and timer settings as you will on the vehicle.
Shove a screwdriver between the coupons, and twist until you destroy the weld. You should have a nugget on one coupon and a hole in the other.
When performing your test welds and subsequent spot welds, always check to see if a red glow appears in the nugget area while welding occurs.
A few other tips:
Follow the vehicle manufacturer’s recommendations about STRSW and I-CAR’s recommended procedures.
Maintain adequate recommended welding tip pressure, and keep the tips dressed to the recommended size.
Use the shortest possible welding arms.
Use maximum current with the shortest effective weld time.
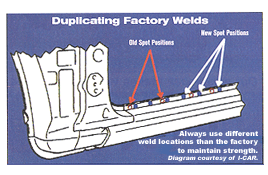
Use 30 percent more spot welds than factory to maintain overall strength.
Use different weld locations than factory to maintain strength.
Limit STRSW to non-frame structure areas.
Pay Now or Pay Later
When it comes to spot welding machines, I started out small and ended up with what I really wanted three machines later, spending twice the amount as if I’d just bought the right one first.
Bite the bullet and fault on the side of the more powerful, more technologically advanced machine. It’s far cheaper in the long run (trust me, I know!), and it’s worth the investment.
Writer Mike West, a contributing editor to BodyShop Business, has been a shop owner for almost 30 years and a technician for almost 40 years. His shop in Seattle, Wash., has attained the I-CAR Gold Class distinction and the ASE Blue Seal of Excellence.


