Your shop has just repaired a 2006 Dodge Charger LX that was damaged in the rear. The repairs included replacing the rear body panel, deck lid and rear fascia. Everything looks great, and the fit and finish are to OEM standards. You’ve taken all the right steps, and your customer has happily picked up the vehicle.
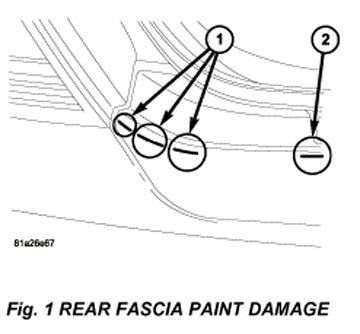
Several weeks have passed when your customer returns, stating that the paint is wearing off the top corners of the rear fascia. After inspecting the vehicle, you find that several lines of paint have worn off the top of the fascia, right below the deck lid in the corners (figure 1). Upon further examination, you determine that the deck lid is hitting the rear fascia when the customer closes it. You apologize and explain to the customer that you may need to perform some adjustments and will then have to repaint the rear fascia. You provide a rental vehicle at no charge and explain that the vehicle should be repaired by the following day. Now your shop has to absorb the rental car, the materials and the additional labor costs.
Could this problem have been prevented?
In this case, the problem may not have been caused by your repairs, but you could have prevented this condition prior to customer delivery. Here’s how …
The problem lies with what Dodge calls an “over-slam” condition. To prevent this problem, Dodge offers the following repair procedure:
Repair Procedure
Always refer to ALLDATA® for safety procedures, identification of material types and welding procedures.
The original over-slam bumper system isn’t sufficient to stop the deck lid from contacting the rear fascia when the gap is less than 5.0 mm (0.2 in.) at the “corner surface” and less than 8.0 mm (0.315 in.) on the “horizontal surface.” The Service Kit will increase the gap to the corner surface (figure 1).
Parts Required
Chrysler® Part # – 68011573AA
Description – Service kit, deck lid
Service kit contains:
2 deck-lid inner bumpers
2 fascia bumper assemblies
2 fascia seals
1 deck-lid seal (with stuffers)
Procedure
Step 1
• Open the deck lid.
Step 2
• Remove the old deck lid seal.
Step 3
• Install the new deck lid seals w/stuffers.
Step 4
• Remove the tail lamp assembly.
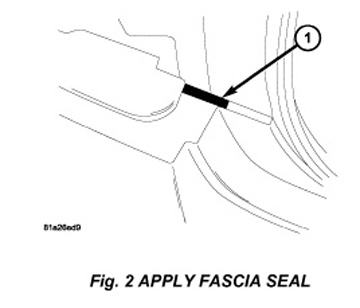
Step 5
• Clean any dirt from the rear fascia (figure 2).
Step 6
• Remove tape backing from the new fascia seal.
Step 7
• Apply the new fascia seal in the area shown (figure 2).
Step 8
• Install the tail lamp assembly.
Step 9
• Repeat steps 4 through 8 for the opposite side of the vehicle.
Step 10
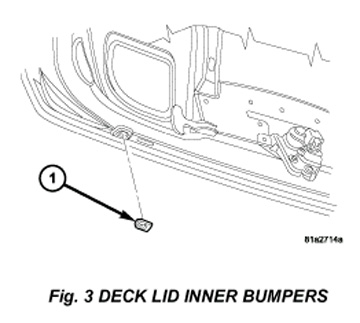
• Remove both of the old deck lid inner bumpers from the deck lid (figure 3).
Step 11
• Install two (2) new deck lid inner bumpers on the deck lid (figure 3).
Step 12
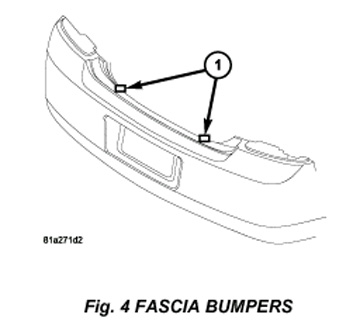
• Remove both of the old fascia over-slam bumpers (figure 4).
Step 13
• Install two (2) new fascia bumper assemblies (figure 4).
NOTE: Use a small flat head screwdriver to remove push pin.
Step 14
• Close and open the deck lid five (5) times to allow and assure adjustment for the deck lid.
Step 15
• Rub out, spot repair or refinish the rear fascia paint surface and deck lid edge as necessary.
Writer Dan Espersen is the ALLDATA CollisionConnect Program Manager. Espersen is I-CAR Platinum Certified, a Gold Pin Member of the Collision Industry Conference (CIC) and holds an AA Degree in Automotive Technology. He has 15 years of experience in the collision industry and 17 years of experience in the automotive industry.
© 2007 ALLDATA LLC. All rights reserved. All technical information, images and specifications are from the ALLDATA Product. ALLDATA is a registered trademark of ALLDATA LLC. All other marks are the property of their respective holders. Dodge, Chrysler and Charger are registered trademarks of the Daimler Chrysler Corporation and are being used solely for reference and application purposes.