Sanding may not be the most exciting job in the shop, but there’s no denying it’s a critical step in the repair process. Choosing grits and tools, as well as which sanding techniques to use, can result in either well-done, profitable jobs or major-league headaches due to comebacks, and wasted materials and productivity.
To help you avoid such major-league headaches, I interviewed three current shop owners and one former shop owner who now travels the country as a training instructor for a major paint company. These four men have a combined industry experience of 101 years, and their tips, techniques and experiences — as well as my own — are reflected in this article.
As you’re probably already aware, each shop does things a little differently than the next. However, certain steps and time-tested methods in the sanding process are mutually agreed on by most technicians.
Drop that Sandpaper!
Before you even think about touching a car with sandpaper, you should do two things to set the stage for a successful repair: Wash the vehicle thoroughly, and then pre-inspect the vehicle. Why? To see damage that might have been hidden from view due to dirt and grime.
The pre-repair inspection also gives you the opportunity to alert the customer to pre-existing damage he may have been unaware of. This gives you the opportunity to up-sell the job and reduces the risk of customer complaints about a door ding he first notices when he picks up the vehicle.
The paint company training instructor I interviewed told me that during his years as a paint manufacturer’s representative, one out of every three shops he called on were experiencing re-do problems due to unseen damage. He also said that surveys conducted by General Motors and Ford have shown that the average unhappy customer tells 19 people about his “bad” experience at a repair facility. Why risk such bad word of mouth when you can take a couple of simple steps to help ensure customer satisfaction?

Clean Is Good
Now that the vehicle is clean and the customer has been updated on any additional repair items, do you grab the nearest DA sander and let it rip? Not yet. Instead, grab a squeeze bottle or a sprayer full of wax and grease remover and apply the remover to the repair area.
Before wiping the area dry, step back to look at the wet surface reflection. Why? You may see defects in the job surface that you were unaware of. “The eye can often see what the hand can’t feel,” says Mike West, owner of Southtowne Auto Rebuild in Seattle, Wash.
After viewing the wet repair area, wipe it dry with clean prep wipes or clean white rags to remove any contaminants; you don’t want to grind them into the job surface during sanding.
At this point, it should be clear that starting out clean is the first step to achieving a successful repair. If you think you don’t have the time to do these things, think again. Do you have the time to re-do the job because the body tech missed damage or the paint tech had a fisheye problem because of wax or silicone contamination? The answer should be obvious.
Choosing Your Paper
There are basically two types of sandpaper: dry, which can only be used dry; and waterproof, which is most often used wet with water but can also be used dry. Within these two categories are many grits, styles, brands, colors and shapes to choose from. Some brands are known for their even abrasive distribution and consistent abrasive size, which results in a more uniform scratch pattern.
There are many grades of sandpaper, too. For instance the “P” grades of paper widely used today produce a more uniform scratch than the old-style papers. The “P” grade papers tend to be coarser than their old-style counterparts. A sheet of P600 waterproof is equivalent to approximately 400-grit old-style waterproof paper. Economy brands of sandpaper tend to have a less consistent abrasive distribution, which results in a more uneven scratch pattern. What I’m saying is that you’ll get better results by using a high-quality paper. Yes, it may cost more initially, but it will save you time in the long run because “bargain brands” can cut unevenly and wear out quickly. As an industry veteran puts it, “Why trip over dollars trying to save nickels?”
This brings us to a couple tricky issues: choosing the proper grits and the tools for the job. There’s no cut and dried answer to determine which grits and tools to use for the job at hand. You either make your choices based on what someone taught you, or you learn what to use through trial-and-error. Many techs learn on their own the evils of using too coarse or too fine a grit for the job.

Sanding with a grit that’s too coarse can lead to — but isn’t limited to — undercutting bodywork; deep sand scratches in the color and/or the clearcoat; solvent soak in/solvent reactions; and scratches in the paint job that are difficult to polish out, giving the job a “swirly” look.
Problems associated with using a grit that’s too fine include lack of adhesion (paint and/or clear peeling away from the primer) and loss of productivity due to slow cutting (for example, trying to sand a rough primer surfacer with 600 grit).
One shop owner told me about a re-do problem that he believes was caused by a technician who accidentally used the wrong grit paper when final sanding the primer-surfacer and the blend area prior to painting. The vehicle, repaired and painted, was being washed in preparation for delivery. But when the water from the hose’s spray nozzle hit the repair area, the paint came flying off in sizeable sheets. The shop owner — who also does the paint work — was alerted to the dilemma and questioned the tech who’d sanded the car. The common practice was to final sand the primer surfacer and the blend area with wet P800 paper. The tech said he thought he used P800, but P1500 grit paper was also found in the wet-sanding bucket. The shop owner came to the conclusion that either the tech had, in fact, grabbed the P1500 by mistake or had used a worn out piece of P800 paper. According to the shop owner, the sanding job looked fine prior to being painted. The moral of this real-life story? Pay attention to what you’re doing and use the appropriate sandpaper.
Because I have no desire to unleash the wrath of techs across the nation who disagree with my recommendations because they use a different tool or grit than I suggested, I have, for the sake of information, put together a basic list (see box titled “Task, Grit and Tool List” below) of job tasks and the common grits and tools used for them. If you do it differently and have no problems, more power to you.
Guide Coat as a Guide
After you’ve chosen your style of paper, grits and tools for the job, in most cases — except when sanding a blend area — you’ll want to guide coat your surface.
Guide coat is commercially available in two forms: aerosol cans or powder. Some techs simply use a contrasting color of primer surfacer sprayed on very light and dry. Guide coat allows you to see surface imperfections like pinholes and deep scratches in body filler or primer surfacer. Because you have to sand the guide coat off, it also helps to ensure you don’t miss any areas. If you haven’t sanded all the guide coat off, you aren’t done.
I work in a shop where we had been using aerosol guide coat. But during my interviews for this article, a couple guys told me about the advantages of the powder type: it’s environmentally friendly because it contains no solvent, said one shop owner; there’s no dry time or clogging your paper, said another. Curious, I purchased a package. I noticed that a kit, which consists of a cartridge of the powder with a foam applicator, costs three to four times as much as a spray can. I also noticed that when I applied it, a little went a long, long way. As I sanded, there was no annoying paper clog-up the way there usually was with the spray type. The only drawback I found was that if you spill any, which I did, it makes one heck of a mess. Other than that, I strongly advise any of you who are stuck on spray guide coat to give powder a try. I think you’ll be pleasantly surprised.
Sand Away!
With the job properly prepared and your paper and tools by your side, it’s time to begin the actual sanding process. Once more, I turned to the industry veterans to find out what they believed to be the proper motion/technique. Here’s what I learned:
Regardless of whether you’re sanding by hand or machine, do so at a 30- or 45-degree angle, continuously alternating the diagonal pattern laterally so as not to create grooves or patterns in the work surface. Simply stated, sand diagonally at a 30- or a 45-degree angle using an “X” type or cross-hatch pattern. The diagonal “X” motion method is used for common sanding tasks, such as cutting down and smoothing body filler, feather edging, block sanding and color sanding. Of course, there will be exceptions to this rule. For example, when grinding, it’s common to work the tool horizontally back and forth from side to side.
In addition to motion, the position of your hand or tool in relation to the work surface is also important. You should hold most tools flat on the work surface and apply even pressure to the tool. Hand boards and sanding pads should be held flat on the work surface as well. (Yes, I realize that sometimes tools must be used tipped on edge, but this type of technique should only be used by advanced-level technicians.)
When hand sanding, more often than not, you’ll be using some kind of block or hand pad. Many styles of hand pads are available, ranging from very thick and firm to extremely thin and flexible. The thick, firm ones are good for working on straight, flat areas. The thin, flexible pads work well on curves, nooks and crannies.
Keep the palm of your hand as flat as possible and exert light to medium pressure evenly on the pad. Never sand with your finger tips; this causes finger marks to appear on the work surface. As you sand, check your paper for signs of uneven loading. If this occurs, your hand isn’t held flat and even on the pad.
When dealing with oddly shaped work surfaces, like compound curves, remember — as one expert told me — you can’t sand an egg with a flat board. Pre-curved boards, flexible boards, teardrop-shaped blocks, etc. are all designed to make your sanding job easier. Don’t be afraid to try something new. It could really pay off by saving you time and headaches.
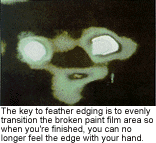
When it comes to feather edging, the key is to evenly transition the broken paint film area so, when you’re finished, you no longer feel the edge with your hand.
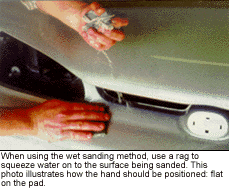
Last, but not least, a few words about wet sanding: Paper manufacturers advise that you soak your paper for at least one hour prior to using it. Lubricants like liquid dish-washing soap or specialty sanding suds are fine — just stay away from heavily lanolized brands. Soaps that “soften hands as you do the dishes” could contaminate your sanding job. Many prefer to use plain water. It’s up to you. When wet sanding, don’t be frugal with the water — it’s what keeps the paper free from debris and excessive loading.
The Good, the Bad and the Ugly
To wrap up, I’ve made a list of how “good” techs sand and how “bad” techs sand. Don’t be a bad tech. It’ll catch up to you eventually, and when it does, it’ll be “ugly.”
The Good:
• Start with a clean surface;
• Do a pre-inspection of the vehicle;
• Use high-quality paper;
• Use guide coat;
• Use the appropriate grits for the job;
• Wear the proper safety equipment;
• Use correct tools/specialty items to help the job progress smoothly;
• Sand using even pressure with an alternating stroke pattern;
• Sand keeping their hand or tool flat in relation to the work surface;
• Are educated and take advantage of information sources available to them, such as abrasive manufacturers reps and telephone help lines. They know the sanding specifications for their particular paint system. They also read technical bulletins and attend seminars. Education is a powerful tool;
• Pay attention to details. They closely inspect sanded areas and scuff seams, and they stay focused on their work;
• Practice proper feather edging techniques, making sure the edges feel smooth;
• Take pride in doing the best job possible.
The Bad:
• Start out with a dirty work surface;
• Use improper grits;
• Sand too far out on the area adjacent to the repair;
• Undercut body work;
• Use a grit coarser than 80 when sanding by hand, which results in undercutting the body filler and having to re-apply more filler. This wastes time and material, and irritates the boss;
• Rush the job;
• Daydream while they sand. This tends to result in cut-throughs, sanded moldings, unsanded areas, etc.;
• Sands in one place and doesn’t keep moving;
• Sands without alternating the stroke pattern;
• Is a “know it all” or is too stubborn to learn new things.
Happy Sanding
This article isn’t meant to be the final word on sanding. It is, however, meant to be a helpful overview. Hopefully, it’s shown you that sanding is more than just a daily chore — it’s a craft that demands skill and attention to detail.
Writer Kelly Skahan is the office manager and a prep technician at Patrick Enterprises in Pacific, Wash.
|
Task, Grit and Tool List • Rough cutting body filler — 36, 40. Airboard, 8-inch DA sander. • Weld finishing, cleaning up welds — 50, 60, 80. Die grinder, air grinder, electric grinder. • Sanding body filler — 80, 8-inch DA sander, airboard, hand boards, hand blocks. • Light metal finishing, finish sanding plastic filler and some DA use — 100, 120, 150. Handboards, DA, hand blocks. Note: Some techs use a body file for metal-finishing applications. Body files are graded by the number of teeth per inch. The fewer teeth per inch, the coarser the cut. • Block sanding, DA use, feather edging, final sanding body filler — 180 through 500 grit (dry). DA, 8-inch DA, handboards, hand pads, hand blocks and a good, thick, straight industrial-type paint stick. • Final sanding primer surfacer, sanding of blend panels — 600, 800 (usually wet, though dry paper is acceptable, too). Hand pads, DA sander (for use with dry film discs). Note: Scuffing paste used with water and a fine scuff pad is also a common method used to prep the blend area. Industrial grade Ajax can be used instead of scuff paste. Don’t use the Ajax available in grocery stores because it contains additives that could cause contamination. • Color sanding, defect removal prior to compounding and polishing — 1000, 1200, 1500, 2000 (wet paper or dry film discs). 3-inch DA with foam interface pad, DA, assorted hand pads (for wet sanding). Scuff pads made from nylon web are a common sanding tool used in many shops. The pads are available in several grades. Here are the most common ones: — Maroon: coarse, used for general scuffing and prepping new parts prior to priming and or sealing. — Gray: fine, for final scuffing of primer surfacer and scuffing the blend area when using scuffing paste. Also used to scuff plastic parts and to apply plastic preparation solvents. — White: extra fine, used to scuff blend panel prior to clearcoat blending. Can be used with scuff paste. Scuffing sponges are available in all three grades listed above and are used to scuff hard-to-reach areas. |


