About 50 million exhaust components are sold each year through various suppliers and installers. Since the mid-’80s, exhaust components made of stainless steel – namely 409, 409 aluminized, 304 and 321 – have comprised a good portion of the market. For the high-temperature, specialized exhaust systems on many late-model U.S. and European cars, alloy blends – such as 185sr and 12sr stainless – also are used but come at a premium price; they’re 40 percent more than the traditional 409 aluminized.
Body shops, like yours, often service these exhaust systems – whether they’re stainless steel or an alloy blend – because they’re part of the chain of damage incurred in a collision. But because of all the new components, traditional exhaust specialists can no longer stock four or five universal mufflers and the few sticks of pipe that used to allow them to fit and fix anything on the road. That leaves a fair amount of business open to you – if you know what you’re doing.
Inspecting an Exhaust System
Understanding the chain of events that may have resulted in a damaged exhaust system starts with a thorough inspection during the estimating process. If you’re not loading vehicles on a lift and critically inspecting undercar components, you’re likely to miss a good deal of the damage. If your shop doesn’t have a lift in the estimating bay, you may want to consider buying one. Jacking up the chassis and using a creeper to examine the underside of a vehicle isn’t the most effective way to estimate undercar damage.
Once you’ve got a vehicle on a lift for proper estimating, be sure to check these critical inspection points on the vehicle’s exhaust system:
1. Converter heat shields (though not relegated to emission-related devices) – Shields that are damaged and rattle, are missing or are displaced may allow an errant engine sensor to raise the converter temperature under the chassis to dangerous levels. This is a definite area of concern since a red-hot catalytic converter can ignite the interior rug or the vehicle undercoating.
I personally bought new carpet and new leather seats for a late-model ThunderBird when just such an event occurred in our shop. A judge determined that had we replaced the missing heat shield (which, by the way, was missing before the accident), the subsequent damage wouldn’t have occurred.
2. Exhaust hangers – These hangers are designed to keep the exhaust system tucked up into the body well area out of harms way and to absorb vibration. The latter property can be compromised if a shop decides not to use an original design hanger as a replacement. Any exhaust component not mounted in the correct position can exhibit vibrations that emulate defective mechanical components, such as pressure plate, transmission or engine tuning difficulties. Universal hangers were OK to use on vehicles produced well before the 1990s, but they’re just not good enough today.
3. Gaskets and flanges – Ever been almost done with a repair only to find an exhaust system leak at a header or collector or because the pipes and muffler fit poorly? Ever had a customer come back because of a leak? If an exhaust pipe is crushed, the energy transfer toward the front of the vehicle will create a deformation, which will allow the system to leak. If you’re repairing an exhaust system, leaks are simply unacceptable.
Handling a leak situation becomes more complicated if the system is stainless and will add significantly to the estimate total. In general, when replacing components such as pipes and mufflers, replace distorted flanges and always install new gaskets where they’re used by the factory. Listing these items on a service estimate will help keep you out of trouble should the vehicle someday have a subsequent leak problem.
Inlet and Outlet Sizing
While it may seem that exhaust components automatically fit together because of their design, it’s not always the case. If the system has been off the car and serviced by a muffler shop, the changes made to it will require your shop to either work around and with the changes – if possible – or replace all the pipes and related items that were modified during the original job. This is a common problem on vehicles more than five years old, so be critical in your inspection.
The size of inlets and adapters should be kept the same as the original equipment. This is important not only for proper fit, but so heat-exchange properties of the parts will allow the converter or remote-mounted oxygen sensors to function properly.
Look in service manuals or factory replacement parts manuals to find the actual size of the inlets and outlets of the various components. Comparing the size you have on the car in front of you to these factory specifications will mean a lot less hedging during the original estimate. It’s also important to determine whether you’re dealing with a factory system or an aftermarket system with alterations that may require more time and labor to repair.
Replacing Catalytic Converters
Collision manuals and other repair data sources are good places to find information about replacing catalytic converters. Here’s a quick list of basics and repair tips.
There are three types of catalytic converters:
1. Two-way, or oxidation.
2. Three-way.
3. Three-way plus oxidation, or three-way plus air.
Emission family code labels located in the engine compartment will identify which type is appropriate for the given application.
1. OC or COC identifies two-way.
2. TWC or ORC identifies three-way.
3. TWC/OC or ORC/OC identifies three-way plus oxidation.
Certain vehicle applications may allow for the installation of a universal catalytic converter. This would be necessary if a factory design wasn’t available or if the system was difficult to fit because of frame, structure, or suspension and steering modifications.
It’s important to note, however, that a vehicle’s engine displacement and weight must not be greater than those approved for consolidated (universal) applications listed in a repair manual. Weight is determined by taking the gross vehicle weight, subtracting the vehicle capacity and adding 300 pounds. Gross vehicle weight and capacity can, in most cases, be found on a metal or paper tag located inside the vehicle door sill or in the owner’s manual.
Catalytic converters to be installed in a universal installation should have the correct exhaust adapter kit complete with gaskets or pre-formed exhaust donut-design seals as specified in the installation. Also, a universal air-tube kit may be used to couple a converter to the air supply lines leading down from the engine emission system air plumbing. These items are available in bulk or kit form from most exhaust supply warehouses and major jobbers.
All welded systems – especially those in which one or more converters are in position – should be welded back into their correct position. This ensures that exhaust temperature characteristics will be close or identical to the factory-approved installation.
Catalytic Converters and the Law
Collision shops are subject to the same laws as other exhaust system installers. Likewise, the penalties for violation of EPA published guidelines also apply to your shop.
One of the most important rules to know is the basic “reasoning” or purpose clause included in the framework of converter laws. The crux of this law says you can install a replacement catalytic converter when:
A. The vehicle has a missing converter.
B. A state or local program has determined that a converter is non-functioning because of lead poisoning; damage, such as from a collision; or other mechanical problem, such as that caused by anti-freeze saturation and substrate degradation. (For a collision shop, this may require a four- or five-gas analysis to confirm.)
C. The vehicle has more than 50,000 miles and is more than five years old, and a legitimate need for replacement has been established. (An example here for a collision shop would be a converter that has a loose substrate or a fractured section of the substrate that may obstruct the flow of exhaust through the system.)
Circumstances aside, a collision shop installing a replacement catalytic converter must complete an installers statement as required by the EPA. Included in this statement are a copy of the service invoice including the customer’s name and address; the vehicle make, model and year; the mileage when installed; and the reason for installation. Any affidavits or official documents from a local or state emissions program also must be included, if applicable. A verification statement showing agreement between the customer and installer must be drawn up if the reason for replacement isn’t an emissions program failure.
In addition, the application and installation of a replacement catalytic converter must comply with the Clean Air Act. That means the catalytic converter must:
1. Be installed in one of the earlier three listed situations.
2. Be installed in the same location as the original converter.
3. Be of the same type as the original converter the vehicle was equipped with by the factory and certified for emissions.
4. Be the exact replacement converter as listed for replacement or determined acceptable by the vehicle manufacturer.
5. Be interconnected with original, factory air-injection or other components.
6. Be installed in conjunction with any other existing pre-converters as specified in the original factory description of the system. (Don’t forget that engine types and years must be for the original emission system application. Sometimes a used engine from a comparable vehicle model is in violation of emissions law. This is always something to consider when dealing with a damaged powertrain.)
7. Be accompanied by a warranty information card filled out completely by the installer.
Don’t Let Your Profits Go Up in Smoke
With approximately 50 million exhaust components sold and almost 7 million police-reported crashes each year, you’ve got the potential for a lot of business by servicing damaged exhaust systems.
Let’s face it. When it comes to damage, collision forces aren’t selective. An impact can cause problems to vehicle parts never even touched in the accident, including the exhaust system. By learning a few critical system checkpoints and performing a thorough inspection during the estimate process, you can ensure a complete repair and no costly customer comebacks.
Writer Bob Leone, a retired shop owner and contributing editor to BodyShop Business, is ASE three-way Master Certified and is a licensed secondary and post-secondary automotive instructor in the vocational school system in Missouri. He is also a former NAPA A.S.E. Technician of the Year.
|
Replacement Converter Installation Statement Required by U.S. EPA
Catalytic converters are emission-control devices that are designed to last the life of the vehicle and do not normally require replacement. Furthermore, if the vehicle is properly used and maintained, original converters are covered by the emissions-control warranty for five years or 50,000 miles. Federal law prohibits repair businesses from replacing these devices except under certain limited circumstances.In order to verify that the proper circumstances exist, the owner of the vehicle on which such repairs are made and a facility representative must sign the following statement. The vehicle is over five years old or has more than 50,000 miles on it and the catalytic converter required replacement because: ____________________________________________________________ OR The vehicle’s catalytic converter was missing when the vehicle was brought in. ___ ________________________________________________ ______________________________________________ _______________________________________________ The installer must retain a copy of the invoice and this statement for six months and the replaced converter (if any) for at least 15 days from the date of installation of the replacement converter. The replaced converter must be marked in such a way that it can be identified with the customer invoice and statement for EPA inspection. Reprinted courtesy of the U.S. EPA. |
|
Replacing Original Equipment PipesWelded to the Converter
All welded exhaust systems – especially those in which one or more converters are in position – should be welded back into their correct position. This will ensure that exhaust temperature characteristics will be close or identical to the factory-approved installation. The following models have welded original equipment (OE) exhaust systems:
The OE pipes that connect to the converter must be cut off to be replaced. Consult the application listing footnotes in factory manuals for the exact location of the cut.  Information and diagram courtesy of CarQuest Exhaust Products USA. Information and diagram courtesy of CarQuest Exhaust Products USA.
|
|
Driver’s Side Brake Line for Dual-Tailpipe Trucks
Exhaust system modifications by vehicle owners can create problem areas for repairers. To prevent heat damage to the driver’s side brake line, you’ll need to move the brake line away from the new pipe.1. Secure the brake line away from the new tailpipe by using a plastic tie strap to attach the driver’s side brake line to the differential breather tube. 2. Make sure the brake line doesn’t bind or become damaged during normal suspension travel. 3. Re-check the clearances after installation to make sure the brake line is located away from the tailpipe. 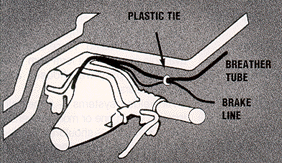 Diagram and information courtesy of CarQuest Exhaust Products USA. Diagram and information courtesy of CarQuest Exhaust Products USA. |
|
Multi-Converter Replacement
High-capacity, three-way plus oxidation converters have been tested to replace two in-line converters with an air tube between them. These two-converter systems are most common on Ford and Lincoln/Mercury vehicles. If both converters have failed or have been damaged, a single high-capacity replacement converter may be installed in their place in approved applications. The multi-converter replacement option is only permitted if it’s been determined that both converters have failed or been damaged. If one converter is still functional, it may not be replaced as part of the repair of a failed converter. 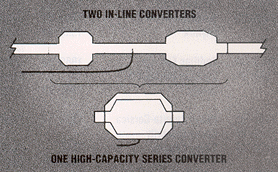 Diagram and information courtesy of CarQuest Exhaust Products USA. Diagram and information courtesy of CarQuest Exhaust Products USA.
|

