Is it ready yet?
How many times do you find yourself racing against time to get the vehicle ready to go? And how do you ensure that it really is ready to go?
What needs to be checked, and can little things you miss become greater exposures than you possibly imagined? Absolutely.
Turnaround time is important in today’s collision repair facilities, but so are customer satisfaction index ratings. Detailing of vehicles has become a big part of final delivery procedures today and something that the customer sees right away.
But what about the many things that aren’t noticed until later?
That’s what I’m here to talk to you about – the items that get missed because of the hectic pace required to get vehicles delivered back to customers who can’t wait.
To avoid these oversights, you should be inspecting many areas of the vehicle before releasing it to the customer – which areas depend on the vehicle and the repairs you’ve performed. But all of them are part of quality control and need to be checked systematically if you don’t want them slipping through.
This means you’ll need to develop some kind of checklist or routine. And these checklists need to be designed for each type of repair and vehicle-specific features.
It’s also important for the person(s) responsible to know what repairs were performed to the vehicle. Keep in mind that some of the items discussed in this article can become possible liabilities while others are just irritating to the customer.
Doors, Hoods, Hatches & Deck Lids
All of these panels, other than some deck lids, use latch mechanisms with a two-stage catch. The first stage is referred to as the safety catch, and the second stage is the primary latch.
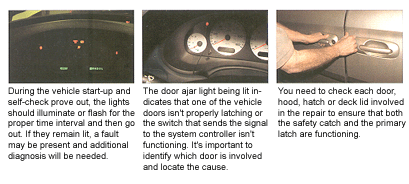
It’s possible that once you’ve completed final assembly and installed all trim and gaskets, the panel can be fitting well and be on the safety catch but not on the primary latch. Operate these panels to see that they first catch on the safety latch and then fully latch onto the primary. Also, because of the safety related to these devices, a check of the fasteners to see that all of them are installed and tight is a good practice.
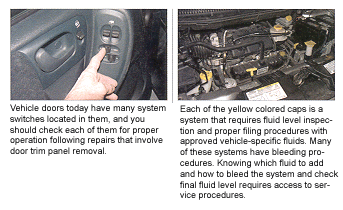
These same panels are equipped with many electronic features. With the amount of electronics and creature comforts in today’s vehicles, it’s important to inventory the features and test them as they relate to the panels involved. Power windows, power locks, power mirrors, defroster units, side-impact restraint devices, radio speakers, courtesy lights and door-ajar dash lights are all items to check.
Door-ajar lights, for example, can be activated by either pin switches in the door jamb area or can be part of the door latch mechanism. And just because the dash panel door-ajar lamp doesn’t illuminate doesn’t mean that all is well.
You should operate each door or hatch involved to see that it does, in fact, cause the dash to illuminate when on the safety catch or when left open. This could become a liability exposure if it’s not working correctly (as opposed to a radio speaker not functioning, which might simply be irritating to the customer).
For power locks, don’t simply check to see if you hear the actuators moving; make sure they’re actually locking and unlocking the door. Some vehicles today lock the doors when placed in gear or when a particular miles per hour is reached. These may require movement of the vehicle or road testing.
Right along with this, many vehicles have remote transmitters for keyless entry. If so, check the remotes for operation. It’s important to secure the remote from the vehicle owner when repairs to the doors, hatch or deck lid are involved.
You should check that standard key entry functions properly as well. It can be easy to forget the key with all the electronics involved with entry systems today.
Security systems are also tied into the latch mechanisms and should be operated to see they’re functioning correctly. From one vehicle to the next, it can be a challenge to know the exact particulars of how these function. You may need to check service specifications. The information required is usually found in the electrical accessories section under power locks, security systems function and operations area of service manual or database systems.
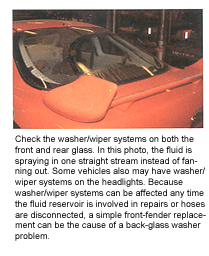
When dealing with the hood and hatch units, a number of system checks also need to be done to ensure everything is hooked up and functioning properly. Washer nozzles need to spray and align so they hit the intended area of the glass. Remote release cables, outside handles on hatches, wipers, high-mount brake lights, defrosters and antennas also all need to operate correctly.
Lighting Systems
With the variety of headlamp styles and aiming hardware used today, it can be a challenge to ensure that units are operating correctly and pointing in the right direction. Some vehicles are equipped with daytime running lights and others aren’t. Some shut off automatically after the vehicle is turned off, others have a time delay and still others require the switch to be turned off. To say the least, it can be interesting to check proper operation.
Also keep in mind that turn signal speed and light intensity can be affected by the resistance value of individual bulbs. All bulbs have to be the proper size and specification, or proper operation as designed by the vehicle manufacturer may not exist. Also, bulb color and intensity require matching bulbs to the other operating bulb to ensure continuity from one side to the other on the same vehicle.
Some customers are opting for custom-type bulbs with super white intensity or various hue effects. If these bulbs are burned out, they’re not a nickel-and-dime item. This can become an issue of what type of bulb is needed and if the bulbs have to be changed as a pair. It might even have to do with what hue or color is legal according to state laws.
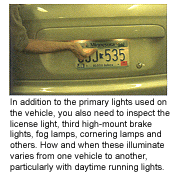
Also keep in mind that high-mount brake lights and regular brake lights are a liability if not functioning when the vehicle is released to the customer.
And what about the rear license and back-up lamps? Are they working?
Interior Checks
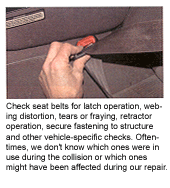
Inspecting the interior restraint systems should be a high priority, yet can be easily forgotten unless you perform a systematic check.
Pull out and inspect all belts to ensure that the webbing isn’t damaged and that stitching isn’t loose. Check the labels on belts for specific warnings. Test latch mechanisms and belt webbing lock-up performance. Also check dash warning lamps for passive restraint systems to see that vehicle self-testing indicates the system is intact.
Even if you did these inspections at the time of damage analysis, it’s a good idea to check them again after completing repairs. Case in point: During a quarter panel replacement that I was involved in, a welding spark must have fallen into the seat belt retractor and melted the webbing about 3 feet down the belt. If that belt hadn’t been pulled out and inspected before releasing the vehicle, it could have failed in the future.
Broken glass can also get into these units during collisions and repairs and cause performance failure. It’s also possible that during anti-corrosion material installation, a retractor unit could become coated – causing not only a performance issue but a mess for the customer.
Operate seats to see that they adjust properly and lock into all positions that utilize mechanical release mechanisms. Inspect seat frames to ensure that they’re not twisted or broken from the collision.
You should also test creature comforts like heated seats and power controls for proper function. If the seats have been removed for any reason, inspect all fasteners to make sure they’re tightened properly.
You may also need to test all the items on the steering column. This includes headlamps, high and low beams, horn, cruise control, wipers and washers, airbag dash light operation and tilt mechanisms. This could likely require road testing the vehicle and may be the time for transmission and engine controllers to be retrained if the vehicle requires.
You should operate other dash functions as well, including all settings for the heater and A/C systems. Just recently, I road tested a vehicle that was “ready to go” and got a face full of dust when I turned the defroster mode on. Also check dash lights for airbag and restraint systems, ABS, engines, traction control, security systems, etc.
Under the Hood
This area can present final inspection challenges.
All fluid levels are up for grabs, particularly if the vehicle was hit in the front and the damage involved mechanical systems. Coolant level checks and bleeding procedures can require looking up vehicle-specific recommendations.
A/C systems require hooking up equipment and performance testing of the system. Find out if it’s already been done so you don’t waste time doing it again.
Check brake fluid levels. If low, ask yourself why.
Inspect power steering and transmission levels if the cooling system and radiator were involved.
Is the battery held down in place, and are the cables properly routed and tightened?
Other items to check might be replacement of all underhood labels. Emission labels, belt routing, airbag warning labels, A/C service information label and others. In addition, check routing of all wires and hoses to ensure that they’re secure and not rubbing on any moving parts.
Check to see that service caps have all been replaced on items like the A/C fittings, radiator overflow tanks and windshield washer fluid reservoirs. Also look for missing fasteners, and check that all fasteners have been tightened.
Luggage Compartment
Where is the spare? Is it in its proper place and tightened down? (On many vehicles, you have to wonder if they’d perform the same in a rear collision if that spare weren’t bolted in place.)
How about personal belongings that you might have removed? Did you put them back?
I remember when a customer’s golf clubs weren’t put back in the trunk. He wasn’t upset because he thought that they were lost. He was upset because he wasn’t able to play golf in the afternoon league – and that, apparently, was worse than having a wheel come off the car.
Also check to see that items like speakers are plugged in and that all mats and floor coverings are in place. With some of today’s sport utilities, the storage areas can be rather involved.
Under the Vehicle
Who torqued the wheels if they were removed, and which ones were removed?
Exhaust system retainers, line and hose retainers and heat shields are often removed to be able to install measuring systems. Have they all been put back in place? We could all imagine what the liability and risks would be if a brake line were left hanging low below the vehicle.
Has corrosion protection been restored where anchoring clamps were installed on pinch weld flanges? What about shields and plastic liners that close out many underbody areas on today’s vehicles? Checking to see that they’re properly in place and that all the fasteners are put in can easily be overlooked, particularly if the liner was only partially removed to gain access.
Simply ensuring that all overspray underneath has been blacked out can make a difference in the customer’s impression of the overall repair.
Are We Done Yet?
Certainly many of the things suggested here could involve an entire article by themselves. So how can we expect the car to be ready to go in an hour or less if during final clean-up and detailing (a job in itself) any of these items turns up?
I’ve recently been hearing from shop managers that they’re finding themselves having to personally inspect vehicles because items are getting missed. Many of the items covered here require communication between departments and knowledge of how the specific vehicle being repaired should function.
Gone are the days that just anybody can wash the car and it’s ready to go. Today we need quality-control, detail-orientated technicians who can go over the vehicle and pick it apart.
I train entry-level technicians, and I’m finding more and more that I have to schedule time at the end of the day after students are gone to go over vehicles to make a list of what needs to be finished the next day before it can go.
This isn’t because we’re seeing less concern over quality but, rather, because vehicle design requires us to have more knowledge and to perform more careful inspections than ever before.
Writer Tom Brandt is an autobody collision technology instructor at Minnesota State College Southeast Technical Campus in Winona, Minn. The program is a post-secondary, two-year diploma program and is NATEF certified. Brandt has 16 years of teaching experience, has been an I-CAR instructor for 15 years and, prior to that, was a combination technician.
|
Final-Inspection
Checklist
The following quality-control
|