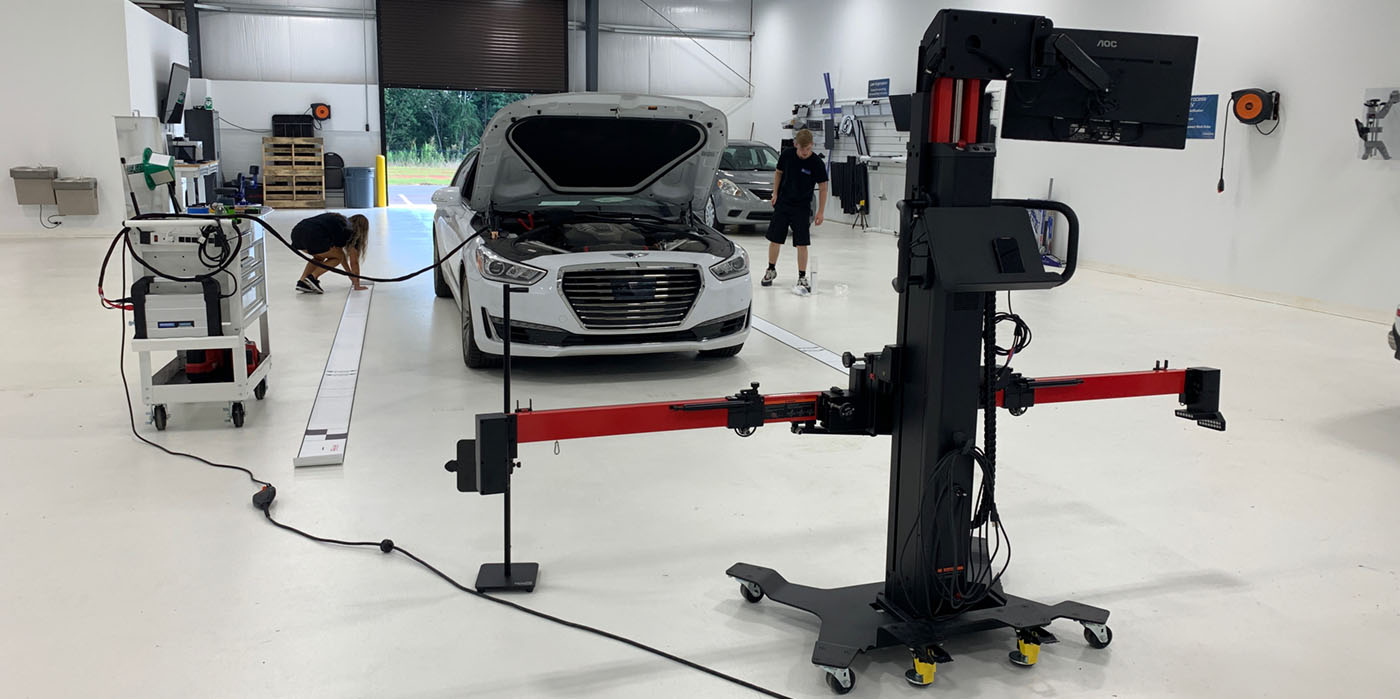
It’s a whole new world in the collision business. After your shop repairs a vehicle, it might look as good as new, but how about all those electronic systems that need resetting, reinitializing and adjusting? In the past, you may have subletted these “non-collision” jobs to a mechanical shop. But today, with the right information and a good scan tool, you can keep these jobs – and the profits they generate – in house.
As you already know, every manufacturer does things differently, so up-to-date factory procedures are essential to making sure the system will work correctly once it leaves your shop.
Here are two short excerpts from Lexus taken from ALLDATA Collision S3500. They concern adjusting and resetting the collision avoidance system on a 2011 Lexus ES 350.
NOTE: These articles and diagrams are shown as examples only. They do not include the entire procedures.
Service Information
Always refer to ALLDATA Collision S3500 for safety procedures, identification of material types, recommended refinish materials, removal and installation procedures. Always refer to the manufacturer for questions relating to applicable or non-applicable warranty repair information.
Reinitializing Distance Control ECU
NOTICE: Be sure to perform the following procedures after replacing the distance control ECU:
1) Turn the engine switch on (IG).
2) Turn the cruise control main switch on.
3) With the brake pedal depressed, push the cruise control main switch to RES/ACC three times within 3 seconds. Check that the buzzer sounds at this time.
NOTICE: Do not turn the headlight dimmer switch on at this time because the optical axis automatic adjustment mode has already started, which may lead to an incorrect optical axis setting. If the headlight dimmer switch is turned on by mistake, readjust the optical axis. See: Distance Sensor, Cruise Control > Adjustments > Millimeter Wave Radar Sensor.
 Millimeter Wave Radar Sensor Adjustment
• After replacing the ECM on vehicles with the radar cruise control system, it’s necessary to initialize the ECM so that the ECM can recognize the radar cruise control system.
See: Engine Control Module > Removal and Replacement > Installation.
• After replacing the distance control ECU, it’s necessary to initialize the distance control ECU so that the ECU can recognize the specifications of the vehicle.
See: Cruise Control Module > Removal and Replacement > Installation.
• There is a limitation on radar beam axis adjustment.
• Since the radar sensor is installed together with the radiator support upper and hood lock support sub-assembly, it’s important that the radar sensor, radiator support and other related parts are installed properly.
• When the sensor is removed from the vehicle for trouble diagnosis or repair, it’s necessary to adjust the radar beam axis after the operation.
CAUTION: Exposure to radio frequency emissions is hazardous to your health. It’s hazardous to your health to be within 20 cm (7.87 in.) of the device’s radio frequency aperture.
NOTICE: This device complies with FCC radio frequency emission regulations.
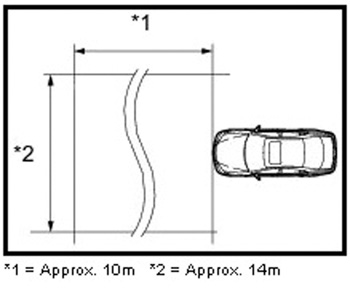
• Perform measurements on a level surface.
• Make sure that no large pieces of metal are within a 10 m (32.81 ft.) x 14 m (45.93 ft.) area in front of the vehicle. If possible, the surrounding area should also be free of large metal objects.
Before adjusting the radar beam axis, prepare the vehicle as follows:
1) Check the tire pressure and adjust it if necessary.
2) Remove all excess weight from the vehicle (luggage, heavy objects, etc.).
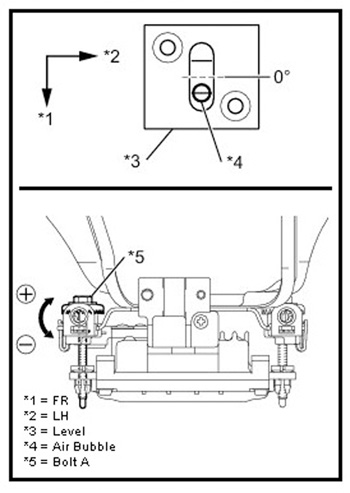
Check and adjust the vertical direction of the radar sensor:
1) Remove dust, oil and foreign matter from the radar sensor’s level rack.
2) Set a level on the radar sensor’s level rack.
3) Check that the level’s air bubble is within the red frame. OK: Level’s air bubble is within the red frame.
If the bubble is not within the red frame, use a screwdriver to adjust Bolt A until the air bubble is within the red frame.
HINT: The adjustable range within the level’s red frame is +/- 0.2°. The target angle is +0.2° (upward angle of 0.2°). A
Dan Espersen, ALLDATA Senior Collision Program Manager, holds an AA Degree in Automotive Technology. He has 46 years of experience in the automotive industry, including 19 in the collision industry. Edited by technical writer Jeff Webster.
© 2012 ALLDATA LLC. All rights reserved. All technical information, images and specifications are from ALLDATA Collision S3500. ALLDATA is a registered trademark of ALLDATA LLC. Lexus and Lexus ES 350 are registered trademarks of Toyota Motor Sales, U.S.A.. All other marks are the property of their respective holders.