With all the new electronics driving our automobiles and new procedures to repair today’s vehicles, sometimes we forget some of the other stuff. We always tend to focus on the newest and greatest when we talk about training on repairs, so other types of repairs lose to the flair of the new stuff.
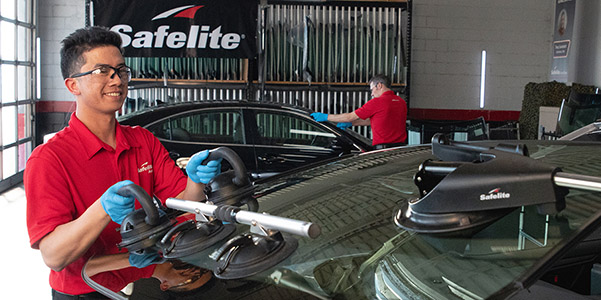
Glass replacement and glass R&I is increasing in all shops. With the need to improve cycle time, waiting for the glass shop to send a technician can be risky. They may be on time or may be a day away. Because reinstalling glass is usually the last thing done, this could add time to a repair you didn’t need. Many shops are now doing their own R&I of glass, which is a good thing as it gives you more time and labor instead of a sublet. This also gives a shop more control of their cycle time.
Glass Training
When doing training on glass, I hear many technicians say, “We just throw the glass in.” I cringe when I hear that as there’s a lot more to installing glass. I wrote an article earlier about new wire tools and power cut-out tools to give shops an idea of what they may need for removal. Equalizer Tools of Texas is an excellent company for tools and training on the removal and installation process. These tools are designed to limit or reduce the damage to the vehicle’s finish and metal during removal. When used correctly, these tools can make that type of damage a thing of the past.
These tools limit the possibility of corrosion, which is important. With all shops offering a lifetime warranty on repairs, along with owners keeping vehicles longer, a shop must be prudent in following the proper procedures.
Glass Industry
The auto glass industry focuses on installing auto glass in all makes and models. The urethane adhesive companies which supply the adhesive products have established procedures and guidelines for the correct way to install auto glass. Shops that follow these standards are AGRSS-registered shops. Techs who have passed Auto Glass Safety Council (AGSC) certification requirements have taken the training and know the proper procedures. The urethane adhesive manufacturers have all the guidelines needed for them. The issue at hand is the focus on mobile installations. Glass techs are usually only replacing a broken window from vandals or cracked windshields. Not much focus is put on what happens in body shops. When metal is repaired or replaced, procedures need to be followed to guarantee a good adhesive bond.
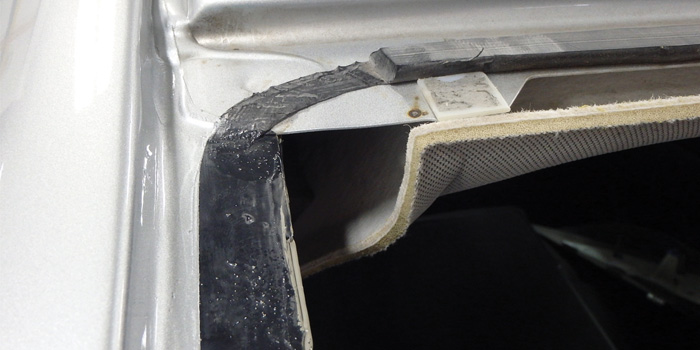
Body Shops
It may seem simple to a shop: repair or replace damage. Paint vehicle. Install glass. Simple, right? That’s where the problem is. It’s not just that simple. The paint systems used in body shops are changing. Paint systems used in the past were relatively simple to use and understand. With the introduction of new multi-stage paints, waterborne and the new generation of clearcoats, shops may need to alter certain practices during auto glass installations to maintain the vehicle’s structural integrity. The I-CAR GLA02 class covers this very well. More than ever, vehicle manufacturers are using the windshield and tempered glass with the bonding system to maintain the structural integrity and overall occupant safety.
On new vehicles, whether the pinchweld is painted or just primed from the factory, the topcoats must meet certain strength parameters, which is achieved by using particular primers and paints and then baking the finish at high temperatures. This level of adhesion can only be achieved at the factory level. Body shops cannot duplicate this process of topcoating and high temperature baking since it will destroy the vehicle interior, among other factors.
Testing done by independent labs has found that paints baked at lower temperatures (similar to body shops) may not achieve these adhesion strength requirements. Tests have also shown that even after shops bake a vehicle in a booth for one hour, many paints will only achieve a fraction of the adhesion strength required by vehicle manufacturers for use on pinchweld bonding areas. Often because of baking at low temperatures, the paint will not fully cure for up to 90 days. In comparison, urethane adhesives used in auto glass replacement have a short cure time. Therefore, the different cure rates between the two products may jeopardize the integrity of the installation and affect vehicle safety.
The trapping of solvents during the curing process will affect the adhesion and cure of the finish. This weak bond will cause warranty issues and bond failures. This could also lead to windows releasing from the vehicle during normal operation or in a crash. In short, the paint and or clearcoat is incompatible with the urethane adhesives designed to hold the glass. If the glass in question is a windshield, this becomes a life and death situation.
Because of the above detail, it must be noted that under no circumstances should color or clearcoat be applied to the pinchweld. The only recommendation is the use of epoxy primer to any bare metal and or e-coated surface. The epoxy primer will promote adhesion and act as a barrier coat to protect from corrosion. The urethane adhesive manufacturers’ pinchweld primer will then be applied to the cured epoxy primer. Then, the urethane adhesive will be applied once the urethane adhesive manufacturer’s primer has flashed.
Recommended Procedures
To eliminate these problems, recommended procedures outlined by vehicle manufacturers include:
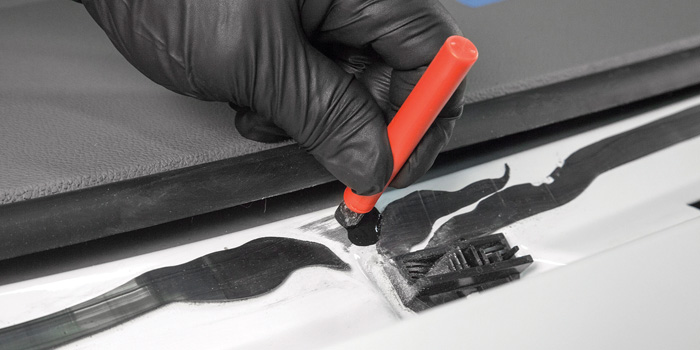
- When removing structural glass (such as a windshield, backglass or quarterglass), leave the old urethane on the pinchweld until right before installation. Then remove the old urethane, leaving one to two millimeters on the pinchweld. This gives the urethane adhesive a contamination-free surface for optimum bonding ability. Primers or dust will affect the adhesion. By stripping the urethane down right before the installation, all contaminates are removed. This is referred to as a full-cut technique.
- When painting is involved, use the same procedures as above. It’s acceptable to paint or prime right on top of the existing urethane, as this will be removed prior to the installation. When refinishing the pinchweld metal (while sectioning quarter panels or replacing the roof), follow all paint procedures until color coat or basecoat is to be applied. You must tape off the pinchweld at this stage. Under no circumstances should body fillers, color coats or clearcoats ever be applied to the actual urethane bonding area. Vehicle manufacturers recommend epoxy primers such as DP-40 or the equivalent. When the vehicle is ready for the glass installation, remove the tape and prime over the epoxy primer with the urethane manufacturer’s pinchweld primer. This will act as a topcoat and promote adhesion for the urethane.
A note on urethane adhesive manufacturers’ instructions: Many instructions will state that primer may be used over bare metal. If the bare metal has minor surface scratches or is less than one square inch in surface area, I agree. When we get to areas of bare metal that are longer, up to six inches or more on the pinchweld, we have a problem. This is common during roof and quarter panel replacements.
The daubers made of wool used to apply urethane manufacturers’ primer work well for short spots. But in long applications such as across a roof pinchweld, the thickness and coverage thins out as primer is applied, which leads to a screen door effect. There is coverage but it’s not consistent. This coverage is even worse when acid brushes are used. If you were to apply to clear glass, in the long strokes you can see streaks of insufficient coverage. A second coat should be applied, but now we have inconsistent mil thickness of primer. We also still have inconsistent coverage.
This problem would be a warranty issue further down the road. Urethane adhesives cure by moisture absorption. This absorption may bring moisture to the areas or streaks in primer coverage and make corrosion possible. By applying a barrier coat such as epoxy primer to bare metal, you seal out any chance of moisture coming in contact with the metal surface. Don’t get me wrong, urethane manufacturers have tested and proved that their systems work. I believe they do. In the real world, many techs do not take the time to be sure of proper primer coverage. Some do, but many do not. This is not a problem of product but use of application. By following the recommended procedure of applying epoxy primer, you get great adhesion and protection from corrosion.
This process also applies to aluminum. In the past, it was argued that special adhesives were needed on aluminum panels to prevent a reaction between the adhesive and metal. We call these non-conductive urethanes. Today, urethane manufacturers say the primer used in the installation process prevents that reaction. In small surface area exposure, I agree, but again, only if it’s applied correctly. We again have the issue of a large surface area application. To prevent any issue arising, it’s still recommended to use epoxy primer first, then urethane adhesive companies’ pinchweld primer to assure a proper bond and protection.
Contrary to popular belief, epoxy primer does not need to be sprayed to be applied, nor does it need to be reduced if not sprayed, avoiding masking and the three-ounce rule. There are alternatives. Also, the cure rates of epoxy primers are much faster than in the past. If a shop sets up a standard operating procedure (SOP), the cost and time would be minimal to do the job correctly. For information on how to use correctly, contact your paint manufacturer to verify that all this information is correct.
Sample SOPs
Here are some samples of SOPs:
Please note: There is a pinchweld primer offered with all urethane adhesive manufacturers. This primer is only to be used for scratches and any bare metal less than one square inch. Any larger surfaces will require an epoxy primer before applying the adhesive manufacturer’s pinchweld primer.
Epoxy primers are able to be applied using one of the following five procedures:
- Standard primer gun
- Preval sprayer supplied on carts
- Roll on
- Wool dauber
- Acid brush
Please note: The acid brush may be used in other applications using epoxy primers. In our testing, the acid brush was found to be lacking coverage for the application required for auto glass and has been removed from recommendation. Spraying is the optimum procedure but has drawbacks of masking materials and time along with possible overspray issues.
The procedure will be most efficiently done before the bake cycle begins. The time for cure varies before top coating with any products such as urethane adhesive primers at 70 degrees at 50 percent relative humidity. This time is reduced by force curing in the bake booth to recommended time.
The following options are designed so that a shop can implement a procedure best to not affect cycle time. Best practices should be followed by all technicians.
Option 1: When the vehicle is in prep using the spray technique
- The metal where windshield adhesive will be applied in pinchweld will be cleaned with wax and grease remover.
- Mask surfaces required to prevent from overspray.
- Prime repair area of pinchweld with epoxy primer using standard primer gun or Preval sprayer, adhering to proper flash times between coats.
- Remove masking.
- After masking vehicle for paint refinish, technician will apply 1/2-inch 3M green tape to pinchweld over the epoxy primer.
- Vehicle is sealed, painted, clearcoated and baked.
- When masking is removed, the glass technician will apply the windshield adhesive manufacturer’s pinchweld primer over the epoxy primer. This will be followed by a urethane adhesive.
Note: The bake cycle reduces the cure time of the epoxy primer
Option 2: Vehicle is moved to prep using a dauber or roller technique.
- The metal where windshield adhesive will be applied in the pinchweld will be cleaned with wax and grease remover.
- Paint technician can prime area with epoxy primer using a 1/2-inch roller or wool dauber. Care must be used when using dauber, and apply in one direction. If the technician uses a back-and-forth motion during application, an uneven mil thickness will occur and not give proper coverage.
- Finish prepping vehicle for priming. Tape off epoxy primer with 3M green 1/2-inch tape prior to applying other primers or seal coats.
- Complete refinish operations.
- Remove tape from pinchweld and prep and install glass following urethane manufacturer’s guidelines. Bake cycle will allow for installation of glass after removal from paint booth.
Option 3: Vehicle is in paint using dauber or roller technique
- The metal where windshield adhesive will be applied in pinchweld will be cleaned with wax and grease remover.
- The area to be primed with epoxy primer is taped off using 3M green 1/2-inch tape.
- All priming and refinish operations are completed.
- Tape is removed and paint technician primes area with epoxy primer with roller or dauber. Care must be used when using dauber, and apply in one direction. If technician uses a back-and-forth motion during application, an uneven mil thickness will occur and not give proper coverage.
- Bake cycle is started.
- All procedures for glass installation can be done in the bake cycle.
Option 4: After completing repairs prior to vehicle being sent to prep
- Body technician will brush or roll primer on pinchweld area.
- Another option is the Preval sprayer. This allows for no changes in paint line.
- Pinchweld will be taped with 3M green 1/2-inch tape prior to color and clearcoat application. All pinchweld areas where urethane adhesive is to be applied should not have any color or clearcoat applied. This will cause a failure in adhesive bonding leading to:
- Leaks
- Wind noise
- Glass failure
- Structural failure
Please note: With many of the new roofs being adhesively bonded to vehicles using windshield urethane adhesives, this procedure and (change of primers) will be needed for more than glass installations.
These are just examples of SOPs. I encourage you to contact your paint reps for their recommendations. The recommendation of 3M green tape and the 1/2-inch size is because that’s usually the width of the adhesive bond line. It is also the only tape I know tested to not leave residue on the pinchweld.