The restyle market includes an incredible array of products used to modify the exterior or interior of a vehicle. One way drivers can customize their coupes is with decals. They come in a nearly limitless variety of colors, sizes and designs and can be easily applied or replaced by your technicians.
While it’s obvious the application and removal of decals isn’t your core business, they’re relatively easy procedures. Plus, they can provide added income and are a means to getting future paint and body work. Most decals come pre-cut and sized to fit a particular type of vehicle. Others, including most wood-grain decals, must be cut to fit.
Equipped to Stick
According to I-CAR’s Uniform Procedures for Collision Repair (UPCR), you’ll need the following equipment and materials to apply or remove a decal from a customer’s vehicle:
- Heat gun.
- Steamer.
- Razor knife.
- Plastic squeegee.
- Plastic razor blades.
- Adhesive remover.
- Chemical stripe remover.
- Non-abrasive stripe remover disc.
- Glass cleaner.
You’ll also want to protect the vehicle when applying any decals. To do that, follow the vehicle and paint manufacturer’s recommendations for the amount of time to wait before applying a decal to a newly applied finish. Generally, it’s best to wait at least 24 hours, or you may come to the shop the next morning and find the decal has wrinkled and fallen off. To ensure proper performance, I-CAR’s UPCR recommends not applying a decal when the temperature is below 60 degrees F. Ideally, the surface temperature of the panels you’re working on should be 60 to 80 degrees F.
If you’re removing a decal to replace it with a customer’s new choice, remember not to overheat the area when using a heat gun. Be sure to test a small, hidden area before applying any chemical removers to a panel that’s not scheduled to be refinished after the job is done.
It’s a Sticky Job
If a customer wants to replace decals already adhered to his vehicle, you’ll need to remove the old ones before any other work is done. To do this, I-CAR’s UPCR lists the following procedures:
1. Remove exterior trim and hardware along the line of the decal, if required to access the full decal.
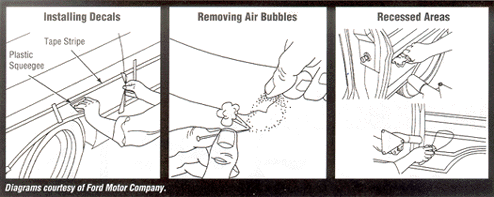
2. Remove the decal by using a heat gun, steamer, plastic disc, plastic razor blade or any combination.
3. Clean the repair area with the proper surface cleaner. Make sure all the original adhesive is removed.
Now you’re ready to jazz up that Jeep. To apply a decal:
1. Clean the area where the decal will be applied, using the proper wax and grease remover. Wipe dry. (This step may not be required on newly refinished panels.)
2. Align the decal to the panel. Use body lines or masking tape for alignment marks. Take note of areas where the decal will have to be trimmed or separated, such as over a panel gap.
3. Spray or sponge water on the application area. For large decals, use a pH-neutral soap and water solution or glass cleaner to allow easier positioning. Follow the product or vehicle manufacturer’s recommendations for the type of lubricating liquid to use.
4. Start removing the paper backing from one end of the decal.
5. Position the decal on the panel. Continue removing the paper backing while smoothing out the decal with a plastic squeegee.
6. Press out water bubbles. Work from the center to the edge.
7. Remove the protective cover sheet from the decal.
8. Wipe the decal gently to remove excess water.
9. If any bubbles can’t be smoothed with just the squeegee, slit the bubble with a razor knife and flatten it out with the squeegee.
10. Separate or trim any parts of the decal, if required, by lightly dragging a razor knife over the cut line. Don’t cut into the finish.
Once you’ve completed the application process, inspect the decal for the following conditions:
- Proper position and alignment.
- Proper adhesion.
- No bubbles or folds.
- Proper trimming or splicing.
- Proper color and design match with any existing decals.
If you notice any defects in the application or the product, correct them before returning the car to the customer. Applying decals – just like repairing a collision-damaged vehicle – will only be profitable if you do the job right the first time.
Writer Melissa McGee is managing editor of BodyShop Business. Information for this article was reprinted courtesy of I-CAR’s Uniform Procedures for Collision Repair.
Photo courtesy of SEMA.

