The move toward metal bonding instead of welding is slowly but surely catching on. More original equipment manufacturers (OEMs) are using adhesives in manufacturing and specifying adhesives for aftermarket repairs. And when the automotive assembly industry changes, the aftermarket changes with it. One area where using metal bonding adhesives is becoming more popular is door skin bonding.
While some OEMs have been bonding door skins for more than eight years, door skin bonding is just now becoming an accepted practice over welding in body shops. In fact, with the products and procedures available today, body shop technicians can duplicate the same type of adhesive bonding that’s being used on door skin panels from the OEMs.
Why consider bonding? With bonding there’s no grinding of welds, so repairs take less time. Most adhesive manufacturers have also limited the liability of the body shop by providing lifetime guarantees of the repairs, and some have even given lifetime guarantees against corrosion resistance. Adhesive bonding not only adheres the skin to the inner shell, but also seals the seam so moisture and salt won’t get in and initiate the corrosion process. For this reason, shop owners and technicians can be confident that rusting won’t occur over time – as it often does with welding – and that they’re providing their customers with high-quality repairs.
Body shops replacing door skins with metal bonding adhesives should use the OEMs’ recommended procedures or tested procedures validated by a reliable research and testing facility. Some adhesive manufacturers may require the priming of any bare metal, while others may recommend bonding to bare steel. It’s suggested that the directions and usage recommendations that accompany the product be read before applying any adhesive.
Let the Bonding Begin …
The following is a typical procedure from an adhesive manufacturer for acrylic technology.
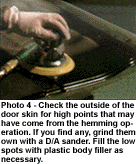
1. Remove the damaged door skin. First, grind the outer edge of the hem with an angle grinder and 36-grit disc until you’ve cut through the outer skin. Then, remove the remaining door skin from the door frame with an air chisel.
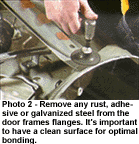
2. Grind the weld nuggets flush with the door frame. Remove rust, adhesives, coatings and galvanized metal from any flange area where the metal bonding adhesive will be applied. No priming is necessary to the bare metal.
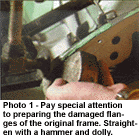
3. Straighten and align the door flange with a hammer and dolly.
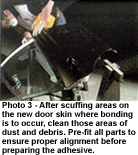
4. On the new door skin wherever bonding is to occur, scuff with an abrasive pad to remove the gloss of the E-coat. It’s essential that the E-coat primer on the new door skin not be sanded through or removed. Clean all bond surfaces of dust and debris. Pre-fit the part for proper alignment.
5. Prepare the adhesive. Dispense a small amount of metal bonding adhesive from the cartridge to level the plungers and to assure an even flow of both components. Then, attach a mixing tip and dispense a mixer’s length of the adhesive. From this point, you’ll need to apply the adhesive and assemble the components within the work time suggested.
6. Apply an 1/8- to 1/4-inch bead of metal bonding adhesive to all mating surfaces of the new door skin. Be sure there’s adhesive on all the contact points in the flange area. Missing spots could provide potential areas for water leaks, corrosion development and looseness of the door skin.
7. Properly position the new panel if repositioning is needed, slide the panel and don’t lift it apart. Clamp the frame and door skin together to hold the alignment while rolling the hem flanges.
8. Allow the adhesive to cure per the manufacturer’s recommendation. Expect the adhesive to be a little “tacky” on the surface. This is a normal property of the adhesive. If possible, completely remove all excess adhesive squeeze-out that may be visible before it sets up.
9. Scuff the hemmed area with a scratch pad, and prime per your paint manufacturer’s recommendations.
10. Apply seam sealer if required, and paint per the manufacturer’s recommendation.
By following these procedures, a professional body shop technician can expect to provide a repair that will last the life of the automobile, bringing the door skin back to pre-accident, factory condition.
Writer Jeff Miller has been with Lord Corporation for 17 years and currently serves as an application engineer. During his career, Miller completed autobody technical school and has served as an autobody technician and an I-CAR instructor. All photos in this article were provided courtesy of Lord Corporation.


