Quarter panel replacement is something we all take for granted after we’ve put on a few dozen of them. But it wasn’t always second nature. Do you remember the first quarter panel you installed? I do. And it wasn’t glamorous.
I remember how proud I was that I replaced that bent Granada quarter panel in such a short period of time and with very little instruction. Being a 17-year-old “man” fresh out of high school, I knew what I was doing and didn’t need any instruction … at least I didn’t think I did. In fact, I thought I was doing just fine – until I shut the door.
That’s when reality reared its ugly head.
The edge of the door in the dogleg area protruded about a half an inch farther out than the quarter panel next to it. The really sad part is that the experienced painter/shop foreman had painted the misaligned panel without shutting the door. You can imagine the look on our faces when we realized the mistake I’d made.
But you don’t have to “live” the mistakes that I made while gaining that coveted “experience” in order to learn from them. I will admit, though, that there’s nothing like living a mistake to make you remember how not to do something – but that’s not the wisest path to knowledge. The wisest way is to learn from someone else’s mistakes. And let me tell you, if there’s a mistake to be made, I’ve either made that mistake myself or I know someone who has.
With that said, let’s get started replacing a quarter panel.
1. Assess the damage. This first step is a constant for any repair and is the step that can save you the most time. Try to recreate the damage process by examining the vehicle until you’re confident that you know how the damage happened.
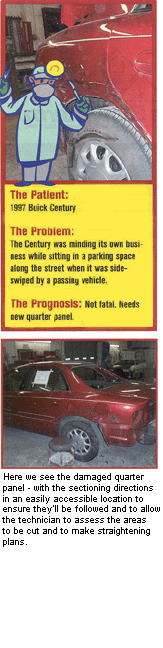
You also need to confirm the applicable location of the section to be made. This Century’s new quarter panel actually came with an instruction sheet enclosed in the box. This sheet had very specific section points to abide by, and the panel came precut to those dimensions. If the panel you get doesn’t come with such instructions, refer to the applicable service information for the vehicle in question.
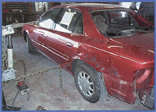
2. Reverse the damage. Once you know how the damage happened, plan to “reverse” the damage. “First in last out” is a saying you’re likely familiar with, and it definitely applies to inner structure damage.
The direction and planning here will make or break the whole process.
3. Measure and perform preliminary pulls. I try to do most – if not all – of the pulling and inner structure repair with the old panel in place, ironing the wrinkles as well as possible during the pulling process. (This may explain why, before I throw it away, I try to iron out all the wrinkles in the aluminum foil used in my lunch.) Doing this will give you a better indication of the alignment of the inner structure.
It may appear to an onlooker that you’re trying – in vain – to save a wasted panel, but you’ll understand how straightening that piece of scrap will help you to align the inner structure. This works in all but the most severely damaged panels. Measure properly to ensure you’re repairing the inner structure to a point that the new quarter panel will fit with no interference.
4. Make your rough cut. Once you’ve made the preliminary pulls, stress relieved and aligned the inner structure as well as possible with the panel in place, it’s time to make some cuts to remove the major portions of the soon-to-be-discarded panel. We call this our preliminary or rough cut, since it’s made safely away from our final cut line to avoid terminal error.
Some of you are likely muttering, “I don’t need to make a rough cut. I can measure and hit the precise place I need to place my section line.” And granted, some of you probably can do that consistently, but I’m a bit cautious and find it easier to get the repeatable accuracy needed by adding this step.
During this step, you need to make your cut far enough back from the section line to allow the final piece you remove to be used as a backing plate. Lengths of backing plates vary depending on the location they’re to be used, so refer to the directions for the vehicle at hand for the dimension needed.
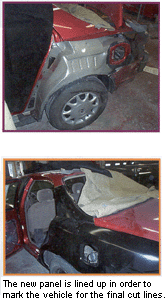
5. Test fit the panel. After you’ve made the preliminary cut, prepare to zero in on the final cut by preparing the vehicle for a test fit of the panel. To do this, drill the applicable spot welds loose to allow enough of the old panel to be removed from the inner structure to allow the new panel to lay close to its final location. Position the new panel overlapping the section areas.
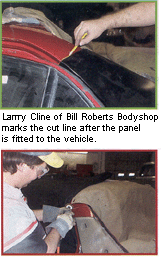
6. Mark your final cut. Once you’ve established a good fit and confirm that the gaps are in alignment, use the panel as a template to mark the final cut. Use some kind of marker that you can see well enough to follow when cutting.
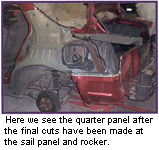
7. Make your final cut. When cutting the vehicle for this repair, keep in mind that the directions call for a butt joint with a backing plate. This kind of joint typically requires a gap one-and-a-half times the thickness of the metal to allow adequate penetration when welding. Remember to retain the portion of the sail panel and the rocker panel that you cut off because you’ll need them to use as a backing plate. The part closest to the final cut is typically the easiest part to make fit as a backing plate because it’s shaped the same as the panel it’s backing up.
8. Trim the backing panel to fit the back side of the old panel and tack it in place to allow a smooth flush fit of the new to old panel.
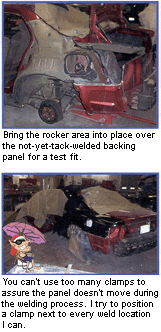
9. Test fit the backing panel using either clamps or screws. I like to use a combination of both. Whichever method you choose, keep in mind that if you can’t get the panel to fit now, it won’t be any easier to make it fit after you’ve welded it.
I like to clamp around the wheel housing and the open areas, and in the openings and closed places – such as the sail panel and rocker – I often fit the panels with screws. If you fit your backing panel with screws, you can go back and weld the screw holes up after removing them, making an effective plug weld between the backing plate and the outer panels.
10. Prep for welding. After confirming that everything fits, prepare all surfaces for joining the new panel to the vehicle. When I’m preparing the areas to be welded, I grind the areas where I plan to weld and then coat those areas with a liberal application of weld-through primer.
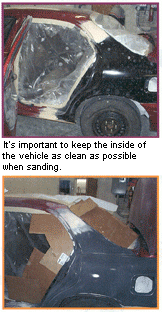
During every step, pay close attention to corrosion-prevention practices so your repair doesn’t later cause a potentially terminal rust situation. You certainly don’t want to leave any bare metal for damp air to collide with.

11. Clean up, tune your welder and prepare the vehicle for welding. OK, our panel fits and lines up and you’ve prepped the areas for welding. The car is just begging for you to start up that fire-breathing welder and to melt the metal into nice, little rosebud welds. But don’t jump too quickly. It’s wise to pick up some of those scrap pieces you’ve trimmed off to be discarded and to tune that welder in to the metal and conditions you have at hand. A little practice here will make the welds you have to do go much smoother. It’s always better to spend that extra time dialing in the welder instead of trying to redo or, worse yet, cover up substandard welds that can only lead to failure down the road.
12. Weld your section lines and plug areas. When doing this, keep heat distortion at a minimum. Most all of the directions I’ve found from vehicle makers prescribe skip welding here. Skip welding spreads the heat out as you weld 1 inch and skip 1 inch. Once you reach the end of the seam, you simply go back and weld the skipped areas, giving you a smooth, continual weld bead without too much distortion.
13. Dress your welds. Once you’ve welded the section lines and plug weld areas, go back and dress some of your welds. If you did your part and your welder was working properly, the plug welds won’t normally need to be ground down. Typically, a good cleaning should be all that’s required. If you do need to grind any of your plug welds, keep metal removal around welds to a bare minimum. If you remove a substantial amount of metal around the weld area, you effectively weaken the bond.
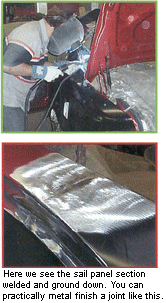
The section line welds, on the other hand, will need to be taken down as close to perfect as possible. When grinding any of the welds, I normally start with a coarse enough disk to remove the desired metal quickly, without making any more heat than necessary. Once the metal is just short of the level desired, I follow up with a finer disk to take away any excessively coarse grinding marks as I finish removing the amount of metal desired. Normally the section line will need a skim of filler to smooth up the minor ripples and any grinder marks that weren’t quite removed during the last step.
14. Finish preparing the jambs for paint. While the filler is drying, smooth any rough edges and clean.
15. Seal the seams. Now that the jambs are smooth and virtually ready for paint, seal all of the seams to prevent leaks and undue corrosion.
16. Sand your filler and prepare it for priming.
17. Prime, block and paint.
18. Restore corrosion protection. This doesn’t take a major commitment of time, yet it can be that proverbial weak link if it’s left undone. We use what we refer to as the “Magic Wand” to reach inside those hard-to-reach areas. It’s basically a long tube with a directional nozzle on the end that will distribute rust-proofing material down into nooks and crannies.
19. Pat yourself on the back. Most of you probably follow all these steps to one degree or another, and many of you likely have some steps of your own, too. That’s OK – as long as we’re all striving for the same thing: quality workmanship.
Writer Keith Combs is the body shop manager at Bill Roberts Chevrolet in Bolivar, Mo., and a GM/ASE Master Collision Repair/Refinish Technician of the Year. He’s been in the collision repair industry for 23 years.


