Knowing exactly how to drive somewhere doesn’t guarantee that you’ll actually get there. Same goes with repairing a vehicle: Having the most advanced measuring system and formulating a good plan doesn’t actually fix the vehicle. Granted, it’s a great start, but making the structural damage move in the direction necessary to correct the dimensions is a whole different game.
Today’s vehicles absorb a great deal of energy from the impact, and to do this requires that the impact energy be dissipated throughout the structure. This creates challenges for the repair process because the impact point may be small, yet the energy expands dimensionally throughout the body. This has been called the “cone” effect by many textbooks and training programs: From a relatively small impact area, the damage is expanded through the rest of the body, not unlike a cone.
In the past, with conventional heavy frames, it was possible to use a very limited number of pulls in a single direction — using shear force to overpower the frame. But unitized construction is completely different. The challenge is that the point-of-impact area on unibody construction isn’t normally strong enough to pull all the (dissipated) damage into alignment — unless it’s very minor damage. And using that same force we used in the past will generally just tear and rip apart panels on unibodies. Many have used the phrase “finesse, not force ” referring to unitized body repairs, and I must agree.
For these reasons, proper anchoring, blocking, pulling and stress relieving are very important to a successful repair today. More specifically, a successful repair requires that:
• The vehicle be properly anchored and blocked during the repairs;
• The direction of pulls reverse the direction the area moved;
• The control of force be accurately maintained; and
• Pulls be made, the progress measured, the area stress relieved and then repeated.
Let’s take a look at each of these individually to help understand how they’re integral to the repair process.
Vehicle Anchoring, Blocking and Holding
• Anchoring — Keep in mind that whatever pulling force is placed on the vehicle is transmitted to the areas of anchoring, so the anchoring area must be secure enough not to allow vehicle movement. It must also be able to withstand the pulling force without distorting the anchor area. On most unitized structures, this involves the pinchweld area at the front and rear torque-box areas. Since this area generally has some reinforcements and multiple layers of metal, it’s usually (but not always) the suggested anchoring location.
Some vehicles don’t have reinforced pinchweld areas or a pinchweld at all. These vehicles have special anchor adapters designed for the pulling system or require modifications to the structure for anchoring; this could include welding or removal of suspension parts to bolt the anchoring fixture. No matter what the case, varying from these anchoring locations and making your own isn’t suggested.
It’s equally not advised to use a limited number of pinchweld clamps. In Figure 1, the distribution of force demonstrates how the pulling force is divided by the number of anchor points. In this example, two clamps would cause 1,000 pounds of pressure to be exerted at the anchoring points, which could distort and damage the area. For most pulling systems, each pinchweld clamp has multiple smaller “jaws” attached to it. This will divide the pulling force even further at each clamping location.
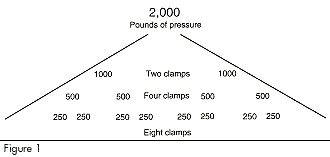 The picture also illustrates how a four-clamp system with two smaller jaws on each clamp will reduce the pulling force on each anchor point. It shows that even with 2,000 pounds of pulling force, the maximum each pinchweld anchoring point will be stressed is 250 pounds. This factor was calculated by dividing the 2,000 pounds of pulling force by eight jaws (two per clamp unit). You could also determine the actual pounds per square inch on each area by factoring in the actual jaw face’s surface area. You can be sure vehicle manufacturers’ engineers and equipment engineers have analyzed this to be certain the mounting area can withstand normal pulling force when properly mounted.
The concept of “properly mounted” is important to define as well. If the pinchweld clamps aren’t properly tightened and the clamp jaws can slip, the force is directed to the other mounted clamp jaws. For this reason, it’s very important to ensure the pinchweld clamps are free from anything that may interfere with a secure anchoring. Pinchweld-clamp jaws should be inspected, cleaned regularly and replaced periodically when they become worn or damaged.
• Blocking — Blocking is a method that allows the use of leverage to ensure the pulling force is concentrated to the proper area of damage. It also allows for the block to place force (normally upward) at a damaged area needing upward movement or to keep an area from moving downward during the pulling process of another area. As with anchoring clamps, the force the block places on its location is determined by the amount of force placed against it during pulling. A block placed under a cross member or structural member will exert the same force upward as the pull is directing downward. This is really useful when restoring datum misalignment.
During pulling, some of the force is absorbed in the body due to the flexing of the unitized structure. The additional force necessary to create movement in the damage area from the loss when the body flexes can cause the pulling clamp areas to tear. An analogy of breaking a green tree branch vs. an old branch illustrates how the green branch requires more effort to break because it flexes before breaking. Blocking can also assist in lessening the flexing.
• Holding — Holding fixtures can also assist in eliminating body flexing. One common type of holding fixture is a turn buckle. This unit has small clamps on each end that can be mounted in a door opening and tightened to lessen the upper body from flexing. If you’ve ever pulled the front structure with the door open or off, you probably know what I’m referring to. Even with the doors closed, body flex is present.
Proper anchoring, blocking and holding are critical to successful structural repairs. With many frame-type vehicles, a multiple-size frame hole clamp is used. In many cases, I’ve seen it become a very successful “can opener,” which is caused by the clamp being pulled downward rather than horizontally during the pulling. To eliminate this from happening, keep the clamp horizontal. Accomplishing this is possible many ways: One way is to place blocks under the clamp so it can’t pull down at the mounting hole. Another way is to place a small hydraulic ram on the clamp to keep it horizontal. Regardless of the method, keeping the clamp horizontal is the goal even if the chain is angled downward 45 degrees.
The Direction of Pulls
It’s sometimes misunderstood what the direction of pulls means. Why? Well, just because the impact was from the front doesn’t mean all the pulls will be directed forward. Many designed bends in a structural member deflect collision energy in a direction other than straight backward. These areas are usually in secondary damage areas and have been, at times, difficult to move during initial pulling.
The term “multiple pulls” has also been misrepresented at times. It does partially mean to divide up the pulling force into more than one area (that probably would tear by itself), but it also means to pull in the direction the damage needs to move. Many times, the impact has caused an area to move in a direction unlike the primary impact direction. If pulls were made only in the opposite direction of the primary damage, these areas would have a difficult time returning. Therefore, these areas must be helped with pulls or blocks to move them in the right direction when the other primary damage is moving.
A perfect example of this is during a frontal collision, when the energy may travel up through the A-pillar (windshield post) and cause the roof panel to buckle at the B-pillar (door rear post). This buckle wasn’t caused because the roof panel moved backward (primary frontal impact), but because the front portion of the roof moved upward from the A-pillar. And since the roof is anchored with the B-pillar, it becomes a hinge point — hence buckling. If you attempt to pull just from the front, it generally won’t restore the roof back down to the proper location — so fixing the damage is difficult. Here’s where the turn buckle can be used to pull the front corner of the roof down and hold it in place during the rest of the repairs, lessening body flex and removing the buckle stress.
This combination of using proper directional pulls in secondary damage areas and blocking/holding will dramatically reduce the amount of pressure needed to pull vehicle structure.
Controlling the Force
I’m sure you’ve heard that unitized structure should be pulled with a minimal amount of force. But how do you know what pressure you’re pulling if you don’t have a gauge to monitor applied pressure? Counting the seconds between each pump beat isn’t a recommended method because it’s very important to see what pressure each of your pulls is placing on the structure. That way you’ll know if the pulling plan is correct. If you have to use excessive force (usually anything more than 2,500 to 3,000 pounds), your pulling plan probably isn’t correct. There may be times in very reinforced center-section areas that this suggested limit is reached, but normally I’ve found that staying below 2,500 pounds is an achievable goal.
Many of today’s pulling systems have pressure gauges for this purpose. If the pulling system uses foot hydraulic air pumps, these gauges may have a tendency to get damaged since they’re often mounted at the pump base. It’s important to be very careful with these gauges and to keep them maintained. Some gauges are located on the frame rack itself, but they may become difficult to see during the pulling. In either case, use them to properly monitor pulling force.
Another hint for reducing the amount of force needed to pull today’s vehicles is to identify anything that may be restricting the damage from moving. This could include an engine cradle or cross member. It may be advised to unbolt a front bolt of a damaged engine cradle to allow for the rest of the structure to move. If the rear engine-cradle mounting area is out of specs, then a pull can be added to the cradle itself to pull that location while the other structure is being pulled. Always take advantage of each situation.
It may also help to cut away some of the primary damage to allow access to the rest of the structural damage. Using welded absorbers as pulling attachments normally doesn’t supply the proper pulling points and, many times, just pulls out the mounting bolts.
The Process of Pulling
In many shops I’ve been in, the clamp assortment is very sparse, and I’ve even seen bolts for each clamp being shared because they haven’t been maintained. If you or your techs do this, please stop it! Make sure clamp bolts are replaced regularly and have numerous clamps available to mount to the vehicle before pulling has begun. It’s not efficient to pull, stop, change the clamp to another location, and then pull, etc.
Once everything is properly anchored, blocked and the clamps are mounted, it’s time to pull.
Pulling and continuing to pull without relieving the internal metal’s state will commonly cause the structure to crack or tear. Because the metal, whether high-strength or mild steel, has been work hardened at the damage, it’ll crack or tear before moving unless proper techniques are used. This process requires stress relieving of the metal around the damage.
Stress relieving is accomplished with vibration (heat or mechanical). This is another area that’s commonly misunderstood, which has led to many organizations not recommending the use of heat. Using heat for stress relieving is done to warm up the molecules to allow them to internally vibrate — causing them to move. (We aren’t softening the steel as many of us did on older, conventional frames to ease the pulling load.) The heat necessary to cause this vibration is very low and also the least effective method.
Mechanically causing the internal molecules around the damage to vibrate is easy, and it’s also the most effective method. It can be accomplished with hammering spoons or pneumatic bits. This vibration will quickly reduce the metal stress and lessen the pulling force needed. In fact, if a pull is held at 1,500 to 2,000 pounds and the pulling direction is correct, during stress relieving (vibration) the pressure gauge should drop significantly during the hammering. This verifies the pulling plan. It’s important to note that hammering directly on a buckle should be avoided until that buckle is ready to move and be straightened. Hammering directly on a buckle too soon can harden it further and make it almost impossible to straighten.
This process of pulling to a reasonable pressure, holding, stress relieving the area and repeating the process will achieve the most efficient pulling process with the least chance of tearing or cracking metal. (Keep in mind, if the metal were stressed past its recommended point, it may already have micro-fractures and would need to be replaced anyway.)
Finesse, Not Force
Today’s pulling equipment (like measuring systems) requires a dedicated effort to keep it in top condition. Each system should be cleaned and all moving parts greased weekly to ensure they work properly. Shadow boards should be used, and all accessories should be checked and repaired immediately.
Training by the equipment manufacturer on a regular basis is also necessary, both in-house and at training schools. Independent training programs can also assist with additional training needs to ensure your staff is properly trained — not only on the equipment but on the most efficient repair process.
Falling short in any of these areas will cause a productivity loss and place your shop at an identifiable disadvantage in cost containment and productivity potential — not a desirable position for achieving success in the years 2000 and beyond.
Contributing editor Tony Passwater is a long-time industry educator and consultant who’s been a collision repair facility owner, vocational educator and I-CAR international instructor; has taught seminars across the United States, Korea and China; and is currently an industry consultant. He can be contacted at (317) 290-0611 or [email protected].
Note: This article’s scope isn’t intended to analyze whether the structure should or shouldn’t be straightened due to structural integrity. It’s only designed to provide hints and solutions once that has accurately been determined.

