You probably measure most of the wrecks you repair with a system that utilizes symmetrically located bolts and holes throughout the underside of the vehicle. Most, if not all, measuring systems available these days include equipment to measure upper body structural components such as strut towers, aprons, radiator supports, etc.
But not all measuring systems have complete upper body data available beyond the front end and maybe some door aperture specs.
So what’s a tech to do when the occasional heavy storm brings down some pretty big tree limbs, filling the shop with roof-damaged vehicles? How do you know if you’ve returned the bent box to the same dimensional shape it was when it left the assembly line?
First of all, don’t make a habit of relying too heavily on your measuring system alone. Today’s technology has enabled incredible improvements in measuring equipment available to collision repairers. But as helpful a tool as the measuring system is, remember, it’s still just a tool – and every tool has its limitations. In some cases, it’s a limited ability to measure distances inside the car.
Any time you realize the task at hand is beyond the capabilities of the tool in hand, you don’t deem the task impossible; you simply look for another way.
Tram It
Every collision repair tech should have his own good quality tram gauge. Check them all out thoroughly and get the best you can get your hands on, without regard to price. And take extra care of your tram gauge. Keep it clean, and don’t drop it or bang it around.
On my gauge, I can install different lengths of pointers that enable me to reach around some things to get a measurement. Sometimes, I turn the pointers in opposite directions or turn one at a 90-degree angle to the other. Of course, when you do this kind of “creative tramming,” you’re no longer measuring but merely comparing distances.
The measurement you read on the modified gauge won’t be the exact distance between the ends of the pointers, but the gauge can still be used as a guide to help locate shifts and misalignments in a vehicle’s structure.
Arm Yourself with Info
Before measuring anything, you should get as much information and specifications as possible from the manufacturer. The first place I usually turn to is the National Automotive Service Task Force (NASTF) Vehicle Manufacturer Service Information Matrix. The NASTF Matrix can be found at www.nastf.org and provides links to most large-volume vehicle manufacturers’ service Web sites. Many manufacturers also have toll-free numbers and other contact information listed on the NASTF site.
Many manufacturers’ Web sites offer access to their service manuals and repair information online for a fee. Some only offer full one-year subscriptions, while many offer short-term access for $10 or $15 for 24 to 48 hours.
I’ve also recently been made aware of Alldata but haven’t had a chance to try it out. From what I’ve learned, it sounds like a good place to go for information about a variety of car makes in one place for one price. Because every repair facility and every market differs,
Alldata doesn’t offer a flat fee for access but rather bases rates upon numerous variables, depending upon your facility and market area. For more information, visit www.alldata.com.
Since I’m working at a Toyota dealership, Toyota’s Technical Information System (TIS) Web site is the easiest for me to access, as well as the one I most commonly use. Toyota provides diagrams showing dimensions throughout the body, including windshield and rear window openings, door and trunk opening dimensions, rear strut towers, etc.
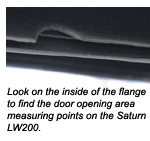
The 2007 Camry diagrams I recently printed show the distances from each rear strut tower to both right and left center door hinge pillars, as well as the corners of the roof. These are some of the most helpful specs in the book when you’re repairing hard-hit side-impact damage or roof damage. Depending on your measuring system, you may or may not be able to reach some of these measuring points, or maybe there’s just no way to get a target or a pointer on it for the system to read. Or perhaps you have the interior and the rear window out of the car and you can reach most of these measuring points, but your tram gauge won’t pass through some part of the vehicle, like a package tray. But all is not lost.
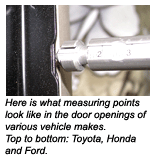
Remember, every measuring point on the sheet is an established point the manufacturer recommends you use when measuring the vehicle. Even if you don’t have a recommended distance between two measuring points that you can reach, at least they’re the OEM-recommended measuring points. As long as you’re measuring from a recommended point to a recommended point, you can compare one side of the vehicle to the other side, which is better than not having anything at all to go by. For example, if you can’t measure from the right rear strut tower to the left corner of the roof, through the package tray, check the diagrams of door openings or the trunk opening for a measuring point you can reach with a tram gauge.
Also keep in mind that when you study these data sheets in the tech manuals, you’ll see that most vehicles are symmetrical in design. Chances are, your sheet will show that distances from right side measuring points to points somewhere on the left side should be the same as the distances from corresponding left side points to the corresponding right side points. Once you know the vehicle should be predominantly symmetric throughout, you can use any of the manufacturer’s recommended measuring points to determine whether or not the vehicle is “square.”
Getting Started
Many of the measuring systems
have the equipment and data to take measurements of the door hinge bolts, but I don’t know how many of them can take measurements of the roof as well. Say you have a 2007 Camry with a tree branch dent in the roof at the center hinge pillar. You need to replace the hinge pillar, front and rear doors, and the roof. When the measuring system tells you the upper door hinge is the correct distance from center, how do you know the roof isn’t still swayed toward the other side of the car?
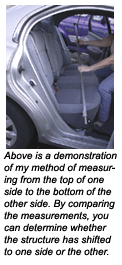
First, check the windshield and rear window openings. Then refer to the data sheets for the front and rear door openings. Locate the highest and lowest measuring points on the hinge pillar. Measure from the top point on one pillar to the bottom point on the other side, lock your tram gauge in that position and check the opposite points. As mentioned, you don’t have specs available to tell what this distance should be, but you can at least use a little geometric principle to determine correct position of parts before you start welding.
Also, don’t rely on just one or two pairs of measuring points to make your determination. Double check as many different points as you can. I’ve been teased for saying it, but I’ll keep saying it: I get more accuracy out of my tram gauge than a lot of techs get out of $30,000-plus measuring systems. Sure, that sounds egomaniacal, but I’ve seen dozens of techs over the years put eight pointers or eight targets on the bottom of a vehicle and call it measured. The more measurements you take, the more you assure yourself of the correct positioning of the vehicle’s structure.
In cases where there are no available established measuring points, I look for points on factory seams or mounting points for equipment, such as some seat belts that are in the same place on both sides of the vehicle. Some places where two or three panels are joined together, the factory has holes in all of the panels to assist assembly line techs in alignment of the panels before they weld them together. Many times, I find these alignment holes in the same locations on both sides of the vehicle and use them. The windshield post and the sail panel have seams at the top (roof) and bottom (cowl and quarter panels) that I’ve used to check the window openings for symmetry.
Many of these points may or may not be reliable for accuracy, so it’s important to obtain as much data as you can and measure many different points. Always measure points identified by the OEM data first, and fall back on these types of points as secondary resort.
The last measurement I take before welding everything together is similar to the very first measurement I take: the measurement I take with my hands and eyes. We’ve all done this for years, especially with vans and SUVs, right?
The first thing I do is walk around the vehicle, visually inspecting door gaps, opening and closing doors and rear gates to determine whether or not the roof moved. Well, many techs do this again before rolling out the welder. Something every good tech does, though most of us are rarely, if ever, paid for it (hint, hint, shop owners), is test fit parts. Every good tech hangs a part on a vehicle to check the fit anywhere from two to 10 times or more, and this is, for the most part, the final measurement. It’s the sheet metal and glass that tell the rest of the story.
When I’m comfortable with the measurements I’ve got and with the shape of the vehicle, I get out an assortment of clips and clamps and locking pliers and all kinds of other grab-ahold and hold-on-tight devices, and I build the car.
I install the doors, set the roof skin on the car to see how well it lays in place, lay the front and back glass in their respective openings, etc. Then I look over the entire vehicle, inspecting gaps and bodylines to ensure that the structure is where it has to be in order for me to weld everything back onto the car without any alignment problems. After all, the worst time to put a car on the frame machine and pull it is after you’ve welded a bunch of parts onto the structure in the wrong position.
Even though everything I measure might appear square and true to spec, I still pre-build vehicles this way to see what they’ll look like with the outer sheet metal on them. This way, if I don’t like how a particular part fits, I can look for the problem and solve it early in the repair process. Early prevention increases production in the long run and reduces stress as well. Triple check everything today so you won’t have to scramble around to correct an overlooked problem next week.
Measure of Success
I’d like to point out that I
certainly don’t intend to discourage the use of any measuring system on the market here. I only want to urge everyone to more thoroughly measure the vehicles you repair.
Any time you want to do a more thorough job on something, you may need additional tools. When it comes to measuring collision damage, you may need more than one measuring instrument to enable more timely production of your best repairs.
But this extra time you take to measure will pay off. Thoroughly measuring inside the vehicle as well as outside leads to easier assembly and better quality repairs – with less last-minute emergency adjustments.
Writer Paul Bailey has been a collision repairman for more than 20 years. He resides in Florida with his wife, Cathy. Contact him at [email protected].


