
Maybe you know an athletic person who won’t do a sport he’s not good at. How about an expert cook who won’t make a certain dish because he’s never been able to master it? Autobody technicians are perfectionists, too. And they need to be. It takes a perfectionist to restore a damaged vehicle to like-new condition. Unfortunately, when it comes to plastic parts repairs, many techs have experienced failures and would rather perform a procedure they are successful at: replacing the part.
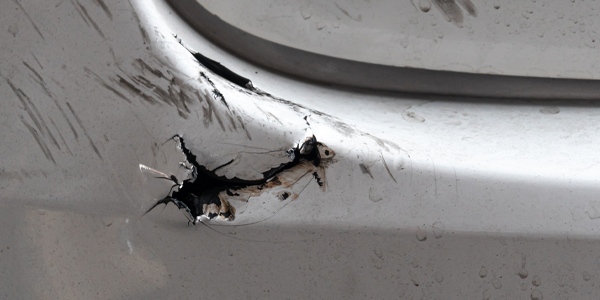
But plastic repairs are something that can’t be completely avoided in the collision industry. Even if a business decision is made to replace damaged parts, there will be times when the part’s price versus the size of the damage – a minor gouge for instance – will dictate a repair.
But don’t worry. There is hope for perfectionist technicians. By understanding the major cause of problems with plastic part repairs, failure can become success.
The failures that occur in plastic repair procedures can often (if not in all cases) be labeled as some type of adhesion failure. But why so many failures with adhesion involving plastics when other types of repairs involving metal have good success rates? After all, plastic repair materials and procedures aren’t that much different than working with body filler, adhesive bonding or other refinishing procedures used on vehicles.
To help you understand what goes wrong – and why – we’ll examine some of the reasons plastic repairs may fail to adhere.
Is It Thermo Plastic or Thermoset Plastic?
Identifying plastics correctly can be a challenge, so choose your repair method and do only the required steps.
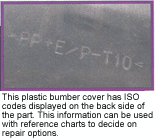
You can identify plastic parts by ISO codes on the parts, which use an alphabet soup of letter codes to identify various families of plastics.
Once you’ve found these codes, you have to cross reference them with the charts from the repair material suppliers to determine the correct steps for the repair. Some suppliers have charts available, including Internet site references. Some charts identify plastics by model year and part usage, and they don’t require removal of the part to get at the back side where the ISO code may or may not be. There’s no question that ISO codes can be of assistance, providing references are readily available.
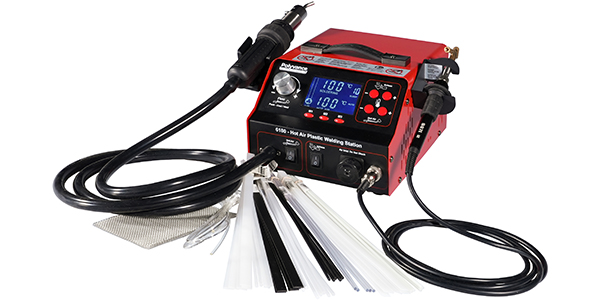
If you’re welding with an airless welder or a hot-air welder, another method of identification is application of heat to determine if the plastic is a thermo plastic or a thermoset plastic. A thermo plastic will melt, reflow and set back up again. Thermoset plastic won’t reflow and set back up again without damaging the plastic.
Some thermoset plastics can be welded, but it involves more of a hot-glue-type welding procedure. Also, the tests must be performed correctly. You have to follow appropriate welding procedures to avoid an adhesion failure. This test can fail if you simply stop when you see the base plastic melting. Urethane bumper covers will melt with a slight color change and don’t dry since they’re a thermoset plastic. They stay tacky in the area where they’ve melted.
Generally, the same identification methods are used when welding, along with methods for identifying the plastic family so you can select the correct filler rod. The welding rod selection test is an adhesion test or stick test. When melting the welding rod for a stick test, both the rod and the base plastic must be melted together and allowed to cool before testing for adhesion.
Is It an Olefin or a Non-Olefin?
When you’re going to perform adhesive repairs, having an ISO code and reference charts can be helpful. But generally, other criteria are applied for identification.
The plastics are divided into olefins and non-olefins.
Olefins require some help to get adhesion when doing adhesive repairs and when refinishing them. When olefins aren’t properly identified, they’re the type of plastic that causes many of the adhesion-related problems.
To identify an olefin, different tests are recommended.
- The grinding or sanding test is one. Using a high-speed sander and a recommended sanding grit (usually around 50 to 80 grit), sand a small, inconspicuous spot. If the area powders, it’s a non-olefin. If it smears or melts, it’s an olefin.
This test, however, isn’t perfect. If you use the wrong speed sander, the test results can be inaccurate. Slow sanding speeds can result in powdering an olefin, and high sanding speeds can smear a non-olefin. You need to practice to gain a correct understanding of this test.
- Another test you can use to identify olefins and non-olefins is the float test. Cut a small sliver of plastic from the part and put it into a container of water. Push it under with your finger and let go. If it floats, it’s an olefin (oily; oil floats on water). If it sinks, it’s a non-olefin. But this test can also be incorrectly read. If too large of a sliver is used, it may stay underwater even though it’s an olefin.
If you’ve identified it as an olefin, you need to apply an adhesion promoter or surface modifier according to instructions for correct adhesion of the repair materials.
Other tests recommend burning a small sliver of the plastic to see if it produces a black smoke or burns clear. I don’t suggest burning plastics since generally, they’re capable of producing highly toxic fumes.
How Flexible Is It?
You may also need to identify plastics by flexibility. Some repair materials are supplied based on flexible and rigid plastics.
Some may have three categories with a semi-rigid rating in the center. If you use too rigid a repair material, it may crack when the part is flexed. If you use a flexible material on a rigid part, it may not provide correct strength for the repair area. To make this type of identification, you need to be familiar with the repair system and have some experience identifying flexibility differences of plastic parts.
All of the above identification steps are what oftentimes determine if system 1, 2 or 3 is to be used, if you’re to do steps 1 through 7 or if you’re to do steps 1 through 7 but skip steps 3 and 5. Adhesion also has to do with our willingness to read and understand the system charts and directions provided.
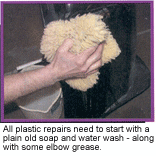
Cleaned and Prepped
Cleaning the part is critical for making plastics repairs stick. If the part is being repaired, it’ll already have road grime on it. If it’s a replacement part that’s to be refinished, it’s likely to have contamination on it from the manufacturing process.
Whether repairing or refinishing, start by cleaning the part with warm, soapy water. Remember, there’s no universal solvent, but water comes about as close as anything. Use a nylon brush to get into body style lines or textured areas of parts. Wash both the front and rear sides of the part thoroughly.
After wiping the part dry, use a recommended solvent cleaner for plastic parts. Usually this is a low-VOC surface cleaner or a special plastic parts cleaner that will help prevent solvents from going too deep into the plastic. The rags used to clean the part should be changed regularly to prevent moving contaminants from one spot to another.
If solvents are too harsh and go deep into the plastic, they can stay in the part for a long time and still look dry on the surface. If other repair materials or coatings are then applied to the area, they can lose their adhesion when these solvents return to the surface.
These solvents can also bring with them other chemicals from within the plastic itself that can compound the adhesion problems. Some new replacement parts have recommendations for cleaning that include white-colored scuff pads and scuffing gel, followed by a thorough water rinse. This gets the part clean while providing micro-scratching without opening up the surface of the plastic.
Once you’ve begun repairs, make every effort to avoid creating any unnecessary contamination to the surface. You can use low-pressure air and clean, white shop towels to clean the surface. Avoid touching the plastic with your bare skin.
Use only the recommended cleaning solvents after you’ve applied repair materials. If you’ve cleaned bare plastic or repair areas, allow extra drying time to make sure all the solvents have had time to escape from the plastic.
Mechanical & Chemical Adhesion
There are two ways to get adhesion – chemical and mechanical. Mechanical methods increase the surface area and provide better grip for many materials. But they can create problems on some types of plastics.
If the repair procedures don’t call for sanding or grinding the part, it’s likely because the particular type of plastic may have impregnated chemicals that create adhesion problems if exposed. For this reason, these plastic parts should be cleaned only, and then specific materials applied. This usually occurs with procedures involving some of the greasier, smooth plastics.
When mechanical adhesion is called for, it’s a good idea to use the recommended grit range. That way, you’ll get adequate adhesion, yet not tear up the plastic so badly that you create refinishing problems or additional surfacer work.
Chemical adhesion is increased on some types of plastic parts by using adhesion promoters or surface modifiers. These products have specific procedures for their application. They should only be applied in the thickness and number of coats recommended by the manufacturer of the repair system being used.
You also need to allow for proper flash time before applying repair materials over them. Too many coats or damp material will create adhesion failure. If you don’t apply the repair material within a specified amount of time after the product has been allowed to dry, you may need to reapply it according to the product instructions.
Other Reasons for Adhesion Failures
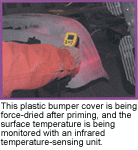
- Improper use of forced heating – Improper use of forced heating can bring chemicals out of the base plastic and cause the repair material to fail to stick. While it may seem like force drying the repair materials is a good idea, it can actually create other problems for the plastic. If you use force drying, keep the temperatures low to prevent sweating the chemicals out of the base plastic. This may require using some type of temperature monitoring device such as an infrared digital heat measuring unit. These units work well because they allow the item to be measured without physically touching it.
- Not following directions – Be sure to follow the product manufacturer’s recommended steps for product use, mixing and application. Don’t intermix product systems because this may create chemical incompatibilities. Don’t use an adhesion promoter or surfacer unless one is specified; some products may have them built in. Wait the appropriate time before trying to sand repair areas. Remember, times given in instructions are generally the shortest possible times under ideal conditions for temperature and humidity.
- Not allowing adequate flash/dry time for solvents – When applying anything with a solvent to plastics, allow additional flash time or dry time as compared to other substrates. Plastics can be penetrated more deeply and need much more time for the chemicals to come out.
- Applying heavy high-build coats – Products are usually applied to plastics using multiple light coats rather than heavy high-build coats. Once repairs are sealed by an insoluble primer, this isn’t so much of a problem.
- Forgetting that plastics hold heat longer – Plastics hold heat for a long time. If you’ve used welding, the weld may not be completely set for a half-hour or longer. This is even more true for thicker plastics. Cooling with water may only quench the surface, and grinding the weld too soon may tear the whole weld out of the repair area. If you’ve heated a part for reshaping or other reasons, wait long enough before re-cleaning the surface of any contaminants that may have come out of the base plastic.
Be Patient!
Even when you do understand adhesion, there’s something else that can cause plastic failure: a lack of patience.
Plastic repairs need time between steps to cool and for all solvents to get out of the plastic and repair materials. Also, refinishing steps need additional flash time and often more coats with less build per coat to prevent solvent penetration.
For the perfectionist technician, there’s nothing more frustrating than having a completed plastic repair get damaged. There may be a small edge that someone gets caught on, peeling the whole repair loose. Worse yet, this could happen after it’s painted!
But don’t get discouraged. Even perfectionist technicians can achieve success at plastic parts repairs with practice, patience and an understanding of adhesion.
Writer Tom Brandt is an autobody collision technology instructor at Minnesota State College Southeast Technical Campus in Winona, Minn. The program is a post-secondary, two-year diploma program and is NATEF certified.ÊBrandt has 16 years of teaching experience, has been an I-CAR instructor for 15 years and, prior to that, was a combination technician.