
 For those of you who don’t know me, I’ve been working in the collision
repair business since the 1970s. So, needless to say, there isn’t much I
haven’t done in the auto body repair field.
I currently own and
operate a collision repair shop in a small North Carolina town. I’ve
built cars with just an idea and a junkyard frame. I also worked for a
NASCAR team in the 1990s and learned what “from the ground up” really
means.
I’m not egotistical, but I feel I can pretty much do
anything to a car. When someone asks me if I can do something they’ve
seen on television or in a magazine, it’s not whether I can do it but
how much it will cost. After all, most good body techs enjoy a challenge
or they wouldn’t be in this trade.
Some projects I’ve taken on over
the years resulted in only meager profits, but the attention they got
(trophies, awards, magazine cover shots) is the kind of PR you just
can’t buy. We also filled a lot of bays in slow times.
Celebrities
love spending money on their cars, and if you’re lucky, they may ask
you to do work for them – and that could get you noticed. We’ve
custom-painted race cars for past and current champions, and those
like-minded racers sure like a one-off paint job!
If you’re
looking for a challenge, good press, great photos and the experience of a
lifetime, custom body modification might be just the thing for you.
Take it from me – there’s money to be made customizing street cars and
show cars, restoring classic cars and custom painting drag cars.
Body Kits and Bumpers
We
started out in our area installing fiberglass body kits and bumpers.
You can achieve a better profit margin when you can add $10 or $15 to
your labor rate (charge-what-you-need pricing) and mark up parts and
kits to what you feel comfortable with. We install four-piece kits and
charge $2,000-plus on the average Honda. You can “guesstimate” or tell
the owner X dollars per clock hour. Materials by the job size or paint
hours…however you want to charge, that’s between you and your customer.
There’s no Big Brother involved.
A lot of customers want remote
door poppers, so they want the door handles removed and the holes welded
over. This is an upsell if you want to install the door remotes, popper
solenoids, door springs, alarms and remote boxes. I’ve subletted these
items and marked them up. It’s up to you.
I’ve had some
customers install these door poppers themselves. The hardest part is
finding suppliers you can trust. I’ve found some great products and
suppliers on NOPI.com, but eBay has been hit-or-miss. There are some
good suppliers on eBay, but make sure you research where your product
comes from or you might get stuck with an el cheapo body kit. Tail lamps
and headlamps aren’t a huge issue as far as quality, but make sure you
can get warranty replacements as needed without a huge hassle. I try to
get a one-year warranty on these items.
The trick to the bumper
kits is making sure that the part you purchase will clear the bumper
reinforcements. This is an important part of the safety structure that
you don’t want to tamper with too much. We’ve had to cut fiberglass
bumper kits back with an air saw to clear the bumper reinforcements, but
that has never created any major problems.
We modified a kit
designed for a Honda Accord and chopped it down to fit a 1990s Ford
Escort. We shaved the door and tailgate handles, install-ed the kit and
molded in all the panels. We also filled the gutters on both sides of
the roof. The owner was a stereo tech, and the car had a great sound
system in it and a fiberglass dash with some custom mods. The car went
on to get a first place trophy at a NOPI show in primer, all the more
amazing because the cars in his class were painted. Needless to say, I
was very proud of all of our efforts and happy for our customer. You
can’t buy that kind of press!
Urethane bumpers are available, but
there’s not much you can do for fit and finish. They’re more flexible
and may resist minor damage, but the cost factored in those bumpers and
kits doesn’t impress me. One that I installed hit a minor amount of snow
and fragmented due to the cold temperature. Based on that, I would say
they lose flexibility in cold temperatures.
Deck Lids and Spoilers
I
get a lot of calls for deck lids and hatchback spoilers. If you do some
research on these product lines on the Web, you’ll find there are lots
of spoiler manufacturers. I have samples sent of products so I can check
the quality before I sell them to my customers. You can also fix up a
shop vehicle or a tech’s car as a way of testing a product before you
actually sell it.
We customized our 1995 Chevy S-10 shop truck
to test some paint products and compatibility issues, not to mention
draw attention to our talents. It turned a lot of heads and people still
ask, “Who painted it?” If you don’t have a shop vehicle, consider
getting one to use for advertising. Putting just a little money in it
can provide tons of great PR.
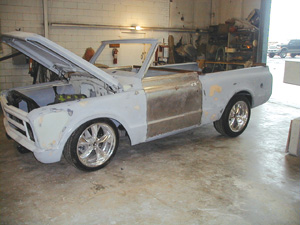
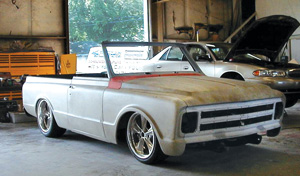
We took on a project doing the
finish prep on a 1970 Chevy Blazer. I wrote an estimate for it at the
customer’s house. The vehicle had been at two other body shops, and the
customer had even taken a slice at it himself.
The frame had
been C-notched above the rear axle and had a front-end set-up for a late
model Corvette. It also had a late model Chevrolet 5.7-liter
fuel-injected V8 for power and a set of Chip Foose wheels. The hood
hinges were a billet aluminum set copied from a BMW. The firewall had
been smoothed out with sheet metal, and the inner front fenders had been
fabricated out of sheet metal. The sheet metal work was fairly good,
but there was some welding that needed to be done and I recommended
removing the primer that had been sprayed on to reveal the work
underneath.
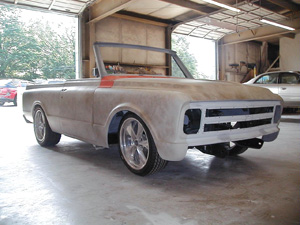
We carefully stripped off the primer and found some
surface rust. I could only guess as to what the other shops had done,
but whatever they did left this layer of rust.
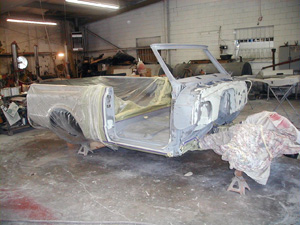
We fitted all the
panels and fixed the many areas that needed attention. We primed all
the bare metal with wash primer and put a good, sound urethane primer on
top. Once we test fitted all the sheet metal and worked on some issues
with the hood hinges and the frame C-notches, we were ready to trim out.
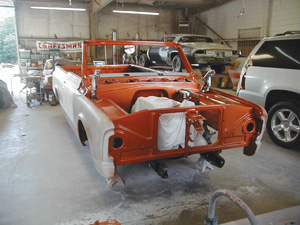
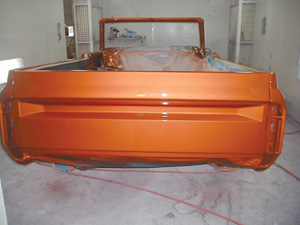
The color was from a late model Corvette, and the customer
wanted a semi-gloss clearcoat under the hood. We sprayed all the trim
out and assembled the truck. We then blocked it and final primed with a
guide coat. We sanded it 320 dry and sprayed it with a good sealer,
basecoat and urethane clearcoat. On jobs like these, I generally try to
use clock time to get paid, but you can bid them how you need to in
order to make a profit.
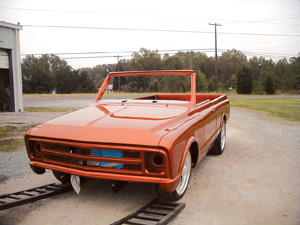
It’s extremely rewarding to do projects
like these, and it greatly helps the big picture when you get $10,000
labor on a job like the Blazer. I always try to get a deposit on these
types of jobs to cover initial parts orders and some labor to get the
process started. Sometimes, body kits need poly putty and priming.
Aftermarket and custom parts may need tweaking and adjustments to make
them acceptable to customers’ expectations, so keep this in mind when
quoting these types of jobs.
Step By Step Installation
1. Before signing for those expensive packages, open the box and inspect the kit for damage. Make sure the gel coat is in a condition where you can sand and prime. Minor imperfections are normal as these are handmade pieces. Also, be sure that it will clear the bumper reinforcement after installation.
2. Test fit the aftermarket pieces. Most kits can be installed using fasteners in the factory mounting locations. Some kits require drilling and installing screws or bolts in some areas to make the installation good and stout. Some trimming may be necessary. If it won’t fit and you don’t feel comfortable with it, send it back and try again with a different manufacturer.
3. Take “before” photos of the vehicle. These, combined with “after” photos, will be great to display on your website.
4. Mount the kit and install headlights and trim to make sure everything clears fine.
5. When bracing is needed, we purchase mild steel supports at a hardware store. I also have a ton of old brackets from the running board days and have been using them up on these jobs. They have 1-inch steel brackets 1/8-inch thick with multi-holes in them that work well.
6. Most front kits and some rears need or come with a mesh to cover large style openings built in them. If you want to cover the openings from the back side with mesh or screen, the local hardware store comes in handy. The lattice used in masonry construction looks great and is galvanized so it won’t rust. To attach the mesh to the bumper, we use two-part epoxy and fasten a cotter key to the back side of the bumper by the rounded end of the key. I suggest a cotter key every 6 inches or so. You can then slide the screen or lattice in place over the ends of the cotter keys and just bend them over to hold the mesh in place after refinishing.
7. Fix your imperfections. Sometimes fiberglass repair may be necessary. This is part of the job, and you can charge for it.
8. Prime and refinish.
9. Install.
10. Take pictures of the after install and paint.
Kits that customers want bonded to the car and molded in require all the steps listed above, plus the extra step of course of bonding the kit to the car. We use a two-part steel-to-fiberglass bonding adhesive, and fiberglass mat and resin to fill and strengthen the part. We then fill with chopped glass, then body filler, then putty and prime for the final coats.
Most of the materials and supplies will already be in your supply cabinet. The supplies you don’t have aren’t that expensive and can be added to the repair order. Estimate accordingly.
Show It Off
As far as
marketing goes, it’s nice to have some good pictures and references of
your custom jobs on your website. Brochures, handouts, press releases
and word-of-mouth work well. If you have a high-quality finished
product, the magazine covers and trophies will come.
We try to
accompany a few of our vehicles to the shows and races to pass out
shirts, hats and other kinds of promotional materials. I also had some
logo decals for our shop made up and put them on the finished product,
usually on the glass. But you can actually put your decal under the
clearcoat if you want as well. Live locations are also great places to
shake hands and kiss babies, as they say!
Let It Shine
I
personally get a lot more out of doing custom work than repairing a
stock car – there are a lot more “ooohs” and “aaahs” when someone sees
the finished product. The only person that knows you fixed a wreck is
the owner! When your work is viewed at 30 or more events a year by
thousands of people, that gets you noticed! We have so much talent in
our shops that we really need to let it shine!
Writer Bob Winfrey is owner of All Precision Collision Repair in Marshville, N.C. He can be reached at [email protected].