Having been involved in the collision repair industry since 1963, my arrival nearly coincided with that of plastic filler. If you ask me, no other single item has had such an overall impact on our industry. (I’m referring to plastic filler, of course. Not to myself.)
And no other product had had such potential for good – or such potential for misuse. And misused it was. Even today, decades later, plastic filler is still misunderstood and improperly used by some repairers.
But before we delve into a step-by-step procedure on how to use autobody plastic filler, I’d like to give you some historical background, some of it from a personal perspective, along with technical information to help you understand how and why the product works, and what can go wrong if you don’t follow the manufacturer’s recommendations.
The Early Years: Bondo Mania
It’s generally agreed that plastic filler emerged on the scene around 1955. Just like the public uses the term Kleenex for several tissue products of many different manufacturers and how Q-Tip is a common name given to all cotton swabs on a stick, plastic filler has been called Bondo in much the same way. Why? Because one of the major manufacturers of plastic filler did a premier marketing job. Not only did the manufacturer market Bondo to our industry, but more significantly, they marketed it far and wide to the general public. Thus, autobody plastic filler became known as Bondo to nearly everyone.
At the time plastic filler began to gain popularity, there were literally hundreds of producers. It was relatively low in cost to manufacture and didn’t require a lot of technology. Still, plastic filler wasn’t universally accepted by collision repairers. I remember quite clearly working for a Pontiac-Cadillac dealer in Denver when plastic filler was in its infancy. The body shop foreman wouldn’t allow anyone to use plastic filler on a repair without his permission – which he granted very sparingly. The body technicians had to purchase it from the parts department upstairs and pay for it themselves. Lead, on the other hand, was free to the technicians. Plastic filler could be used to fill pits in the lead or small defects, but nothing more. Why? Like many other things that are new, they can be wildly abused. (We called it “Skill in a Can,” in the shop.)
Up until that point in collision repair history, our craft required tremendous skill and a lot of hard, physical labor to metal finish damaged panels to pre-accident condition. “Metal finishing” is the manual art of repairing a dented and damaged sheetmetal part without using filler, plastic or lead. How things have changed. The vast majority of technicians today don’t believe that a damaged sheetmetal part on today’s cars can be metal finished because they’ve never seen anyone do it!
Prior to the arrival of plastic filler, we had shoddy operators and shoddy workmanship on the fringe of our industry, just like we do today. And those who would pile on lead an inch deep became the new abusers of plastic filler.
But there was a new, more important factor that impacted the image of our industry even more than these shoddy technicians could: John Q. Public. Lead required equipment and materials (the lead itself, acid, oxy-acetylene torch, lead paddles, etc.) and a definite practiced skill that weren’t readily accessible to the public at large. When plastic filler came along, however, it changed that aspect completely. Now the public at large could attempt what looked relatively easy, compared to practiced lead filling.
Pandora’s Box was opened, and almost every abuse of plastic filler imaginable became visible on the streets. No depth of filler was too great and manufacturer’s instructions were just there to make the can look good.
But in the years following the introduction of plastic filler, much changed and continues to change. The product itself continues to be improved, and it’s easier to use and tremendously more durable (when used as recommended).
The mania has also subsided. I read a European book on crash repair and crash testing published in 1999 by a German fellow named Deiter Anselm. His comment, “The euphoria of plastic filler is waning,” seems to agree with what manufacturers representatives tell me. The volume of filler being sold declined with fuel consumption. As cars got smaller, we began replacing more parts.
The Five Basic Filler Groups
I’ve always believed that to use something properly, it helps to understand it. I know this isn’t a universally held belief, but here goes anyway. I hope you get something out of it.
Plastic filler can be categorized into five basic groups: heavyweight, lightweight, fiber-reinforced, metal-reinforced and polyester glazing putty.
- Heavyweight filler – These fillers are the oldest and were the first to be invented. Heavyweight fillers use talc for the filler component in their resin, which produces a strong, sandable filler. (Baby powder is a form of talc.) This type of filler is used when repairing fiberglass because fiberglass and heavyweight fillers approximate the same hardness, which is good when sanding. It’s mistakenly believed that the heavyweight filler is the cheapest to produce. Not true. The raw materials for heavyweight filler are more expensive than those for lightweight filler.
- Lightweight filler – Lightweight fillers dominate the market because they’re easier to sand and cheaper to produce. They’ve been around since about 1975, and instead of talc, they use hollow glass beads or “quartz microspheres.” The filler manufacturers discovered that using a hollow substance as the filler component with the resin made the plastic filler much easier to sand and lighter weight, which lowered freight costs.
- Fiber-reinforced – Special jobs require special requirements. Fiber-reinforced filler is used when added strength is required, such as when rebuilding shattered fiberglass.
- Metal-reinforced – Metal-reinforced fillers are used for restoration work or where lead was initially used.
- Polyester glazing putty – This product is used for filling small defects (pinholes) or as a glaze over the whole repair area to reduce the amount of primer surfacer used and the flash times involved. Polyester glazing putty is a thinner, less viscous material, which spreads very smoothly.
Avoid 3 Common Problems
The polyester resin combines in a chemical reaction with benzoyl-peroxide (hardener). The components used for adding body or substance, either talc, glass spheres etc., are basically inert and are used to provide a sandable mass to the plastic filler. Adhesion is accomplished through both a chemical and mechanical bond when the filler is cured.
When filler is used as recommended, very little will go wrong. And that’s the key, “Use as recommended.”
So what are some common problems when the filler isn’t used as recommended? Let’s take a look:
-
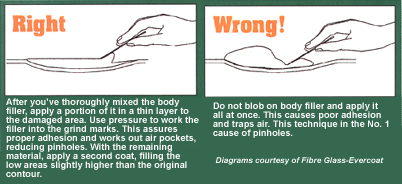
- Lack of adhesion – This is one of the most common problems, and the cause is almost always a poorly prepared surface. Plastic filler becomes more rigid the thicker it’s applied so it shouldn’t be applied over one quarter inch thick. If it is, this can ultimately affect adhesion. It also shouldn’t be applied over any holes or cracks that aren’t watertight in order to prevent corrosion from weakening the bond to the metal.
- Pinholing – This is another common condition. Many believe the mixing process or the application of filler causes pinholing. This isn’t necessarily true. Although air is inherent in the product, the proper mixing and application process helps to force out air.
Improper catalization can also be a factor between two separate coats. When undercatalyzed filler is spread over cured and sanded filler, small bubbles may appear on the surface. This is caused by a chemical reaction of the undercatalyzed filler, which is reacting to the catalyst in the cured filler. When sanded, these bubbles appear as pinholes.
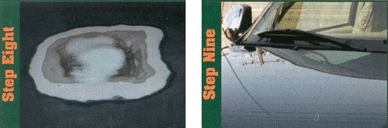
- Staining – This is a complicated problem, and if you’ve ever seen it, you’ll never want to again. It doesn’t show itself readily in darker colors, but it’s visible in the lightly pigmented color coats like silver, light blue and green metallics, along with whites. The stains can be present in a darker color too, but they’re just not visible. They usually manifest themselves in the shape of the filler area and are amber in color.
There are two types of stains. The amine stain is the most common. This is caused by the amine promoter in the polyester resin reacting with the benzoyl-peroxide hardener, producing a photo-reactive chemical that migrates toward sunlight. It uses the solvents in the vehicle’s refinish materials to move toward the surface. When the clear is applied, the solvents in the clear absorb the chemical, and when ultraviolet light hits the chemical, it reacts by turning amber.
To avoid an amine stain:
- Be careful when catalyzing. Use the correct amount. Don’t undercatalyze in hot weather and don’t over-catalyze.
- Choose a non-staining filler.
- Keep in mind that catalyzed primer-surfacers are resistant to staining.
- Know that some clearcoats are more sensitive to staining. Check with your supplier if you have a problem with your clearcoat.
- Let your plastic filler cure before priming. Sanding while still “raw” and then immediately priming can cause staining.
The second type of stain, a bleaching stain, is much more rare. It manifests itself by producing a lighter-colored area in the paint, caused by a gross overcatalization. The peroxide in the hardener is a form of bleach and bleaches the color coat, making it look lighter.
How to Use Plastic Filler on Metal
Plastic filler is most commonly used on metal. The example I’ll use here is one of the most difficult and least favorite types of repair for a body tech: a dent in the center of a hood. Why? Because even the slightest distortion or imperfection will show up in the highly reflective surface of a large hood panel.
This type of repair requires a high degree of skill and care. The job can be ruined in almost any of the various steps because this type of repair is the most unforgiving.

1. Examine the dent. It was caused by a 0.22 caliber gun, which was shot into the air. Those bullets have to come down somewhere folks! The owner found the slug wedged between the bug deflector and the hood, and the dent is behind the center brace under the hood skin. Our owner tried paintless dent repair first. No way. He then took it to the dealer, who told him he needed a new hood. The third guy to look at it was me. I told him that the least intrusive solution was to repair – no teardown or re-paint of the front fenders.
Before getting started, however, you must first plan. You don’t just jump into a repair like this. Think about what can go wrong, and then proceed by attempting to prevent those things from happening. For example, using this scenario, remove the hood. Three minutes of work gives you greater access and reduces exposure for damage to the rest of the vehicle.
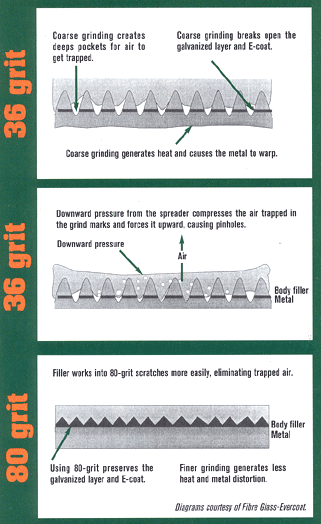
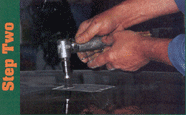
2. Keep the grind area small to prevent getting too close to the panel edges, which will necessitate blending for color match. Use a 40- to 80-grit disc. I’m using 60 grit here to grind the dent area. Keep speed down and heat low, and try to save the zinc coating. Don’t cause damage – repair it.
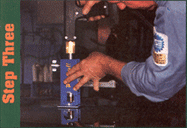
3. Remove the dent to close tolerance of the original position. In this case, I’m using a resistance-welder-type dent puller. The remaining damage should be no deeper than a quarter inch. Never try to just fill a dent like this because when the metal is down, the surrounding area is high. Be careful. You don’t want an oil can or to have to shrink here.
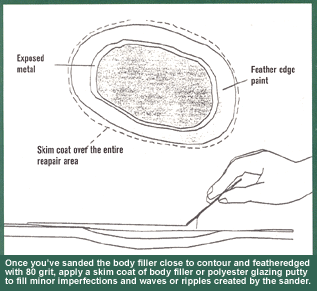
4. Before filling, featheredge the repair area. Each coat should be featheredged at least one half inch. Sand 2 inches beyond featheredge with a final sanding of 180 to 220 grit. Doing this step now reduces the problem of undercutting the filler by featheredging after the filler is sanded.

5. Filler should be mixed on a non-porous surface (not cardboard; it has impurities), such as the aluminum mixing palate shown. Always use a separate mixing knife. Never apply and mix the filler with the same blade.
This can cause soft spots in the filler due to uncatalyzed filler on the surface of the putty knife. I always use a steel blade for application and a small rubber squeegee for small areas.
Filler should be catalyzed at a ratio of 2 percent hardener to 100 percent filler.
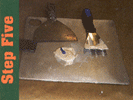
A 4-inch-round puddle of filler will be 2 percent catalyzed by a ribbon of hardener going straight across the entire 4-inch diameter. Therefore, the 2-inch puddle shown here is catalyzed with a ribbon one half way across. Use a wiping motion with downward pressure. After several strokes, fold the mass over and use wiping strokes again to work out trapped air. Avoid whipping motions. Repeat this step until your color is consistent – ensuring a thorough mixing.
6. Apply filler smoothly and avoid thick edges and high ridges. Try to visualize the finished area as if it’d been sprayed.

Your care here determines the amount of sanding you’ll have to do and whether you’ll need more coats. We limit our filling to as close to the metal as possible. Most modern fillers stick to OE finishes or catalyzed finishes. I’m attempting to keep the repair as small as possible, so I stick to filling the metal.
7. I sanded the area with 80 grit. I never hand sand with a coarse paper. Getting these deep scratches out can lead to undercutting, so I use 80 grit and finish by blocking filler with 180 grit. You may use 120 to 180 grit.
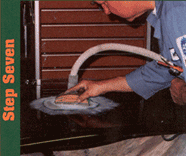
8. The finished repair is ready for primer-surfacer. If you prefer, you may glaze the entire repair area with polyester glazing putty to reduce the amount of primer-surfacer needed.
9. The finished job! No distortion on this 2001 Toyota pickup. We have an excellent color match because of the small repair area, leaving room for a blend without getting too close to adjacent panels. The owner was very pleased. And there you have it. Just be sure to follow the manufacturer’s recommended procedures and success is yours. Take care of the metal – don’t damage it – and use filler as a thin surfacer coat instead of as a substitute for skill. Always be professionals and always be craftsmen.
Writer Mike West, a contributing editor to BodyShop Business, has been a shop owner for almost 30 years and a technician for almost 40 years. His shop in Seattle, Wash., has attained the I-CAR Gold Class distinction and the ASE Blue Seal of Excellence.


