Go to any medium-to-high-volume collision repair facility, and you’ll find hundreds of repairable plastic pieces being replaced yearly. Why? Economics. But there is money to be made repairing plastics. Check out these three innovative plastic repair methods.
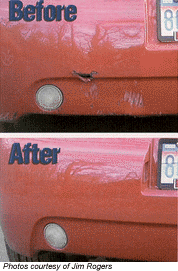
About 10 years ago, a leading insurer asked me how to get plastics repaired more often in the field. Their idea was to provide every shop owner – who agreed to repair rather than replace – with an airless welder. They thought the problem was that the cost of the welder, which was less than $100 at the time, prohibited shops from repairing plastics. To their surprise, I told them the problem wasn’t a lack of equipment or even a lack of knowledge.
It was economic.
At the time, suppliers were emphasizing to shops – and insurers – how easy and fast it was to repair plastics. Many of the demos showed a small damaged area repaired in “minutes” but neglected to mention that many steps were done before the demo, skipped or still needed completed before presenting the vehicle to the customer. Though this type of omission is true with many “sales demos” for any product in any industry, insurers took it to heart. They actually believed it only took minutes to repair plastics, from start to finish, so they immediately changed what they allowed on estimates. Why pay hours for repairs when they “knew” they could be completed in minutes?
I explained to the insurer that plastic repairs weren’t a competitive market item yet since not enough shops or repairers were doing them. I also explained that providing the equipment while figuring “peanuts” on estimates wouldn’t change that. There was just too much at stake for the shop and technician at that rate. Every repair would be scrutinized by the vehicle owner. Plus, at the time, there were possible problems associated with the shrinkage and durability of the repairs, and the refinishing process, to name a few. Just having to redo any area of the repair – even before the vehicle was refinished – could easily cause the job in that area to become unprofitable. Hence, replace it.
My suggestion then was, and still is, to allow up to a percentage of the replacement cost for reconditioning, like we figured for years with “rechrome bumpers.” The “rechrome” list price was basically 25 percent less than the OEM replacement. Using this sort of pricing, it would make sense for shops to repair plastics. It would also finally create a competitive marketplace.
Unfortunately, they didn’t take my advice, and today, you can go to any medium- to high-volume collision facility and find hundreds of repairable plastic pieces being replaced yearly. Granted, some of this tendency to replace is due to shops trying to reduce cycle time – but we’ve designed systems for clients that allow them to reduce cycle time and repair plastics. The real reason shops replace is still economic. Insurers still haven’t realized incentives on the positive side would get more repairs done and would benefit everyone.
Despite this reality, you should still consider repairing plastics. Why? You can lower your loss ratio and score “brownie points.” To help you accomplish these things, I’ll cover three innovative methods currently available for your growing repair arsenal.
Keep in mind, I’m not endorsing, recommending or spotlighting any system in particular, and you should check with your supplier about utilizing these techniques with the products you currently use.
New Challenges for the New Millennium
The plastics used on vehicles today are constantly changing, but two basic categories are still used: thermoplastics and thermoset plastics. In the past, plastics were normally thermoplastics and were a definitive plastic type. Later, thermoset plastics became more popular. These days, thermoplastics again increasing in use.
The key difference between yesterday’s plastics and today’s plastics is that they used to be a definitive plastic type. Today, however, they’re blends and mixtures of various plastics. (At NACE 1986 in Nashville during the I-CAR Plastic Repair Program, it was foretold this would happen – I know because I said it!)
These days, the most common possible repairs are front and rear bumper facias. In the past, facias were normally Thermo Polyurethane (TPUR), then Thermoset Polyurethane (PUR) and are now often an Olefin-based product.
A number of plastics fall into the “Olefin family.” The most common example is Thermo Polyolefin (TPO) or, as some call it, Thermo Plastic Olefin. This is used in many areas but especially in front and rear bumper facias. The catch is that the chemical mixture in each batch varies during manufacturing. There are numerous reasons for this, but why it happens isn’t as important as knowing that it does happen – and that you need to understand how it affects the repair process. To help, I’ll examine two innovative methods of repairing Olefin-based products. But first, the basics.
The Basics Never Change
1. Thoroughly wash the part with a warm to hot soap and water solution. Wash the back side, too. It’s best to use a soft bristled brush. With all plastic repairs, one of the most important procedures is properly cleaning the part before, during and prior to refinishing. This is probably the greatest downfall of technicians – they simply don’t believe how critical cleaning is.
2. After the part has dried, use a solvent- or alcohol-based cleaner designed for plastic. Plastic cleaners aren’t the same as conventional wax and grease removers – they’ve been designed specifically for plastics. There may be times when wax and grease removers are needed – in case of heavy deposits of tar, for example – but for the most part, keep them away from plastics.
In most cases, these cleaners should be used only once – at the beginning of the repairs. Once the repairs start and the plastic is exposed from grinding and sanding, it’s not recommended to use them since the open plastic will absorb the cleaner, can cause a loss of adhesion for any repair material or refinishing product, and possibly cause failure.
3. After the repairs begin, use an air gun to blow off the repair area, a clean dry cloth and possibly flame treatment, which we’ll cover in a later step.
Getting a (Better) Grip
A primary concern of any repair is its durability. Will it hold up if the vehicle is in another collision or if subjected to extreme temperature swings? Though new techniques, products and equipment have eliminated this concern, many in the industry don’t employ them.
This first technique was developed by Jim Rogers of Rochester Hills, Mich., for Crest Manufacturing and has been taught worldwide. The concept is to provide better adhesion by having the adhesive fillers fill small drilled holes on each side of the damage. This provides a better grip for the adhesive through extreme conditions.
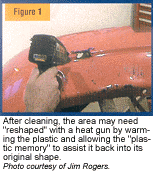
4. After cleaning is complete (as mentioned in the basics), the area may need “re-shaped” with a heat gun (Figure 1) by warming the plastic and allowing the “plastic memory” to assist it back into its original shape. It may be assisted with a combination of heat and cooling methods like we’ve used in metal shrinking for years (except with a heat gun, not a torch).
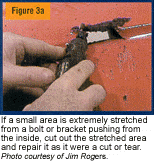
Tip: If a small area is extremely stretched from a bolt or bracket pushing from the inside, cut out the stretched area and repair it as if it were a cut or tear (Figure 2).
5. Align the area and cut out loose pieces.
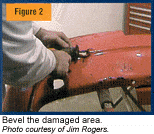
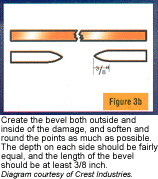
6. Bevel the damaged area (Figure 3a). Create the bevel both outside and inside the damage, and soften and round the points as much as possible. The depth on each side should be fairly equal (Figure 3b), and the length of the bevel should be at least 3/8 inch. (This will vary based on the thickness of the plastic and the extent of damage.)
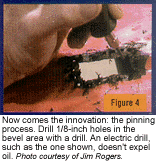
7. None of the steps so far have been any different than what you’re used to. But now comes the innovation: the pinning process. Drill 1/8-inch holes in the bevel area with a drill (Figure 4). An electric drill, such as the one shown, doesn’t expel oil.
8. Blow off the area with an air gun, and wipe the area with a dry clean cloth. Remove any burrs from the holes.
Tip: It’s important not to allow oil from air tools or grease/grime to get into the repair area. If they do, a solvent product may be necessary to remove the contamination. This will certainly slow down the repair process and may cause future failure.
9. Rough sand the areas around the repairs. This can be done with a DA sander, but don’t remove the paint. The filler is designed to adhere.
10. Flame treat the area on both sides.
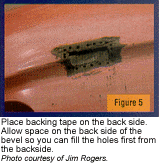
11. Place backing tape on the back side. Allow space on the back side of the bevel so you can fill the holes first from the backside (Figure 5).
12. Fill the holes and back side bevel with structural-type adhesive first. Once you’ve filled the backside, complete filling the opening. Let cure.
13. Level with a slow-speed DA sander or grinder for preparation for the final filler application. Let the final filler cure.
14. Sand the final filler to contour at slow speeds and short times with a DA sander.
15. Finish the final filler by hand sanding.
Burn Baby Burn
You may be wondering about the flame treatment mentioned earlier. This innovation has been around for at least seven or eight years at the collision repair industry level and maybe longer at the OEM level. A number of industry people – including a couple of friends of mine, Ed Staquet and Jim Rogers – discovered it. I was fortunate enough to be involved in some of the earliest tests involving its potential.
At the time, getting good adhesion on any Olefin plastic was very difficult. The adhesive manufacturers generally included some type of adhesion primer or promoter in their line to assist with this challenge, but their success was hampered by the time it took to dry before the adhesive could be applied and/or the time window in which the adhesive needed to be applied. And this cycle had to be repeated for each additional coat of adhesive applied after sanding. The technician generally “cheated” on this process, resulting in failed repairs.
There had to be a better way.
When we tested the flame treatment, we used an oxy-acetylene torch set at a slightly carburizing flame. We allowed the flame to pass across the bare, prepared plastic – not to heat or burn it, but to “flash” it.
Something strange occurred. The plastic appeared to flatten in gloss. We then applied fillers to it and found incredible adhesion had occurred.
I also ran a test later in China while working with a technology-exchange group. We compared the adhesion of untreated, adhesion promoter prepared, flame-only treatment, and flame treatment and adhesion promoter prepared areas of the same Olefin plastics. The hands-down winner was the flame-only treatment.
Why? It’s very similar to what I consider the greatest invention of all time: the thermos bottle. It can keep hot things hot and cold things cold all day long – but how does it know which to do? We may never know. Actually, many have attempted to figure out how flame treatment works (but no one’s figured out the thermos mystery). The best explanation is that Olefin plastics contain release and other contaminating agents, and when these plastics are exposed, the agents come to and are on the surface of the plastic. The flame actually burns these agents off, allowing the filler to bond better.
Many suggest using only a butane or propane torch, but I’ve found an oxy-acetylene one works fine – as long as the flame isn’t too acetylene rich that it leaves acetylene soot. This is why we used an almost neutral, slightly carburizing flame.
It’s interesting that Polyethylene, which we thought for years couldn’t be repaired with adhesives or painted, has been repaired successfully with the use of the flame treatment.
The Universal Solution
At some point in history, it was going to be a life saver to have International Standards Organization (ISO) codes marked on every plastic part for proper identification. But the ISO code just didn’t happen as anticipated in the United States – and happened even less internationally.
But since blends of TPO, TEEE, EPM, TEO and a score of others have entered the picture, some welding repair systems don’t work well because the welding rod doesn’t match the plastic blend well enough to provide a proper repair.
From this came all types of identification methods. Burn tests, float tests, sanding tests, adhesion of rod tests, etc. This confused the issue so much (as well as the technician) that repairs were passed up because of it. Companies even produced giant wall charts with elaborate flow charts in an attempt to simplify this process of identification.
But this need to know has lessened with this second innovation: a universal welding rod. This rod allows repairs to a blend plastic to be just like any other. And the process is simple and easy.
I was also fortunate to be involved in the early testing of this concept many years ago. In fact, I still have some of the earliest material we used to test. The greatest concern at the time was the ability to handle temperatures below freezing – and today that’s not a concern.
The initial steps for any plastic repair are basically the same:
1. Properly clean. This includes the same steps as mentioned earlier: warm/hot soap and water wash and a plastic cleaner on both sides.
2. Properly align damaged areas. The alignment may include heating with a heat gun and cutting away loose areas. The better the alignment is made and held, the less finish work will be required.
3. Properly hold damaged areas for repair. This is normally accomplished with aluminum body repair tape since it has good adhesion and doesn’t burn during welding. The front side is normally taped first so the backside is repaired first.
4. Properly prepare the area for repair. This follows normal procedures of creating softened bevels in the damage area with slow-speed grinders, die grinders and DA sanders. It’s very important that the bevel in the back side is at least 50 percent through to the front side in depth. (This is a common error made by technicians.) This system suggests at least a 1- to 1 1/2-inch wide area. Rough the area with 50 grit on a slow-speed grinder, and then featheredge with 80 grit on a DA sander.
Tip: Don’t use a high-speed sander or grinder on the surface. The speed and the amount of time the tool is applied to the surface will generate heat. This can work against you and cause the plastic to deform and/or smear. Use new or unworn sanding abrasives at a slow speed and for short time segments.
Once preparation is complete, the welding process has begun. In this case, a true “welding” isn’t going to occur. The process resembles closely what we’ve called a brazing process for steels. The welding rod has very good adhesive abilities and in essence “glues” the damage together with itself.
5. With the airless welder set to the highest temperature, use the round tip rather than the speed tip to melt the universal welding rod onto the surface.
6. Achieve the best adhesion by pre-melting one side of the end of the rod, and then flipping the rod over so the melted portion sticks to the plastic.
7. Cut off the melted part of the ribbon using the edge of the welder tip, and spread the welding rod into the bevel’s root. Don’t attempt to melt the base material together with the welding rod.
8. After the welding rod on the backside cools (you may force cool it with water), repeat the beveling and welding process on the front side. Build the universal rod slightly higher than the surface. The universal rod is also a sandable filler.
9. After the welding rod cools (you also may force cool it with water), use a DA sander at a low speed with 80-grit abrasive to level the welding rod to contour. If additional filler is needed, use a final filler per manufacturer’s directions.
The Nagging Repairs
Even though repairs of front and rear facias are the most common and economical for the collision repair industry, many other types of plastics and damage don’t lend themselves to normal welding and adhesive repairs. Also, the increased use of other “hard plastics” on motorcycles, snowmobiles and water sports equipment has introduced a different need of repair.
Generally, these repairs consist of a clean break at a corner and/or edge and may include a tab, mounting stud, hole or even a threaded hole – and they’re often in high stress areas. These types of damages can also be seen on many other collision-damaged parts. Headlight mounting panels, grilles and shields all are examples of the same type of damage. And again, we generally replace vs. repair.
The last innovation for this article provides a unique method of handling these repairs. Many times, the corner, tab or mounting tube is lost or damaged beyond use. The uniqueness of this system revolves around the ability to create the piece that’s needed.
The process includes a material that’s referred to as a molding bar. This material is used to create a mold for the replacement of the damaged, missing section, and the material maintains a form very well at room temperature.
As with all repairs, the cleaning process is completed before preparation. Once prep is performed, a good tab, stud or corner is used to create a mold for the damaged piece(s). The process begins with the molding bar:
1. Drop the molding bar into water that’s about 130 degrees F. The bar becomes moldable until it cools.
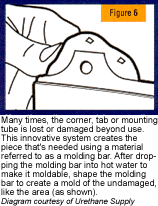
2. Use the molding bar to create a mold of the undamaged, like area (Figure 6).
3. Prepare the damaged area for the new piece, similar to other repair methods. Bevel the damaged area from both sides where the new piece will be bonded and extend so the material has sufficient bonding area.
4. Transfer the cooled molding bar to the damaged area.
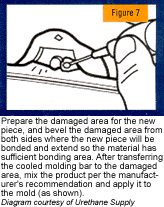
5. Mix the product per the manufacturer’s recommendations and apply it to the mold (Figure 7).
Profiting from Plastics
The scope of this article allowed me to discuss three innovations currently available, but many additional ones weren’t covered here – such as the stainless steel mess repair, the creation of a threaded mounting tab or stud, and re-texturing. And as changes continue to occur at the OEM level, the aftermarket manufacturers of products and services will continue to develop new and better methods.
Our industry, like any other, resists change even when that change is a good idea. We did it when plastic filler was first introduced in the 1960s, when third-generation unibodies and basecoat systems were introduced in the ’80s, with HVLP guns and airbags in the ’90s, and with Internet communication in 2000. One of my favorite sayings is this: Change will happen continually – with or without you.
I hope you continually look for innovations and ideas that make repairs easier, cheaper, faster and better. And I hope you understand that if you don’t, someone else will.
Contributing Editor Tony Passwater is president of AEII, a consulting, training and system-development company. He’s been in the industry for more than 27 years; has been a collision repair facility owner, vocational educator and I-CAR international Instructor; and has taught seminars across North America, Korea and China. He can be contacted at (317) 290-0611, ext. 101, or at ([email protected]). Visit his Web site at www.aeii.net for more information.
Special thanks to Jim Rogers of Crest Industries, Kurt Lammon of Urethane Supply Company and Tim Lewis of G T Motorsports for the information they supplied me for this article.
|
Categories of Plastics
|

