Owning the most advanced measuring system and developing a brilliant repair plan based on the damage found
doesn’t guarantee you’ll able to repair the vehicle. It’s a great start, but if you can’t make the structural damage move in the direction necessary to correct the dimensions, you’re still left with a mangled vehicle and an angry customer (who may want to mangle your face).
But it doesn’t have to come to this. You’re a collision repairer, not Rocky Balboa.
To prevent your face from having to absorb the energy from a customer’s left hook, let’s take a look at how today’s cars absorb the energy from a collision:
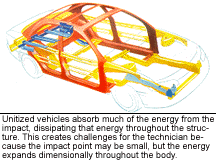
Unitized vehicles absorb much of the energy from the impact, dissipating that energy throughout the structure. This creates challenges for the technician because the impact point may be small, but the energy expands dimensionally throughout the body. With conventional full-frame vehicles (which have made a comeback in the past few years), you could use a limited number of pulls in a single direction, using brute force to overpower the frame. Hiya! But with unibodies, brute force isn’t the strategy you want to adopt — unless you want to tear the vehicle in half. The point-of-impact area on unibody construction isn’t normally strong enough to pull all the dissipated damage into alignment, unless the damage is very minor. So if you use the "Hiya!" pulling approach on unibodies, you may again find yourself facing an angry customer who wants to "Hiya!" your face.
To help keep your face intact — along with your customers’ vehicles — the following procedure describes repair methods and inspection requirements for straightening structural parts using hydraulic pulling equipment, and much of it is being re-printed courtesy of I-CAR, as written in its Uniform Procedures for Collision Repair (UPCR). Note: Based on UPCR, your anchoring equipment must be capable of working with a 3-D measuring system, holding the vehicle solidly in place, holding the vehicle at a minimum of four locations and distributing the forces of multiple pulls. Your pulling equipment must be capable of making multiple pulls; working with a 3-D measuring system; monitoring the pulling pressure; making pulls in any direction, at any angle; and applying the forces necessary to return the damaged area to proper dimensions.
Parts Protection
To protect computers and other sensitive parts from damage:
• Follow the vehicle maker’s recommendations for recording and re-setting electronic memories.
• Ensure the ignition switch is in the lock position and the key is removed.
• Disconnect and isolate the negative battery cable, and disarm the passive restraint system. Follow the vehicle maker’s recommendations.
• Carefully remove computer modules when welding or heating within 300 mm (12 inches) or a greater distance when recommended by the vehicle maker.
• Protect computer modules, connectors and wiring from dirt, heat, static electricity and moisture.
• Loosen or remove any wiring harnesses or electrical parts that could be damaged during the repair process.
• Remove the battery if it’s near an area to be heated. To protect mechanical system parts:
• Don’t use undamaged mechanical parts as attachment points for pulling.
• Ensure chains, clamps and anchoring devices aren’t crushing, pinching or applying pressure on undamaged mechanical parts.
• Remove parts or loosen their mounting points if pulling could damage them.
• Follow the vehicle maker’s recommendations for disconnection, removal and installation of mechanical parts.
• Protect any open lines or hoses from contamination.
Anchors Away!
To anchor the vehicle:
1. Determine the anchoring locations and required adapters or methods. Use vehicle repair information or anchoring equipment instructions. The anchoring locations must be able to withstand the pulling forces to be applied.
2. Remove parts if required for access to anchor locations.
3. Remove grease and undercoatings from the areas where anchoring clamps will be installed.
4. Reposition or remove brake and fuel lines and wiring harnesses to avoid damage, and provide clearance for the pulling and measuring systems. Inspect for missing or damaged fasteners, mounting hardware, etc. Plan to replace any damaged parts.
5. Support the suspension system. Follow the vehicle and equipment makers’ recommendations.
6. Tighten the clamp fasteners securely. Follow the equipment maker’s instructions. On systems using chains, remove all slack and twists from the chains.
7. Re-tighten the anchoring clamps after the initial pull.
8. Add additional anchoring locations as necessary to prevent damage and to aid in the pulling process.
9. Restore corrosion protection and refinish all anchoring locations after straightening is completed.
Block and Hold
BodyShop Business contributing editor Tony Passwater also recommends blocking and holding the vehicle to aid in the pulling process.
• Blocking is a process that allows the use of leverage to ensure the pulling force is concentrated to the proper area of damage. It also allows for the block to place force — normally upward — at a damaged area needing upward movement or to keep an area from moving downward during the pulling process of another area.
As with anchoring clamps, the force the block places on its location is determined by the amount of force placed against it during pulling. A block placed under a cross member or structural member will exert the same force upward as the pull is directing downward. "This is really useful when restoring datum mis-alignment," says Passwater.
During pulling, some of the force is absorbed in the body due to flexing of the unitized structure. The additional force necessary to create movement in the damaged area from the loss when the body flexes can cause the pulling clamp areas to tear. Blocking can also assist in reducing flexing.
• Holding fixtures, such as a turn buckle, can also assist in eliminating body flexing. A turn buckle has small clamps on each end that can be mounted in a door opening and tightened to lessen the upper body from flexing.
Passwater says proper anchoring, blocking and holding are critical to successful structural repairs. "With many frame-type vehicles," says Passwater, "a multiple-size frame hold clamp is used. In many cases, I’ve seen it become a very successful ‘can opener,’ which is caused by the clamp being pulled downward rather than horizontally during the pulling."
To stop this from happening, Passwater recommends keeping the clamp horizontal. How? One way is to place blocks under the clamp so it can’t pull down at the mounting hold. Another way is to place a small hydraulic ram on the clamp to keep it horizontal. Keeping the clamp horizontal is the goal, says Passwater, even if the chain is angled downward 45 degrees.
The Pulling Process
To correct structural damage:
1. Develop a repair plan by determining the location of all damage and the direction of impact. Use a 3-D measuring system to verify the damage. Record and compare the vehicle measurements to the dimension specifications. Determine which parts must be removed for access, the number and direction of pulls, and any pushing or blocking requirements.
2. Attach pulling clamps, weld-on tabs or other devices to areas that will allow the damage to be removed, reversing the direction of damage.
3. Set up multiple pulls, if necessary, to remove as much damage as possible at one time and to prevent tearing or distorting the metal.
4. Apply pressure evenly to all points at one time, or pull small amounts at a time, moving from one attachment point to another, depending on the plan.
5. Monitor the pulling process visually, including spot weld locations. It may be necessary to re-weld damaged spot welds before or after the pulling process. Measure the complete vehicle to ensure all damage is being corrected.
6. Correct secondary damage and damage farthest from the impact point before removing all primary damage. Follow a last-in, first-out order.
7. Relieve stress frequently throughout the pulling process. (Keep in mind that many manufacturers don’t approve the use of heat for stress relieving). Monitor the pulling pressure to ensure stress is being relieved.
8. Continue pulling until the dimensional alignment is restored.
9. A calculated over-pull may be necessary to allow the parts to stay in correct dimensional alignment when the pulling pressure is released. If not, the process must be repeated.
10. Use a 3-D measuring system to verify the repair. Record the measurements.
11. Restore the corrosion protection to the repaired areas and to the areas where anchoring and pulling clamps were installed.
12. Refinish as necessary to restore the appearance.
After pulling, inspect for proper dimensional alignment. The tolerance for unibody vehicles is ±3 mm (1/8 inch), unless the vehicle maker specifies less. This tolerance is for individual measurements, as well as the overall length of the vehicle. The tolerance for body-over-frame construction is ±5 MM (3/16 inch), unless the vehicle maker specifies otherwise. Verify the operation of all closure panels, including proper gaps and margins.
Next, inspect the straightened structure or frame for any visible damage; shiny, silvery splinters in the stressed area; and improper corrosion protection. Note: A dye penetrant may aid in locating minor stress cracks in the repair area.
If any of the above defects are found, the parts may have to be replaced. If excessive overpulling occurred, the parts will usually have to be replaced. Follow the vehicle maker’s guidelines for replacement of structural parts.
Inspect all re-installed fasteners for replacement of one-time fasteners and proper torque.
Think About It
Pulling isn’t simply about yanking the vehicle until it pops back to its original shape — it’s about understanding how the vehicle reacted to the impact and understanding what you need to do to bring it back to pre-accident condition. It requires thought — not just action.
One thing to think about is the direction of pulls. Why? Just because the impact was from the front doesn’t mean all the pulls will be directed forward. Many designed bends in a structural member deflect collision energy in a direction other than straight backward. These areas are usually in secondary damage areas and are sometimes difficult to move during initial pulling.
Another thing to think about is what the term "multiple pulls" means. In part, it means dividing the pulling force into more than one area, but it also means pulling in the direction the damage needs to move. Many times, the impact has caused an area to move in a direction unlike the primary impact direction. If pulls are made only in the opposite direction of the primary damage, these areas will have a difficult time returning, so they must be helped with pulls or blocks to move them in the right direction when the other primary damage is moving.
Consider a frontal collision, when the energy has traveled up through the A-pillar (windshield post) and caused the roof panel to buckle at the B-pillar (door rear post). This buckle wasn’t caused because the roof panel moved backward (primary frontal impact), but because the front portion of the roof moved upward from the A-pillar. Since the roof is anchored with the B-pillar, it becomes a hinge point and buckles. So if you attempt to pull just from the front, it generally won’t restore the roof back down to the proper location. This is where the turn buckle can be used to pull the front corner of the roof down and hold it in place during the rest of the repairs, lessening body flex and removing buckle stress.
Another thing to think about is the force you’re applying to a unitized structure. Passwater says that if you have to use anything more than 2,500 to 3,000 pounds, your pulling plan probably isn’t correct. "There may be times in very reinforced center-section areas that this suggested limit is reached, but normally I’ve found that staying below 2,500 pounds is an achievable goal."
To help reduce the amount of force needed to pull today’s vehicles, identify anything that may be restricting the damage from moving. This could include an engine cradle or cross member. "You may also want to unbolt a front bolt of a damaged engine cradle to allow for the rest of the structure to move," says Passwater. "If the rear engine-cradle mounting area is out of specs, then a pull can be added to the cradle itself to pull that location while the other structure is being pulled."
It may also help to cut away some of the primary damage to allow access to the rest of the structural damage.
Pulling for You
Not everyone can successfully pull a vehicle — if they could, you’d be out of work. But not all collision repairers can successfully pull a vehicle either.
This isn’t good.
Take advantage of training offered by your equipment manufacturer and also the independent training programs offered by various sources in the industry. Training will ensure that you and your staff are not only properly trained on the equipment, but also on the most efficient repair process.
And that’s what it’s all about: efficiently producing quality repairs. Not understanding the pulling process slows down productivity, lessens profits and increases the chances of an angry customer wanting to mangle your face because you didn’t properly repair his mangled car. Don’t take this the wrong way, but you’re probably more capable of mastering the pulling process than becoming the next Italian Stallion.
Writer Georgina Kajganic is editor of BodyShop Business. Much of the technical information provided in this article has been re-printed courtesy of I-CAR, as written in its Uniform Procedures for Collision Repair (UPCR).


