 How is your cycle time? Could it be improved? Do you remove your own glass for collision repair? Do you install your own? How many times have you waited to proceed with a vehicle because the glass technician didn’t show up yet to pull the glass? How many times have you waited for the glass technician to come and install the glass?
These are a lot of questions, I know, but they’re questions you should be asking. If you don’t have a cycle time issue involving glass, congratulations! You’re doing awesome. But if your cycle time has been negatively impacted, here are some ideas that may help. We’ll also cover some procedures to help you avoid making costly mistakes.
Three Scenarios
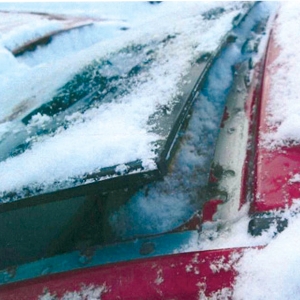
We’ve seen it many times in the past: the shop calls to have glass removed from a vehicle. Some time later, the glass tech shows up and removes the glass. There are three likely outcomes that will occur on R&I of a stationary or adhesive-bonded glass:
- The glass breaks or is damaged beyond reusability. This is a 50/50 chance as the glass is designed to stay in the car during a crash. You then must purchase new glass and charge for installing it.
- The glass is saved with no damage to it or the pinchweld. This is awesome! The glass can then be installed at a later date.
- The glass is saved but the pinchweld is damaged by the removal process. That’s good for the glass, but now we need to repair the metal. This may not be an issue if the panel is to be replaced or refinished, but it could add some work to the repair. If this does happen, check the P-pages for times allotted for repair. Hmmm…checking the P-pages for information. That seems like a good idea!
Scheduling
Let’s talk scheduling first. If you sublet repairs, call the glass tech as soon as possible for the removal. We know it’s a two-trip process for R&I of most glass. When the glass is removed, set up an appointment for installation. If you’re having morning shop meetings and watching cycle time, you know when the vehicle is scheduled to come out of the paint booth.
If the time changes, keep the glass tech in the loop just as you would a customer. This will help them schedule their day better and not wreck your schedule, which will ultimately help you build a good working partnership with them.
If you do your own R&I of glass or are considering it, the same three outcomes we discussed earlier are possible. How do you increase the chance of successfully removing the glass and not damaging the pinchweld? Over the past few years, this issue has been a hot topic as damage to steels, the cost of repair and the cost of glass has increased. With more aluminum-intensive vehicles such as the Ford F-150 being delivered soon, damage to metals and procedures to repair this damage and prep metal will change. Not being prepared for these changes could lead to costly mistakes.
Can It Be Done?
Let’s start with first steps first. We’ve scheduled whomever is to remove the glass. The first order of business is to establish if it can be done. Some windows cannot be R&I’d. An example is the small vent windows in the front and rear of the Toyota Prius. Toyota states they’re one-time use parts and are a structural part of the vehicle. Toyota also has priced them well below the cost to R&I to make it cost prohibitive to R&I.
The other glass that cannot be R&I’d is the non-factory installed glass. This would be glass that has been replaced already. As all glass is structural and has liability, the Auto Glass Safety Council (AGSC) has provided a standard known as the Auto Glass Replacement Safety Standard (AGRSS) that dictates procedures for safe installation of auto glass. The purpose of the document is to protect consumers from improper procedures and prevent injury and loss of life. Visit the AGSC website at www.autoglasssafetycouncil.org to see the AGRSS Standard and find shops that are AGSC accredited.
The adhesive-bonded glass that is not from the factory may not have been replaced or prepped properly. Because of the unknown products or procedures, urethane adhesive companies will not honor or warranty its installation. This puts an incredible amount of liability on the glass technician. The standard does address the issue, and there’s an interpretation on their website as to why the use of used or recycled glass is not allowed by the adhesive companies.
 What’s the Substrate?
So now we’ve established that the glass can be removed. If the vehicle is an unfamiliar year and model, the technician will need a magnet to establish if the pinchweld or panel is steel, aluminum or plastic. If the magnet sticks, we have steel. If not, we have something else. Most likely it will be aluminum if the glass is on the body of the vehicle. If it’s a metal tailgate, you’ll need to look up what type of metal it is – not just the outer skin but the inner shell also. Lincoln has vehicles such as the MKZ where the tailgate is an aluminum skin on a magnesium shell. If the shop or technician is using induction tools for glass removal, this combination could be a disaster. Also, beware of heat being used on adhesive-bonded panels and high strength and ultra high strength steels. Heat becomes the enemy in these applications.
If you ever need to establish the difference between aluminum and magnesium, find a shiny spot void of paint or primer, apply white vinegar to an exposed area, then watch for a reaction. If it remains clear, it’s aluminum; if it bubbles, it’s magnesium. This identification process can be done much faster by looking up what the substrate is in repair manuals. If plastic or SMC or even carbon fiber, then you must adjust removal procedures accordingly.
Identifying the substrate is a critical process for two reasons. The technician removing the glass needs to know what tools can be used so as not to damage the glass and also not damage the vehicle itself. The second reason is to ensure he uses the correct primers and adhesives for installation. The body shop technician and paint technician will also need to know substrates to correctly repair and paint the vehicle.
The goal is to remove the glass and limit damage to both the glass and the vehicle. Admittedly, though, damage is sometimes going to occur due to design challenges or simply because “stuff happens.” We want to limit those issues as much as possible, though, because a shop with a high glass breakage rate could face challenges from two sides: first, a customer may not be too happy to get a phone call saying that the glass broke and there will be an added expense. Second, insurance carriers look at extra costs and wonder who’s responsible. Is it from design challenges, “stuff happens” or a lack of discipline? When the insurer compares what’s happening at your shop to other shops in the area, it won’t take them long to figure out the real reason for the breakage.
 Tools
Tools
The traditional tools of the past such as cold knives have limited use in the R&I of glass. Encapsulated glass and recessed moldings limit their ability to work.
Power tools have an advantage over hand tools as they’re faster and more flexible. Depending on the blades, they will have good reach for better access. In the proper hands, these tools can do major work with little effort. In the wrong hands or on glass that’s difficult to remove, the tools can and will do major damage to a pinchweld area, which will involve sanding, priming and painting to fix or, worst case, metal replacement. The damage at the time of removal, though, is only part of the problem. Failure to properly repair the damage can lead to corrosion or glass failure later – a warranty and/or liability nobody wants.
There has been a resurgence in wire tools for glass removal, but they’re being used much differently than the old two-man wire method. The design of wire into a square and the much higher tensile strength make these tools easier to operate and less able to cause damage, if any. If the steel wire is not the best method to use, some systems use a string in its place. But this is no normal string cord – it’s incredibly strong to cut through urethane adhesive. It also has an advantage over wire as it can be reused.
Basic designs have the string or wire placed around the outside perimeter under moldings. The ends are brought inside through the urethane to the interior of the vehicle. There are many systems, but the operations are similar. One end is anchored to a suction cup or tool placed on the interior side of the glass, while the other is anchored to a rotating, winch-style tool attached to the glass by a suction cup that’s also set up on the interior side of the glass. This winch is then rotated by a ratchet power screwdriver or winding crank to pull cord or wire through the urethane at an angle that makes cutting fairly easy. The tools are adjusted periodically to maintain the best cutting angle. The removal process removes glass and moldings together, and damage is reduced or eliminated during removal. Keep in mind that no tool is perfect, but I’ve found these wire tools to be consistent. The learning curve can be a challenge but, when mastered, they’re fast and incredibly efficient.
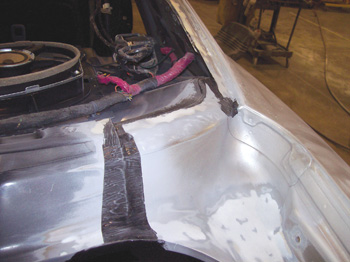
Damage Done
What happens if damage occurs? Then proper procedures for repairing the pinchweld must be followed. Scratches or damage must be sanded and primed. No grinding! Thinning of the metal in any way is unacceptable for repairs. The structural integrity of the vehicle is the No. 1 priority. Grinding also creates heat, which may release adhesives that hold the panels together. If adhesive is compromised, the panel may need to be re-installed or replaced. If the damage leaves bare metal exposed in excess of one square inch, an epoxy primer must be used. This is an important note that can be found in many adhesive manufacturer and vehicle manufacturer instructions. Failure to follow these instructions can cause glass retention failure or corrosion.
Ford (F-150), Toyota and other vehicle manufacturers call for this method in their procedures. Epoxy primer is a barrier coat to keep out moisture and protect against corrosion. It’s also the best surface for the urethane adhesive manufacturers’ black pinchweld primer to adhere to. The pinchweld primer used for glass is meant for touch-ups and bonding to epoxy primers. Application by daubers gives inconsistent mil thickness and coverage to be used by themselves to cover bare metal. Urethane cures by absorbing moisture to cause the chemical reaction to cure. If moisture is drawn in and permeates primer to bare metal, corrosion will result. This again leads to liability and warranty issues.
Painting pinchweld areas is not a recommended practice by many vehicle manufacturers, paint companies and urethane adhesive suppliers. Although vehicles may be painted at factories when assembled, we all know the procedure when painting in the aftermarket is different.
Paint cure and adhesion of paint becomes an issue. Urethane adhesives used for glass replacement are solvent-free, and paints and clearcoats contain solvents. When a vehicle is painted by a body shop, solvents are released for months until full cure. A solvent-free product that’s absorbing solvent from the paint will create an incompatibility and lead to product failure. This is why epoxy primer is recommended on pinchwelds, and also why they should be taped off with 3M ¾-inch green tape. (This is the only tape I know that won’t leave a residue on the primer). Once the refinish is done, the tape is removed and you have a nice, clean epoxy primer surface to bond to. Note that etching primers do not form a barrier coat and are not recommended for this procedure. All you need is a light scuff of epoxy primer, and make sure to follow all procedures recommended by the adhesive manufacturer.
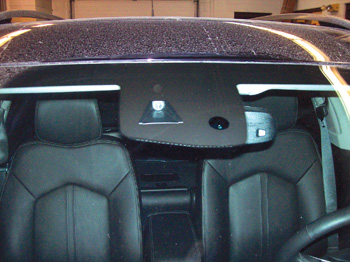
I recommend getting body technicians adhesive-company certified. All these procedures are also relevant to adhesively bonding roofs on new vehicles. Knowing cure times and prep procedures on the glass and body of the vehicle is a critical component of auto body repair.
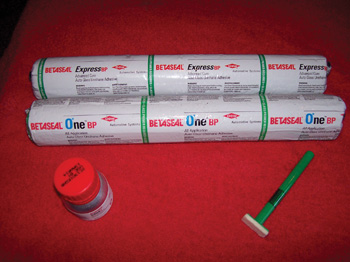
Urethanes and Primers
Be sure your technicians or the company you’re using knows the proper urethanes and primers for different materials. The urethane being used on a Honda Civic may not be the urethane required for the F-150 or other aluminum parts. These parts require a non-conductive urethane, as carbon in conductive urethanes may cause corrosion on aluminum panels.
Another consideration is that many European cars require a high modulus urethane that’s stiffer when cured to maintain body rigidity while driving.
 Cycle Time Impact
Many shops are doing their own R&I, which is great. Some shops want to get into the procedure to save time and improve cycle time, which is great, too. I’ve also seen shops that combine the two. Since the removal requires the most technical ability and experience, many shops will remove the easier parts and call the glass tech for the more difficult ones. This usually has little effect on cycle time.
The wait for installation can have a major effect on cycle time. Timing could be all messed up, and then the car gets delayed a day. Training a tech for the installation part of the R&I may be more feasible to reduce costs and delays. Once the glass is removed, installation is similar in all vehicles. But make sure to get the technician adhesive-certified before installing any glass. By installing in-house, the vehicle will move faster to delivery. Practice is what makes a technician more proficient in removal, and that will come with time. The nice thing is tools are getting better and faster. Checking out doing your own glass work would be a wise business choice. Being educated about issues is even better.
Certification Pays
I do want to stress a final point in this article. Being an adhesive-certified technician will give you the basics for stationary glass installation. I recommend taking the I-CAR GLA01 and GLA02 courses. Even then, the installation of windshields should be done by AGRSS-certified technicians. The liability in windshield installation is enormous to any company. Many lawsuits get filed over failed installations. If the quarter glass or backglass are beyond the technician’s capability, call an AGRSS-registered company. Your shop’s name and reputation are worth it.
Mitch Becker is a technical instructor for ABRA Auto Body & Glass. Contact him at (763) 585-6411 or [email protected].


