Whew! You’ve just finished pulling a severely damaged vehicle back to specifications. You can pat yourself on the back for a task well done, but don’t break your arm doing it because your job isn’t done yet. After you’ve finished pulling, it’s essential to restore corrosion protection to the repaired areas and to those areas where anchoring or pulling clamps were installed.
The mission of the collision industry is to restore a vehicle that’s been in an accident to its pre-loss condition. This means the repaired vehicle will behave in the same manner structurally if it’s involved in another accident and will have the same paint warranty and corrosion protection as applied by the vehicle manufacturer.
Of those three areas, corrosion protection is the least understood — until you read this article, that is.
Corrosion Is Bad
Corrosion is a chemical process that starts with iron, oxygen and moisture (electrolyte) to form the chemical compound ferrous oxide, more commonly know as rust. As rust begins to spread, it eats away at the steel, making it progressively weaker.
Vehicle manufacturers have developed methods to protect the steel on today’s vehicles through a process called galvanizion. This process coats one or both sides of the metal with zinc. When zinc is exposed to moisture and air, it forms zinc oxide, which acts as a barrier against corrosion.
As collision repairers, it’s up to restore this and other protective measures to vehicles that have been involved in a collision.

Armed for Battle
What products can we use to restore corrosion protection?
• Weld-through primer — The first product we need is weld-through primer, which can be brushed or sprayed on and works by coating the bare steel with zinc. To illustrate its importance, I plug-welded two pieces of steel together. On the first pair, I used weld-through primer; on the second, I used none. After seven days, I peeled back the coupons and found the weld site on the uncoated metal was covered with rust, but none had formed on the coated metal. (See Figure 1.)
If you choose to use weld-through primer as a corrosion protector, keep a couple things in mind:
1. Weld-through primer has poor adhesion qualities and shouldn’t be used over larger areas.
2. Check with your paint system manufacturer to see if they recommend its use.
• Sealers — Unitized vehicles are constructed by welding various components together. It’s very critical that the resultant seams and joints have the proper anti-corrosion materials applied to them because of their vulnerability. When we replace a damaged panel, we must re-seal these joints and seams, and the products that accomplish this task are commonly called sealers. These products work by filling gaps and sealing seams from air, moisture, exhaust fumes and road noise. They’re applied by spraying, brushing and pneumatic guns. Before applying any sealer, check the vehicle manufacturer’s repair manual for the location and type of sealant necessary.
• Rust proofing materials — Rust proofing materials (also known as cavity wax) are waxy compounds made from non-hardening material designed to flow into cracks and crevices to seal areas that aren’t accessible using conventional materials. This product can be used in interior closed surfaces (inside hood ledges, deck lid ledges, front and rear rails, and inside door shells). Before application, consult the vehicle manufacturer’s repair manual for recommended usage.
• Undercoatings — Another category of anti-rust treatment is undercoatings. These compounds are applied to exposed exterior surfaces (aprons, wheel wells, body underside and lower portions of fenders, doors and quarter panels) and are sprayed on before painting. They prevent damage to sheet metal from flying stones.
• Corrosion protection primers — Corrosion protection primers are applied directly to bare and uncoated steels (replaces E-coat). There are two types of these primers, and you can use either one. The first is a self-etch primer, which can be a single- or two-part component material. The second is a two-component epoxy primer. Both types have excellent properties for adhering to bare metal but shouldn’t be confused with high-build polyurethane primers. Some paint manufacturers have developed two-part primers that work like both epoxy primer and a high-build polyurethane primer.
Finish the Job
With corrosion protection in mind, let’s look at a typical panel repair after the vehicle has been straightened:
1. Carefully remove the interior trim panel and moisture barrier.
2. Remove the outside door handle, belt molding, side molding and outside mirror.
3. Mask off all openings.

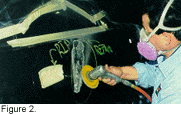
4. Expose the bare metal with a 36-grit sander. (See Figure 2.)
5. Remove the dent with a dent-removal system.
6. Check for low areas and continue to use the system until the dent has been removed.
7. Remove high spots with a “picking” hammer. (See Figure 3.)
8. Smooth the surface with a disc grinder.
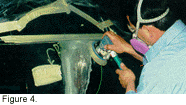
9. Featheredge the surrounding area about 2 inches back. (See Figure 4.)
10. Apply self-etch primer to the bare metal.
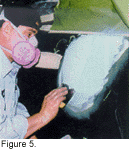
11. Apply body filler over the primed area (you need to use a high-quality body filler that will go directly over the primer). (See Figure 5.)
12. Apply gravel guard material to the lower section of the door.
13. Mask off vehicle again.
14. Apply one to two light coats of epoxy or self-etch primer to repaired areas.
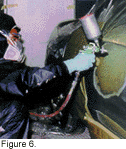
15. Apply one to two coats of polyurethane primer to repaired areas. (See Figure 6.)
16. Prep, refinish, polish and assemble.
The procedures I’ve described comprise a generic method of restoring corrosion protection to a damaged panel. Before you start the process, check with your particular paint company and follow the recommended procedures for corrosion protection and warranty. Remember, your job isn’t complete until the vehicle is back to pre-accident condition.
Contributing editor Toby Chess is director of technical training for Caliber Collision Centers. He’s also the Los Angeles I-CAR chairman, an I-CAR instructor and a certified ASE Master Technician.


