 A new car is in the shop, and the front end looks like it ran into a tree. Turns out it did! So what’s it going to take to get it back on the road? Well, it starts with you, the estimator. As an estimator, you need experience, good judgment, diplomatic skills and accurate information.
As far as experience, judgment and diplomacy go, you either have them or you don’t. We can’t really help you there. But when it comes to information, that’s a different story. Today, every model year brings innovations: materials technology, electronic systems, finishes, vehicle drivetrains, steering and suspension, etc.
Can you develop a repair plan just by looking? How about an educated guess, or calling your friend who worked on one of these vehicles once? Sorry, the old ways just don’t work anymore!
Information is the key – but not just any information. You need manufacturers’ information. OE procedures and guidelines are absolutely required to efficiently and effectively repair today’s vehicles. You need them to write a repair plan. Your parts manager may need them to order the correct parts the first time. And, of course, your technicians need OE information to make accurate repairs in the shortest amount of time possible.
Repair Plan
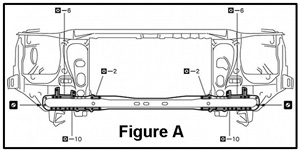
Back to the car in the shop. You start to build your repair plan. As an experienced estimator, you probably have a good sense of how deep the damage goes. But what about that frame rail? Can you section it? (Figure A). Are you sure? Can you tell what kind of steel is used in each location? Those are just a couple of factors that will make a difference in the estimate…and, ultimately, in the profitability of the job. Of course, profit isn’t the only concern. Your primary mission is to deliver a vehicle that’s safe to drive. That’s really the bottom line, isn’t it?
Here are some of the questions you may have to wrestle with:
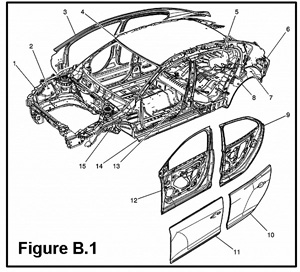
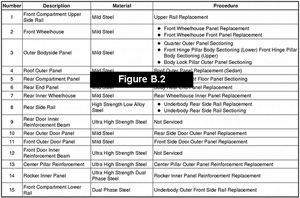
• How do I determine the types of construction materials?
• Is the part I’m repairing made from high strength steel? Ultra high strength steel? Dual phase steel? High strength low alloy steel?
(Figures B.1 & B.2).
• How do I know for sure if the manufacturer says it’s safe to section a particular component?
• Do I have all the information I need for a safe, reliable yet efficient repair, including electronic system reset or reprogramming procedures?
• Will my estimate comply with my shop’s DRP agreements (if you participate in one)?
• Will the shop make money on the job?
• Do I have the precautions I need to work safely? What are the special safety concerns for hybrid vehicles? With hybrids, the safety of the technician and the vehicle needs extra attention. (Figure C).
Figure C: Precautionary Statements for a 2011 Toyota Prius
CAUTION: Pressing the power switch with the brake pedal depressed causes the system to enter the READY-on state. This is very dangerous because high voltage may be applied to the inspection area.
NOTICE: A short circuit to ground may occur if the AMD terminal is disconnected before the cable is disconnected from the negative (-) terminal of the auxiliary battery. If a short circuit to round occurs, it can result in an open circuit in a fusible link or fuse.
NOTICE: When the cable is disconnected from the negative (-) battery teminal, initialize the following system(s) after the cable is reconnected: Advanced Parking Guidance System.
OE Information
OE information is the gold standard for collision repair. When developing a repair plan, OE repair information helps you:
• Increase estimate accuracy for collision and mechanical repairs.
• Identify proper repair procedures to reduce supplements.
• Provide required documentation to customers and insurers.
• Increase sales and consumer confidence with a professional explanation of necessary repairs.
• Manage costly vehicle returns.
Here is an excerpt of an OE repair article for a 2011 Buick Regal A-pillar – front hinge pillar body sectioning (upper).
Service Information
Always refer to ALLDATA for safety procedures, identification of material types, recommended refinish materials, removal and installation procedures. Always refer to the vehicle manufacturer for questions relating to applicable or non-applicable warranty repair information.
Removal Procedure
WARNING: Sectioning should be performed only in the recommended areas. Failure to do so may compromise the structural integrity of the vehicle and cause personal injury if the vehicle is in a collision. The body side outer panels are available in one-piece side frames. You can perform any one of these replacement procedures separately or in any combination, depending upon the extent of damage to the vehicle. Sectioning must take place in specified areas only. Stay away from the door and window opening radius areas. Perform sectioning only in straight areas of the openings.
1. Disable the SIR system.
2. Disconnect the negative battery cable.
3. Remove all related panels and components.
4. Repair as much of the damaged area as possible.
5. Remove the sealers and anti-corrosion materials from the repair area, as necessary.
NOTE: Sectioning can be done anywhere in the straight area along the rocker panel.
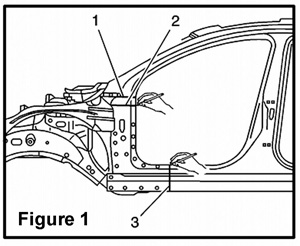
6. On the A-pillar, measure down 100 mm from the door wiring conduit hole lower edge (1). Mark this cut location on the front hinge pillar (2). Mark a cut location in the straight area on the rocker panel (3) (Figure 1).
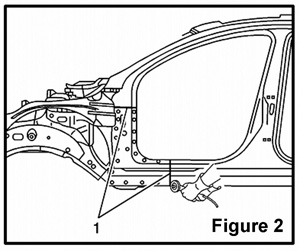
7. Cut the front hinge pillar body where sectioning is to be performed (1) (Figure 2).
8. Locate and mark all the necessary factory welds on the front hinge pillar body. NOTE: Record the number and location of welds for installation of the service assembly.
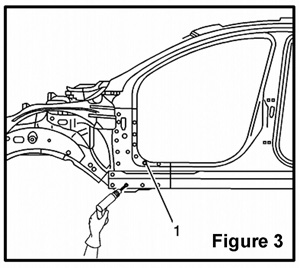
9. Drill out all factory welds (1) (Figure 3).
10. Remove the damaged front hinge pillar body.
Installation Procedure
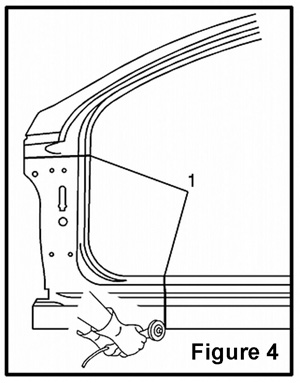
1. Cut the replacement hinge pillar in corresponding locations to fit the vehicle (1) (Figure 4). The panel should be trimmed to allow a gap 1-1/2 the metal thickness at the sectioning location.
2. Create a 50 mm (2-inch) backing plate from the unused portion of the service part for the A-pillar area.
3. Create a 100 mm (4-inch) backing plate from the unused portion of the service part for the rocker area.
4. Trim the backing plates as necessary to fit behind the panel at the sectioning joint.
5. Drill 8 mm (5/16-inch) plug weld holes along the sectioning area in the service part, and at the locations noted from the original panel.
6. Prepare all mating surfaces.
7. Apply weld-through coating to all mating surfaces.
8. Fit the backing plates halfway into the sectioning joints, 25 mm (1-inch) at the A-pillar area and 50 mm (2 inches) at the rocker panel areas. Clamp the plates in place and plug weld to the section joint.
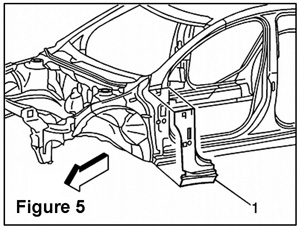
9. Position the outer front pillar to the vehicle using three-dimensional measuring equipment (1) (Figure 5). Clamp the pillar in place.
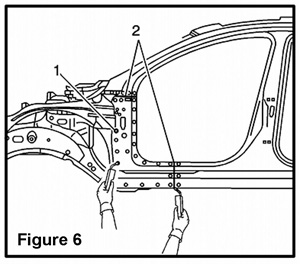
10. Plug weld accordingly (1) (Figure 6).
11. Stitch weld the butt weld locations (2) (Figure 6).
12. To create a solid weld with minimum heat distortion, make a 25 mm (1-inch) stitch weld along the seam with gaps of 25 mm (1-inch). Go back and complete the stitch weld.
13. Clean and prepare all of the welded surfaces.
14. Apply the sealers and anti-corrosion materials to the repair area, as necessary.
15. Paint the repaired area.
16. Install all of the related panels and components.
17. Connect the negative battery cable.
18. Enable the SIR system.
NOTE: This repair/service procedure is excerpted from information published by the vehicle manufacturer and is intended for the purpose of promoting OE collision repair information to trained, professional technicians with the knowledge, tools and equipment to do the job properly and safely. Before attempting the repair described, refer to the complete article in ALLDATA Collision S3500. It’s recommended that this procedure not be performed by “do-it-yourselfers.”
Dan Espersen is ALLDATA’s collision senior program manager. He’s a well-regarded collision expert with over 35 years of experience in the automotive industry. He’s a gold pin member of the Collision Industry Conference (CIC) and holds an AA degree in automotive technology. Edited by technical writer Jeff Webster. © 2011 ALLDATA LLC. All rights reserved. All technical information, images and specifications are from ALLDATA Collision S3500. ALLDATA is a registered trademark and ALLDATA Collision is a mark of ALLDATA LLC. Toyota and Prius are registered trademarks of Toyota Motor Corporation and/or Toyota Motor North America. Buick and Regal are registered trademarks of General Motors Company. 3M is a trademark of 3M Corporation. All other marks are the property of their respective holders.


