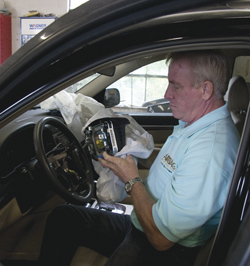
Over the years, the collision repair industry has evolved from a hammer-and-dolly craftsman trade to a laser-precise exact science. The focus has dramatically changed from primarily cosmetic to a highly technical means of repairing vehicles and restoring them to the standards designed in the factories and testing labs.
Throughout the years, the automobile has been redesigned piece by piece and system by system. Frame damage once requiring a good pull from a floor-mounted tower now requires a laser accurate measuring system capable of pulling as little as one millimeter. And what once was merely a lap safety belt is now a restraint system with more than eight airbags, seat belt pretensioners and accident detection sensors.
My point is that just as automotive mechanical, composition and refinishing have developed, so too have automotive safety and restraint systems. Repairing restraint systems today is different than repairing those of even 10 years ago, and the world of airbags is constantly changing.
A Modern Look
Most 2010 vehicles will have these components as a base safety restraint system:
• driver and passenger airbags
• front seat belt pretensioners
• side curtain airbags
• seat airbags
• clockspring
• remote sensor(s)
• control unit
• passenger seat sensing system
Some OEMs will add rear seat airbags, driver and/or passenger knee airbags, rear seat belt pretensioners, deployable steering columns, pop-up roll bars, rear window airbags, rear curtain airbags (two on each side), whiplash protection systems or even external (pedestrian) airbags.
Knowing the components of the vehicle you’re repairing is critical to repairing it properly.
Scary Stuff
“He knows just enough to be dangerous.” We’ve all heard that before, and it’s no exception when it comes to technicians working with airbags. The amount of misinformation freely distributed and discussed online by untrained techs is truly scary. A couple common misunderstandings are:
1. To reset the airbag light, just unplug the battery and wait a couple of minutes.
2. The clockspring needs to be replaced every time the airbag goes off.
Both of these concepts are wrong! Knowing that every vehicle is different is the first correct assumption one can make. There are classes offered by colleges, technical schools and car manufacturers for those seriously interested in learning how to service and repair these systems properly. Two-hour entry level seminars only touch upon the generalities of each system and, although participants leave with a certificate, the learning has really just only begun.
The restraint system is the only vehicle system with clearly spelled-out criteria and component replacement requirements.
Each manufacturer has defined the requirements for replacement components for every type of deployment, whether it’s a front deployment of one seat belt pretensioner and one airbag or a complete side hit deploying both the curtain and the seat airbag.
Safety First
Although each manufacturer has unique rules for powering down a restraint system, a good rule of thumb for all vehicles (including hybrids) is to disconnect the battery, remove from their cradles all powered devices such as cell phones, iPods or memory savers, and wait 10 minutes before working on any restraint system.
Every vehicle has a reserve battery power circuit to ensure a restraint deployment even if the battery is damaged or becomes disconnected during the crash event. These capacitors retain battery power for up to 10 minutes after disconnecting the battery. It takes less than 9 volts to deploy an airbag or pretensioner, so even the current from a cell phone recharging in the cradle could supply enough power in the circuit to accidentally deploy an airbag.
Component Removal
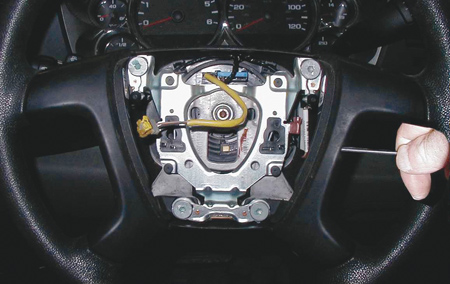
Driver airbags – These are held in place by either bolt-on fasteners or spring loaded clip-in fasteners. To remove, identify the type of bolt used, remove it and release the airbag from the steering wheel. Spring-loaded clip-on designs can be more difficult and may require a special tool. Releasing the spring mechanism is often challenging and sometimes difficult. (Photo 1)
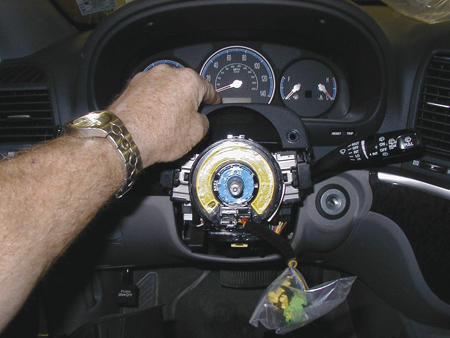
Clockspring – This is the next component to address after the driver’s airbag and steering wheel are removed. It’s nothing more than an extension cord from the dash harness to the driver’s airbag providing a constant connection rather than a rolling spring contact (like many older horn contacts). Many manufacturers require clockspring replacement after a deployment, while others require you to inspect them for damage only. The most common problem with a clockspring is that it may melt during the airbag deployment, making reuse impossible. This component should never be repaired. (Photo 2)
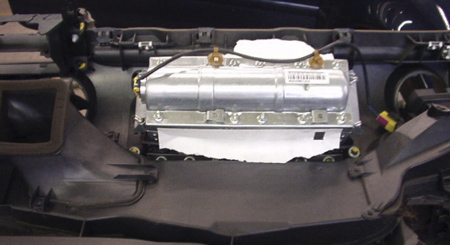
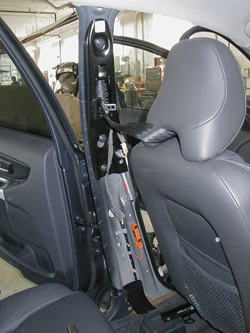
Passenger airbags – There are two types: one with a cover and one without. Most passenger airbags with a cover don’t require the removal or replacement of a dashboard and can usually be accessed and removed through the glove box. Those without a cover require more work and expense, often involving a complete instrument panel overhaul and/or replacement. Knowing how to overhaul an interior is critical to replacing this type of airbag. (Photo 3)
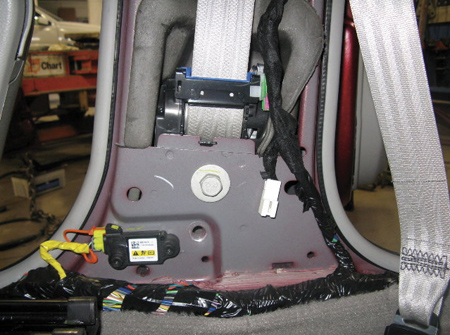
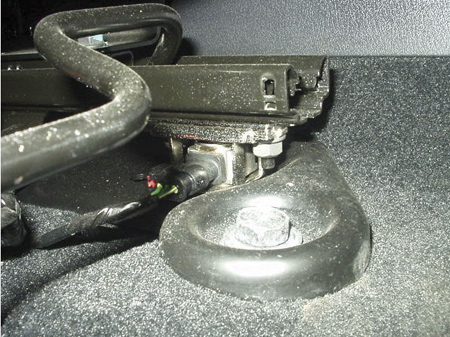
Remote sensors – These are probably the easiest components to replace, although it can be frustrating to find where they’re located. Whether it’s a front sensor, side impact sensor, rear curtain sensor or roll-over sensor, most simply require the removal of the single fastener securing it to the vehicle. (Photo 4)
Control units – These are the most critical components to restraint systems and determine which component will be deployed during a crash. They also continuously monitor the entire restraint system and illuminate the airbag light any time a component or connection isn’t returning the proper signal. After deployment, some vehicles don’t require a control unit replacement. Others require control unit replacement and are “plug-and-play,” while still others require reprogramming, downloading from the dealer or configuration before they’re fully activated. Others may allow multiple crash events before needing replacement. These units can be located throughout the vehicle in places such as under the seat (either left or right front), console or radio, in the kick panel, or behind a heater box. (Photo 5)
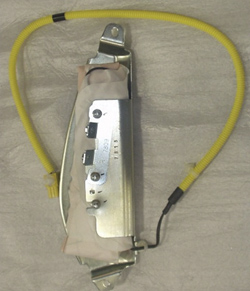
Seat belt pretensioners – These devices, which became prominent after 1999, are designed to pull the “at-risk” occupant back into position milliseconds before the airbags deploy, thus creating a safer deployment. Some manufacturers use a pretensioner in the belt, some use it in the buckle, and some use both. A manufacturer will often require that all the seat belts (and components) be replaced following a deployment. Some systems allow seat belt pretensioners to deploy independent of the airbags, while others still deploy together. Many newer vehicles will deploy individual components as determined by the control unit (e.g. driver’s airbag, passenger’s seat belt pretensioner, etc.). (Photo 6)
Seat airbags – These also have multiple designs, bolt-on external modules and internal designs. Those with an internal design require either full seatback replacement or full seatback overhaul with seat component(s) replacement. This aspect of seat repair is often mistaken for an easy and fast way of cutting a corner to save money. No manufacturer allows the repair of a seat cover following a deployment. They all require seatback or seatback cover replacement. With the high cost of some seat covers, this can be a tempting mistake. But the thread and stitching used for a seatback cover with a side airbag is unique. Following proper procedure is critical for a safe, future deployment. (Photo 7)
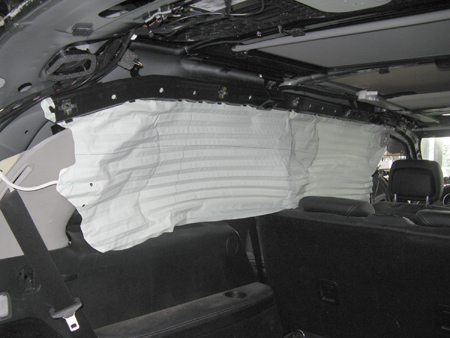
Curtain airbags – These are mounted along the roofline. Following a deployment, some manufacturers allow the replacement of the curtain only, and others require a new headliner, upper trim panels, new grab handles, sun visors and even coat hooks. (Photo 8)
Occupant Classification Systems (OCS) – There are many types of OCS, or Passenger Presence Systems, used in vehicles. Post-deployment, recalibration may require using a set of weights and a factory scanner, or recalibration during a road test. Some seat systems use track-mounted ceramic sensors, while others employ a bladder or weight sensor in the seat bottom cushion. Knowing the necessary precautions and repair procedures ahead of time will save you a headache at the end of the repair. Understand which system you have before removing or replacing a passenger seat. (Photo 9)
Tools and Scanners
Airbag components themselves are fairly well-designed to be bolt-on units. With the exception of a dashboard requiring removal or replacement, or for a side impact with a seat that requires rebuilding, most of these parts are easily installed and require few special tools. Changing a seat belt buckle pretensioner is no more difficult than replacing a buckle without a pretensioner. But component replacement is only part of the job.
Once the correct parts are installed, many systems require seat recalibration or control unit configuration. If you think you have what you need to service and reset these systems, think again. Although the DLC connector has made most vehicle diagnostics uniform, the airbag systems are still outside that box. Also, the computer used for airbag codes is different from the computer used for the check engine light. Almost every vehicle requires a scanner specific to airbags or an interface with software unique to that car and system. If you want to be able to read and reset the airbag light on every vehicle, be prepared to spend between $40,000 and $50,000, knowing that annual updates for each one will still
be required.
In this world of technical accuracies and precision repairs, having the right information and training is critical to a profitable and trouble-free repair. Learning all the proper procedures and specific requirements for these systems makes both estimating and repairing these systems easier and leads to a more successful repair.
| Where to Get the Correct Information |
| Most estimating systems provide pencil sketches, H notes, P-pages and matrix charts that leave the choice of components in the hands of the appraiser, requiring the writer to determine the necessary replacement components. Is the seat belt pretensioner in the belt, buckle or both? Is the control unit a “plug-and-play,” or does it need programming after installation? Unanswered questions like these leave the estimate incomplete, the customer at risk and the shop and insurance company liable for incomplete repairs. However, other sources for the correct information (including the manufacturers themselves) exist. Here’s an alphabetical list of the different ISPs and the information they provide: AirbagSolutions.com – Offers a pictorial database with actual component photos providing OEM requirements and locations for airbag replacement and service following a deployment. ALLDATA – Offers step-by-step replacement instructions for airbag components (some pencil sketches included). Audatex – Offers a descriptive matrix (list) of items to inspect and replace following an accident with an airbag deployment (no photos or sketches). CCC/Pathways – Offers a drop-down list of items to inspect and replace following an accident with an airbag deployment (component pencil sketches). Mitchell – Offers component descriptions, step-by-step replacement instructions and a matrix for replacement items (text and pencil sketches). |
Douglas Gan is chief operating officer of Airbag Solutions LLC and president of Auto Information Services, Inc. (AISI). These companies provide hundreds of shops, insurance companies and individuals with diagnostics, technical repair and information. Gan is ASE certified in ? categories, trained by General Motors and holds a degree in Mechanical Technology. He can be reached at (866) 294-0095.