Okay, so the economy sucks and the long backlog of work we were used to has either become sporadic or has dried up to a few days (or maybe only a week, if we’re lucky). What brought on this state of affairs? The economy, of course. When people aren’t working (and about 10 percent of them aren’t), they’re not commuting to and from work and crashing into their fellow commuters. If they do have an accident while they’re out looking for a job or picking up their unemployment checks, do they fork over the $500 to $1,000 deductible or use that money, if the car is still drivable, to pay the mortgage?
That’s just one factor that has contributed to reducing our workload, but there are so many more that are contributing to a decline in collision repair work. Another one is the high number of total losses, which comprises roughly 20 percent of all accidents. Safer, better handling cars are also reducing accident numbers, as are increasingly common collision avoidance systems, tougher DUI laws, low-interest or no-interest new car loans, better highways, lower used car prices and higher salvage values.
I know, you’re thinking, “Tell me something I don’t know…like maybe where I can get some more work.” Well, if you’re subletting a lot of your work, it could pay you to stop and take a look at doing some of that work in-house. It could fill some of the gaps in your work schedule and help build a more consistent flow.
What in particular am I thinking of? The work that typically gets “subbed out” in many shops: glass work, air conditioning, airbags, plastic repair (don’t like those remanufactured bumper covers? Well, fix them yourself), and the topic of this article, suspension repair.
I can already hear the naysayers saying, “But that’s a different skill set.” But what they really mean when they say skill set is “comfort zone.” Many people don’t like to leave their comfort zone for various reasons. Lack of knowledge creates reduced confidence, which makes some people hesitant to try new skills. Also, everyone by necessity works slower when trying a new repair procedure, and we think slow means reduced profits!
However, the more self-sufficient a repair facility is, the more efficient it is. Also, the more skills and ability repairers have, the more valuable they are as repair people, and the more pride and confidence they have in their own work. To enjoy your work and be skilled at it, you must take pride in what you do. You must always keep an open mind to new ideas, skills, challenges and concepts that will expand your abilities as a technician or a human being. It really is what makes life worth living.
Nuts and Bolts
So let me end my sermon right there and get into the nuts and bolts of suspension repair. But beware! Most damaged suspension components should be replaced, not repaired. I know this is obvious to many of you, but I still feel it’s worth emphasizing because I’ve seen firsthand evidence of heated and straightened steering components on repaired vehicles. This is not recommended or acceptable.
Many fasteners are one-time use only. The shop repair manual, available online from OEMs or other aftermarket information providers on a subscription or per-use basis, will identify these fasteners. Get used to accessing this information because it’s necessary for all aspects of our repairs.
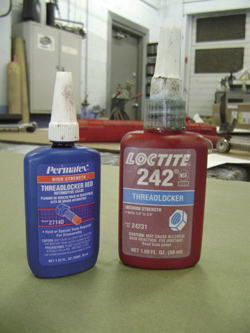
Some nuts have nylon locking devices in their threaded portions, and these lock nuts should be replaced when removed. When removing fasteners that have thread locking compound, be sure to replace the compound when reusing these bolts and nuts (Photo 1). Carefully follow the thread locker compound manufacturer’s application instructions to assure proper fastening.
Don’t depend totally on visual inspection to determine which fasteners should be replaced. Some specific fasteners should be replaced, such as torque-to-yield fasteners that are one-time only use fasteners. These are also identified in the repair manual and should always be replaced with only vehicle manufacturer’s bolts and nuts. Do not replace with fasteners from a hardware or fastener supplier because those won’t have the specific characteristics (tensile strength, yield strength, torque-to-yield factor) the original fasteners were designed for. It’s not difficult, just different. Follow the vehicle manufacturer’s recommended procedures carefully.
Torqued Off
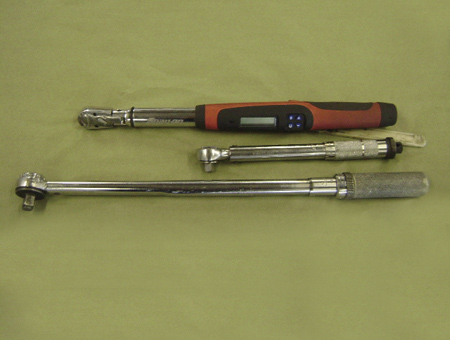
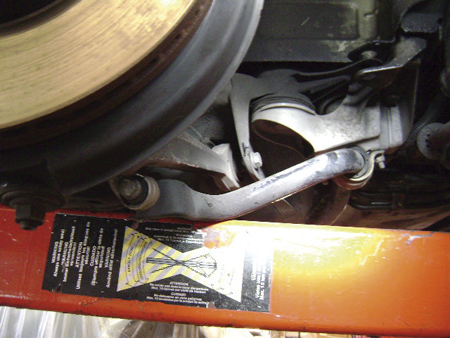
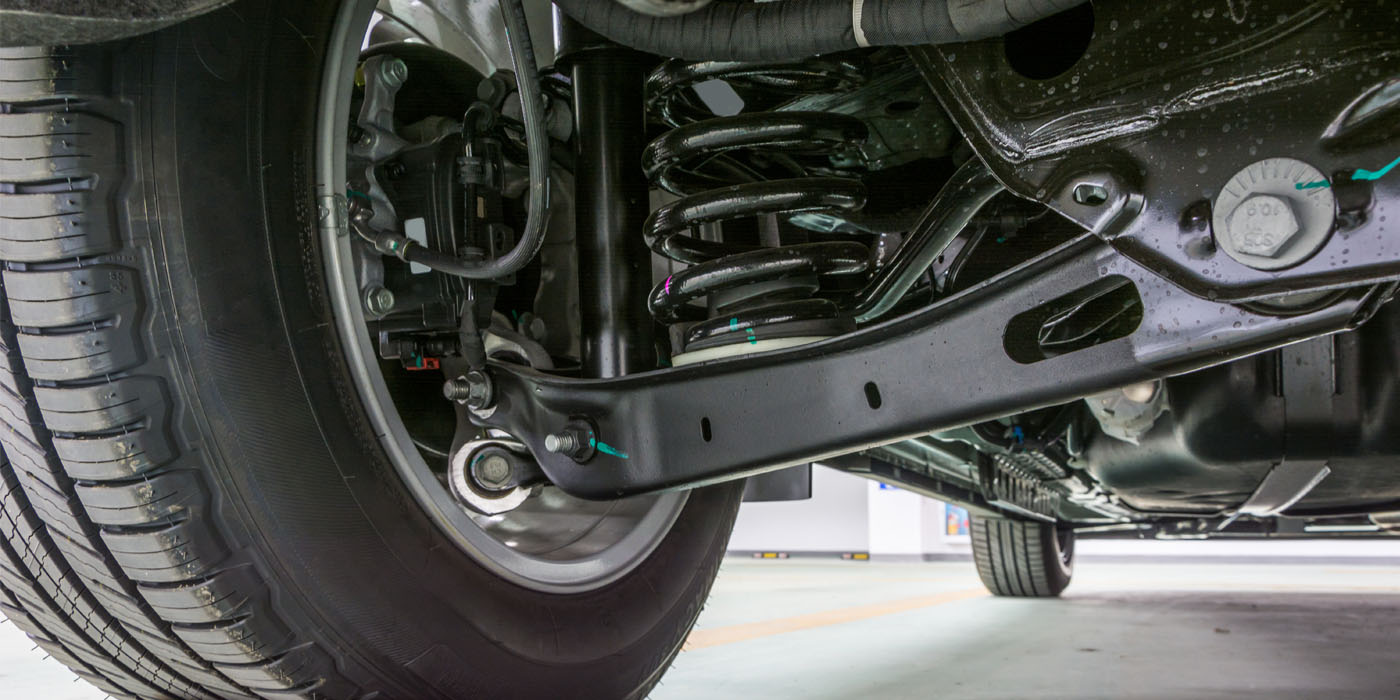
Having the proper torque wrenches and specifications is key to a safe and successful repair (Photos 2, 3). Most manufacturers have torque specs for every bolt on the car, but what is a torque spec anyway? In laymen’s terms, it’s how tight a bolt is when it’s tightened to the manufacturer’s recommended specification in a measurable amount, such as an inch-pound, foot-pound or Newton metre. This is important because how a suspension part functions can depend on the torque (tightness) of the fastener holding it. Imagine a lower control arm (Photo 4) that’s bolted to the engine cross-member with two pivot bolts. The control arm is designed to travel up and down yet remain tight and not loosen at the pivot bolts. If the bolts are too loose, excessive wear and noise from the joint could be the result. If the bolts are too tight, excessive resistance to up and down travel will have an effect on the suspension travel and action, possibly damaging affected components in contact areas. It’s important to carefully adhere to the vehicle manufacturer’s torque specification when working on all parts of the suspension from the wheels inward.
Do not lubricate suspension fasteners unless recommended by the manufacturer. The lubrication of fastener threads will have an effect on torque readings, since torque specs are calculated dry at the factory and therefore lubrication of the threads will affect torque spec accuracy.
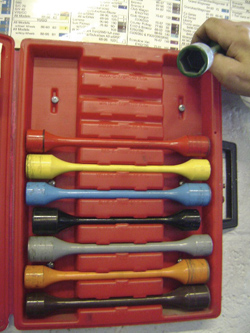
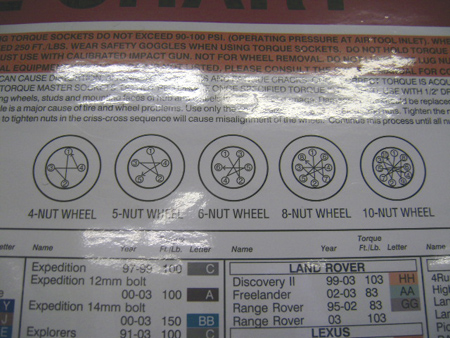
Proper torquing of wheels ensures even distribution of tightening force on brake rotors, brake drums, hubs, axles or any other component that may have wheel studs or bolt holes in it. Torque “sticks” (Photo 5) are devices engineered to provide a specific torque spec amount when attached to a half-inch air impact wrench. These torque “sticks” are color coded to a torque chart (Photo 6) that identifies the proper torque spec of any particular vehicle. This is good for two reasons: even torque on all wheels and speed.
The preferred method or sequence of tightening a wheel (Photo 7) is to use a star pattern to loosely but evenly fasten the wheel to mounting and then sequentially tighten each lug fastener to its proper spec. This avoids damaging wheels or mounting components. Do not use torque “sticks” for removing wheel lugs or else you may damage the device.
Sprung Out of Shape
Springs come in different styles – coil, leaf and torsion bar are the common mechanical types, while some more exotic applications include liquid and gas or air. All springs can be damaged in a collision and, when damaged, are usually replaced.
For our purposes, we’ll stick to the common types. Out of coil, leaf and torsion bar, torsion bar is the least common. Use the shop manual for proper loading and unloading, and remove and replace procedures. There are no repair procedures, and replacement when damaged is the recommended procedure. The ride height is affected by the torsion setting of these bars, as they’re adjustable from side to side. These are used primarily on trucks, although some older vehicles use these, too.
Coil springs are common in modern automobiles and are used most commonly in the McPherson Strut-style of suspension. Coils offer little option for repair, so replacement is the most often used procedure. Check the vehicle manufacturer’s recommended procedure for replacement. It’s often recommended that, if you replace one coil, you replace its mate on the opposite side of the vehicle to maintain proper ride height since springs will weaken with use and age. This normally isn’t a problem because they wear or weaken evenly. However, if you replace only one coil, you’ve changed the dynamics at that point and you can end up with a diagonal ride height variation.
Be Careful!
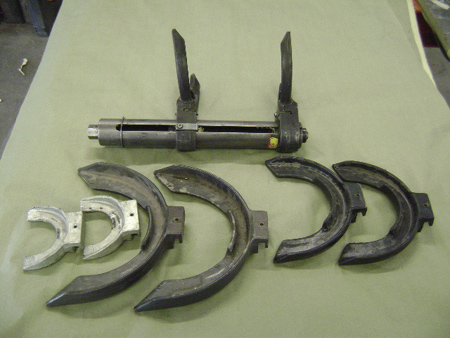
Compressing and releasing coils springs can get wild if you don’t proceed carefully. First and foremost, invest in a quality spring compressor (Photo 8). Getting hit with flying suspension parts isn’t an acceptable consequence to saving a few bucks. Most aren’t that expensive, and the more universal it is, the more useful to you it will be. Never release the strut shaft nut (on top of the strut) without the spring tension compressed and the strut top parts loose and moveable by hand. If you do this, you’ll cause the rapid departure and acceleration of the strut top and possibly the coil spring. When disassembling, take some paint and brush alignment marks on all parts for easy reassembly. This will save you much time and head scratching!
Leaf springs offer the most opportunities for repair. These are commonly found on modern pickup trucks and, of course, on older automobiles. Many times, repair is the best option versus trying to get the proper option spring and then the spring for the opposite side also. Some vehicle manufacturers don’t have a sure-fire, reliable method for identifying the exact leaf spring you need due to the wide variety of models and options they have available. It can get frustrating for you, so repair and re-arching may offer you a much more satisfying experience. If you take your set of springs to a spring repair shop, they can repair, replace and re-arch both springs (assuming only one was damaged) at a reasonable cost (often less than replacing a pair) with each tuned perfectly for height and tension in a quick turnaround time. Same springs and same fit with no hassles sending replacements back and forth.
When removing a leaf spring, raise the vehicle high enough to unload the tension on the spring, place a jack under the differential or axle and remove attaching fasteners and u-bolts. Observe proper torque specs when reassembling.
Struts are Just Shocks
It’s common for struts to bend, but this isn’t always obvious. There are some techniques that can be employed to determine if a strut is bent.
1. Jounce/rebound. This works on a front strut. Jounce the vehicle up and down by pressing down on the front bumper reinforcement while observing the steering wheel in the unlocked position. Steering wheel movement from side to side is an indicator of a bent strut.
2. Place a large ratchet and socket on the top strut shaft nut. Turn the nut clockwise to revolve the strut shaft and, if the strut shaft is bent, this action will cause a tow change moving the steering wheel right to left as you ratchet the shaft. This also indicates a bent strut. A tram gauge can also be aligned with scribe marks on the tires and observed as the shaft is turned.
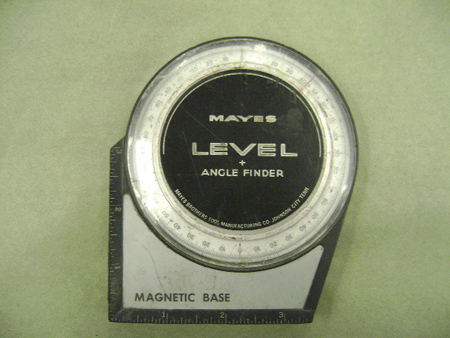
3. A pernimeter (Photo 9) can be placed on the strut housing and observed while the shaft is rotated. Any movement of the bubble while steadily rotating the shaft can indicate a bent strut. Never bend or attempt to straighten a strut. This was a common practice to achieve camber but should never be done. Replace only using the basic procedure described for removal and replacement of coil springs.
Don’t be Racked by Steering
Wonder if the steering rack was damaged when the wheel, strut, knuckle and tie rod bent? Yeah, good thought. Now we’re talking a little more serious money here. If we have to replace it, will it total the vehicle? If you don’t like surprises after the car is repaired, you better check that rack up front. Jack the car up and support. Remove the tie rods from the knuckles. With both sides removed, turn the steering wheel lock to lock from right to left, carefully trying to feel for any damage on the rack or any difference in feel as you turn from side to side. If you feel anything inconsistent from one area to another, it’s an indicator of steering rack damage, which must be replaced. When replacing the steering rack, lock the steering wheel in position to avoid damaging the airbag clock spring.
The knuckle, or steering knuckle as it’s commonly called, generally connects to the lower ball joint (McPherson Strut) and possibly to the upper ball joint (upper and lower A-arm) and steering arm/tie rod end. It usually has a bearing pressed into it, which accommodates wheel hub and axle shaft on front wheel drive cars.
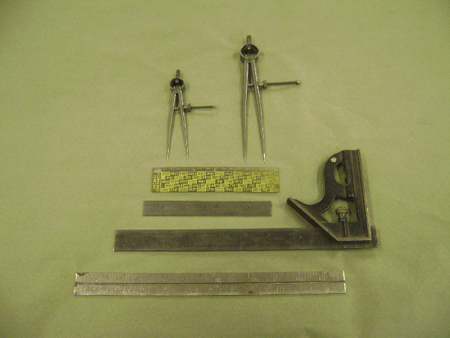
Even though they’re heavy castings, steering knuckles can bend and cause toe and camber problems. It’s not uncommon for a strut and knuckle to bend together and take with them an inner or outer tie rod end along with the wheel and a control arm. Careful measuring is necessary to determine if a steering knuckle is bent. Comparative measurement from the undamaged opposite side is useful. Small straight edges, dividers and steel rules are helpful (Photo 8). If you have access to three dimensional measuring devices, these also may be used to take comparative measurements from undamaged side to damaged side.
If the strut or control arm is bent out of position, I recommend pulling the suspension parts into the proper location to assure correct mounting location alignment for the new replacement parts. Nothing is sadder than bolting new parts in to discover your patient won’t take an alignment. Not good! You’ll need to remove the new parts (you can’t pull on them) and bolt the damaged ones back in to reverse the force that bent the mounting locations in the first place. Check that no wheel setback exists from side to side before disassembling.
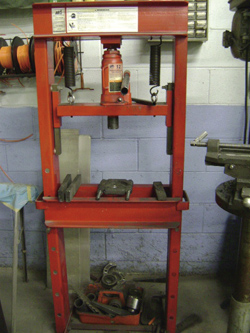
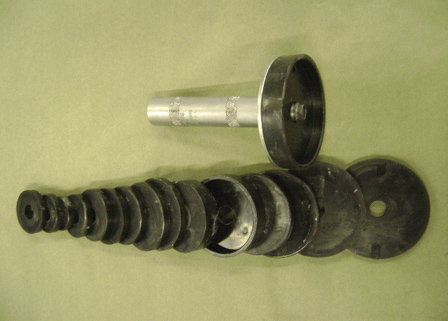
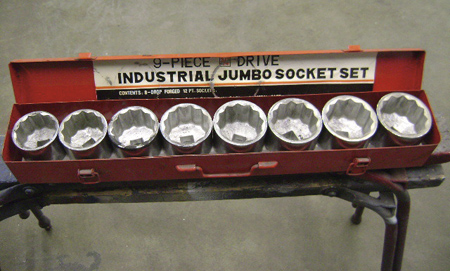
You should have a press. I have a reasonably priced 12-ton model (Photo 9), which is adequate for bearing pressing. Bearing and seal drivers can be expensive (Photo 10) when purchased in sets. However, large socket sets make excellent bearing drivers and are inexpensive, too (Photo 11). The set in the picture was purchased for about $60 – compare that to a $400 bearing driver set.
Pressing in a bearing and hub requires patience, planning and a little courage. Make sure the knuckle is evenly supported on the support bars, dead center under the ram. I like to apply a thin coating of “never seize” grease to the bearing surface of the knuckle, bearing races and hub contact surface. Make sure the bearing is started into the knuckle evenly, not tilted at all. It’s okay to tap on the outer race to set the bearing evenly in the knuckle with a shot-loaded, non-metallic mallet. Be patient and as precise and careful as possible – an extra minute here will save you time and money.
Okay, you’re ready to press the bearing into the knuckle. Use a bearing driver (or socket) that has slightly less diameter than the outer race of the bearing. This will allow you to press the bearing down into the knuckle to its proper location. A large snap ring can complete this part of the operation.
Now for the hub. You’ll need to put the brake backing plate (splash guard) on now because once the hub is in place, you won’t have access to the mounting screws. Now that the brake backing plate is in position, choose a bearing driver (or deep socket) that’s slightly larger than the inside diameter of the inner bearing race and support the knuckle and bearing on the bearing driver (or deep socket) from the bottom or inside. I like to use rolled-up balls of strip caulk around the deep socket to help center it on the inner bearing race because they’re easy to remove and reuse. Position the knuckle and bearing on the driver, dead center under the ram, on the press support bars. Set the hub evenly in the bearing. Place an appropriate-sized driver on the hub and press it into the correct depth.
You’re done and ready to assemble using the correct torque specs. Remember that when you’re disassembling the brake caliper from the rotor and knuckle, you don’t need to disconnect the brake hose if the brake system isn’t damaged. Wire the caliper out of the way, relieving any stress on the hose. Never hang a caliper by the hose because this can damage it. When you use this method, you don’t need to bleed the brakes or possibly set a fault code in the ABS brake system that will have to be cleared. Of course, now the suspension system needs to be properly aligned to complete the job.
For more information, I recommend attending I-CAR classes STE02, STE03, STE04, and STE05.
Writer Mike West, a contributing editor to BodyShop Business, has been a shop owner for more than 30 years and a technician for more than 40 years. His shop in Seattle, Wash., has attained the I-CAR Gold Class distinction and the ASE Blue Seal of Excellence.