
 It’s the little things that can alter a customer’s perception of a collision repair facility. After you repair a vehicle, the customer may come back with something he or she hadn’t noticed before. It must be your fault, right? Not necessarily! Sometimes a problem already exists with a vehicle, and the only way you could know that is by reviewing a detailed, manufacturer-issued Technical Service Bulletin (TSB).
Checking TSBs first can save countless hours of diagnosis and repair time. Here’s a TSB that describes one of those “little things” that can become a big thing in the customer’s mind.
Application
All 2003-08 Honda Elements.
Symptom/Condition
The rear hatch open indicator or rear interior light comes on and/or the tailgate rattles. The probable cause is an incorrect striker position and/or improperly adjusted cushions. Check the striker and cushion adjustments.
Service Information
Always refer to ALLDATA Collision for safety procedures, identification of material types, recommended refinish materials, and removal and installation procedures. Always refer to the vehicle manufacturer for questions relating to applicable or non-applicable warranty repair information.
Procedure
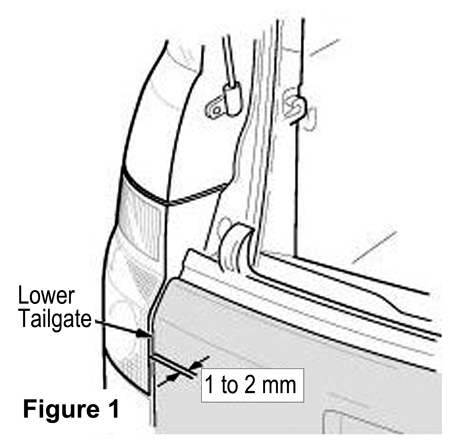
1. With the hatch open, compare the level of the tailgate to the level of the taillights. The tailgate edge should be recessed 1 to 2 mm in relation to the taillight (Figure 1).
• If the measurement is correct, go to Step 3.
• If the measurement is not correct, go to Step 2.
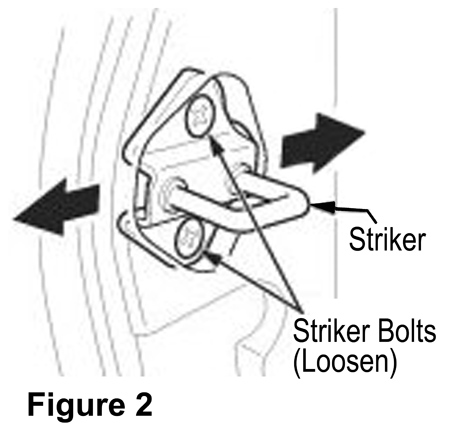
2. Slightly loosen the striker bolts and adjust the striker in or out to get the proper measurement. Torque the striker bolts to 22 N.m (16 lb.-ft.) (Figure 2).
3. Check the tailgate for drag by holding in the release lever and opening and closing the tailgate.
• If the tailgate does not drag, go to Step 5.
• If the tailgate drags, go to Step 4.
4. The tailgate strikers will drop when loosened. Mark the original position before loosening the striker bolts. Slightly loosen the striker bolts and adjust the strikers up and down to eliminate any drag. Torque the striker bolts to 22 N.m (16 lb.-ft.).
5. Check the adjustment of the hatch. The hatch edge should be even with or 1 mm below the fender (Figure 3).
• If the adjustment is correct, go to Step 7.
• If the adjustment is not correct, go to Step 6.
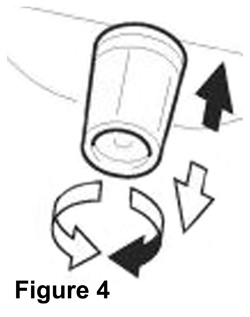
6. If the hatch sits out too far, screw the hatch edge cushions in two full turns. If it sits in too far, screw the hatch edge cushions out two full turns (Figure 4).
7. Check the hatch for latch drag by holding in the release lever and opening and closing the hatch door. If the latch doesn’t drag, the repair is complete.
• If the latch drags, go to Step 8.
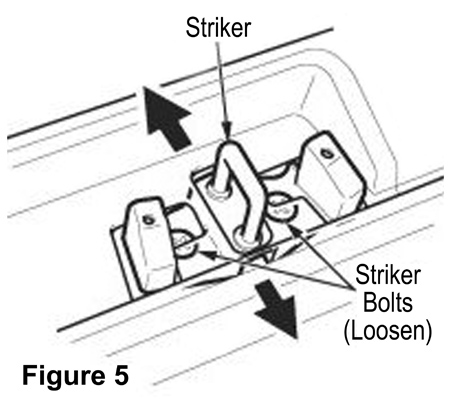
8. Slightly loosen the center striker bolts. While holding in the release lever, open and close the hatch to align the striker. Adjust the striker as needed to eliminate any drag. Torque the striker bolts to 22 N.m (16 lb.-ft.) (Figure 5).
Dan Espersen is the ALLDATA Collision Program Manager, a Gold Pin Member of the Collision Industry Conference (CIC) and holds an AA Degree in Automotive Technology. He has 17 years of experience in the collision industry and 17 years of experience in the automotive industry.
© 2009 ALLDATA LLC. All rights reserved. All technical information, images and specifications are from ALLDATA Collision. ALLDATA is a registered trademark and ALLDATA Collision is a mark of ALLDATA LLC. All other marks are the property of their respective holders.
© Honda and Element are registered trademark names and model designations of Honda Motor Co., Ltd. and American Honda Motor Co. All trademark names and model designations are being used solely for reference and application purposes.