Have you ever had a customer schedule a collision repair, but when the vehicle arrives it has certain conditions that may not be related to the collision? Your expertise and experience may tell you that these conditions were probably an issue prior to the accident and that the customer may have never realized they were present. Right or wrong, we owe the customer an evaluation of those conditions.
During the evaluation, you may often find that the concern can be attributed to another unrelated cause. An important question to ask yourself is, “What tools do I have in place to make this decision?”
One of the best tools you can have is access to factory Technical Service Bulletins (TSBs) and recalls. They can identify factory defects, safety-related problems and recognized issues for which the manufacturer has published a solution. The following TSB from General Motors provides an example of a pre-existing condition similar to a problem you may encounter.
Models
• 2008-2009 Chevrolet Malibu
• 2006-2009 Pontiac G6
• 2007-2009 Saturn AURA
Application
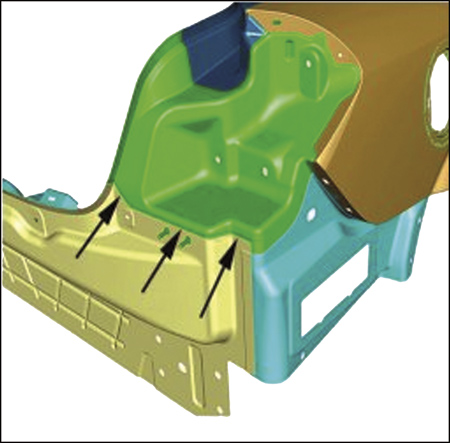
Water leak in trunk area of vehicle/possible lack of audio from radio (apply seam sealer). Some customers may comment on finding either water in the right rear area of the trunk and/or in the spare tire well or no audio coming from the radio. This condition may be caused by body seams in the body rear end panel (including one under the right tail lamp and behind the rear fascia) that may have a void in the sealer. This may allow water to leak into the trunk, and on some models equipped with a rear compartment radio speaker amplifier, water may leak onto the amplifier, rendering it inoperative.
Service Information
Always refer to ALLDATA Collision for safety procedures, identification of material types, recommended refinish materials, and removal and installation procedures. Always refer to the vehicle manufacturer for questions relating to applicable or non-applicable warranty repair information.
Service Procedure
Apply seam sealer to the right side of the body rear end panel seams following these steps:
1. Remove the right tail lamp and rear bumper fascia.
2. Inspect the body rear end panel to tail lamp pocket seams for any voids in the sealer (Figure 1).
3. Clean the affected area and seal the void with a clear seam sealer.
4. Install the right tail lamp and rear bumper fascia.
5. If equipped, diagnose and repair/replace the radio speaker amplifier.
NOTE: This repair/service procedure is excerpted from a TSB published by the vehicle manufacturer and is intended for use by trained, professional technicians with the knowledge, tools and equipment to do the job properly and safely. It’s recommended that this procedure not be performed by “do-it-yourselfers.”
Dan Espersen is the ALLDATA Collision Program Manager. He’s a Gold Pin Member of the Collision Industry Conference (CIC) and holds an AA Degree in Automotive Technology. He has 17 years of experience in the collision industry and 17 years of experience in the automotive industry. © 2009 ALLDATA LLC. All rights reserved. All technical information, images and specifications are from ALLDATA Collision. ALLDATA is a registered trademark and ALLDATA Collision is a mark of ALLDATA LLC. All other marks are the property of their respective holders. © General Motors, GM, Chevrolet, Malibu, Pontiac, G6, Saturn and AURA are registered trademark names and model designations of
General Motors Corporation. All trademark names and model designations are being used solely for reference and application purposes.