 You can learn a lot through hands-on experience, the practical application you use on a daily basis. You also can learn quite a bit just from theory, the study of why something works. But if you really want to learn a lot, try teaching a subject like welding to others either in a classroom or by writing articles for a trade magazine like BodyShop Business. It requires delving further into the research of a subject than you would normally do in your daily work in the shop, where you use a welder and it works well for you so that’s it. No need to get theoretical about it…or is there?
Here we go again with that old saw that says, “Any knowledge is good to know and helps you to understand the reasons a process works,” what its benefits are and also what its weaknesses are. It’s the belief that if I know why and how something works, I’ll have a much better chance of adjusting and perfecting the process to its optimum capability. In other words, I can make the weld better, or repair the machine when it isn’t operating properly.
You may ask, “What do I know about a welder?” Well, with a little understanding and a little diligence, you can probably know enough to correct many problems yourself, which can save you valuable downtime and repair bills for something that can take less than an hour to repair.
The Obvious Ain’t So Obvious
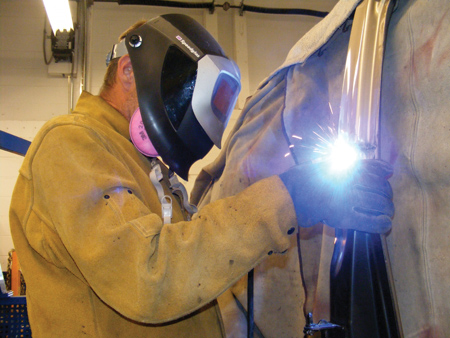
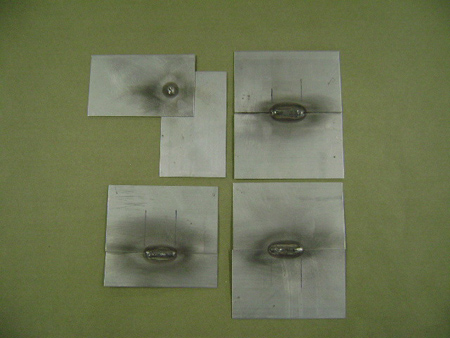
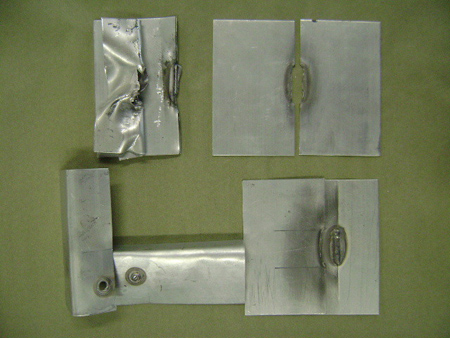
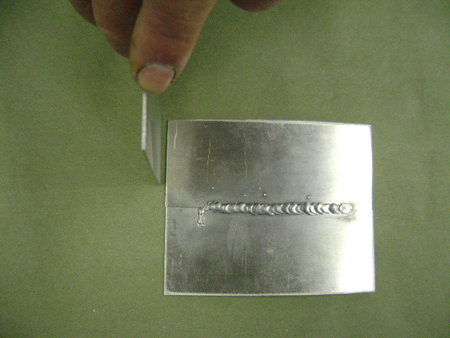
There’s more to welding than just producing “pretty” welds. They have to also hold. I know this seems obvious but…it isn’t. What am I talking about? Well, I’ve been an I-CAR weld quality test examiner for nearly 15 years. Yeah, that’s the guy who visually inspects the weld test coupons to meet the test parameters and then destructively tests the welds to ensure that they’ve met the destructive requirements for quality in regard to penetration, porosity tear-out, etc. We’ve found that only about 40 percent of the test takers pass on their first attempt. There are several reasons for this, which you might learn from yourself:
1. The I-CAR steel weld quality test I’m involved with has no pretest training program involved with it. The test takers are sent study materials that they need to study, practice and perform to achieve a positive result from their tests.
2. The test takers don’t review the CD or pre-test information sent to them by I-CAR prior to the test, even though they should.
3. The test takers don’t practice or destructively test their welds prior to test day and accordingly adjust their machines and techniques to meet the required result. They can, but most don’t.
4. Many employers don’t take an active role in verifying that their test taker/employee is truly ready to take the test. The employer should personally review the requirements of the test and personally verify that its test taker/ employee is meeting the requirements of passing the test.
Here’s the enlightening part: All of the destructively failed coupons (the metal plates the test takers weld on; there are eight sets involved in the test) have passed the visual requirements, one of the two separate requirements needed to pass this test. Visual (weld length, height, width, diameter, porosity and melt-through) must be met first, and then those coupons that pass the visual requirements are destructively tested for the minimum allowed penetration and tearout requirements. So those coupons that fail the destructive requirements have already passed the visual requirements. In other words, a good-looking weld can fail the destructive test (break away without tearing out the minimum required amount of metal from the bottom coupon).
What this means to us in the field is that there are automobiles being welded together with good-looking welds that may break off in a subsequent collision. Not good! How can I say that? Let me reason with you for just a minute. If a test taker/welder shows up for the test, either he or she, or his or her employer, has laid down some hard cash to I-CAR. He or she takes the test and fails. What do you think is happening on the job on an everyday basis?
Hopefully, I’ve made the point that it’s of the utmost importance, whether you participate in the I-CAR weld quality tests or not, that you set up and destructively test your welds each time you weld a part on an automobile. None of us knows when or how our customers will be testing what we do.
History Lesson
Of course, man has been joining metals together for much longer than the automobile has been around. For our purposes, let’s keep in the timeframe of the automobile, around 100 years.
When I first started 45 of those 100 years ago, the principle method of welding was oxyacetylene gas welding, which required a much higher level of skill than MIG with a large heat affect zone – not to mention lots of practice to become proficient. My instructor had me on a welding table, welding together coupons for five weeks, six hours a day, five days a week. I got it…and I never forgot it. A bonus was that it was a solid foundation for the manual skills needed to be proficient at TIG (Tungsten Inert Gas) welding.
Gas Metal Arc Welding (GMAW) is also known at Metal Inert Gas (MIG) or Metal Active Gas (MAG). For the rest of this article, I will refer to it as MIG welding. The MAG welding name comes from the fact that, in some industries, it’s used with the semi-inert gas carbon dioxide (CO2) as the shielding gas. This is much more economical than using mixtures or straight inert gas (pure argon or helium). However, it produces more spatter, which may require grinding, depending on the process and where it’s used.
Lots of Gas
The most common gas in the auto body repair industry for MIG welding steel is the mixture of 75 percent argon, 25 percent CO2. For a few years, I used a 92-8 mixture when a welder salesman told me it had improved properties over 75-25, a cleaner weld bead with lower bead profile, etc. I liked it, but when I bought a new welder, I was having serious problems running .023 wire in this machine despite the fact that it was a 255-amp machine that was supposed to be able to run the small electrode wire. I kept getting burnback in the contact tip no matter how I adjusted the wire speed. I had no problems with .030, but .023 just wouldn’t work. I asked many welder reps why, but got no answers. Finally, I ran into a guy at NACE with a lot of gray hair who was working a welder booth (my welder’s company) who told me to run a bottle of 75-25 and I’d get a better result. I did and…I did. So now I use 75-25 for steel.
For aluminum, you’ll always use pure argon. For steel, set your gas regulator in the 17-25 cfh range, depending mainly on results. This process is an indoor, no wind or turbulence proposition. A nice cool cross draft on hot summer days is good for you but bad for weld quality. With aluminum, you’ll run 25-50 cfm. In either case, too much gas pressure can cause a venturi effect, bringing the polluting oxygen and nitrogen into the weld site that the shielding gas was designed to eliminate. Too little pressure will also have the effect of facilitating a polluted, dirty weld. If you have a dirty weld when you’re done, this could be it. Look at the gas pressure regulator.
All Wired Up
Let’s talk steel. ER70S-6 is going to be the wire you’ll most commonly use. I say “most commonly” because most OEMs recommend ER70S-6 for its carbon, manganese and silicon content. Check the manufacturer’s recommended electrode in the shop manual to be sure. There’s at least one domestic pickup manufacturer that recommends ER70S-3 for structural frame welding.
For most cosmetic and unibody repairs, .023-.030 are the wire sizes. When you get to structural welding on perimeter frames (frame horns, rear sections), .035 is the minimum.
Myriad of Machines
MIG welding machines run the gamut, from cheap 110V machines to exotic three-phase 220V machines with specific computerized programs in-stalled for certain automobiles. The question is, what do you need? Keep in mind that you want to make sure that you have what you need for that heavier project in your future. While the 110V welders are compact and easy to move into small areas, they aren’t intended for heavy structural repairs. And forget about them for aluminum – 220V is a minimum for quality aluminum welding.
Always try out a machine for its intended use on both ends of your project spectrum, heavy and light gauge. There are four weld transfer methods in MIG welding: globular, short circuit, spray arc and the most recent, pulsed spray arc. The short circuit transfer method MIG machine is the most adaptable to collision repair work in general. These machines work great on both light and heavy gauge automotive steels. Having said that, I’ve tried converting my quality 220V 255-amp short circuit MIG to weld aluminum by adding a spool gun and attachments ($800-$1,000) with unsatisfactory results. I did OK on 2.5 to 3mm heavier gauge parts, but had little success with 1mm, which is what a lot of cosmetic aluminum panels are made of. Constant voltage machines don’t work well on light gauge aluminum. I had a pulsed spray arc machine that was made specifically for aluminum automotive repair dropped off at my shop for a demo. The rep left it with me and, after a little practice, I was able to weld an open butt joint from two coupons of 1mm material. There was no burn-through because of the pulsing 110V to 220V action hundreds of times per minute.
My experience is that if you want to weld both aluminum and steel at optimum conditions with as little hassle as possible, a dedicated aluminum machine is in your future.
What’s That Buzz?
Ever been working in your stall while your fellow workman is welding a part on his job, and you hear a semi-loud hum/buzzing sound interrupt the smooth bacon-frying, crackling sound? Kind of like the sound of an electric motor being stalled? When I heard this after the third time, I told him he had some slag in his nozzle. He tried again with more buzzing, and I said, “You’re grounded, dude, clean your nozzle.” He retorted, “I did clean it.” I approached him with, “I’m talking about your torch nozzle, not your nose,” and removed the gas nozzle from the gun/torch to find a large chunk of slag on the contact tip that was wedged onto it.
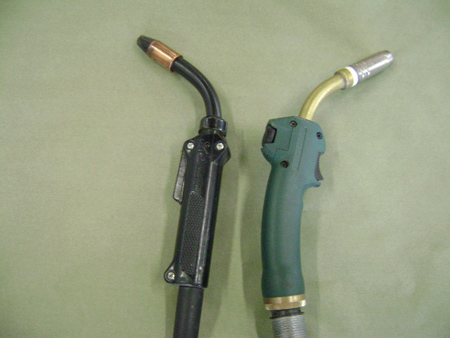
The electrical current is transmitted from the contact tip to the electrode wire. The electrode has no current in it until it passes through the contact tip. That’s why it’s called the contact tip. If the tip is worn, poor contact results in an unstable arc. Change these contact tips at about every 100 lbs. of wire or less, if you’re like me. For steel wire, use the contact tip that’s sized to the wire, a .030 contact tip to .030 electrode wire. For aluminum, always run one size larger contact tip than the electrode wire you’re using. So, for a .030 electrode wire, you run a .035 contact tip. Tool tighten, don’t finger tighten, the contact tip. This establishes a stable flow of electricity to the electrode.
Jerked Around
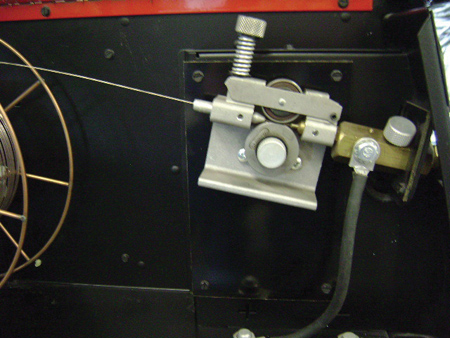
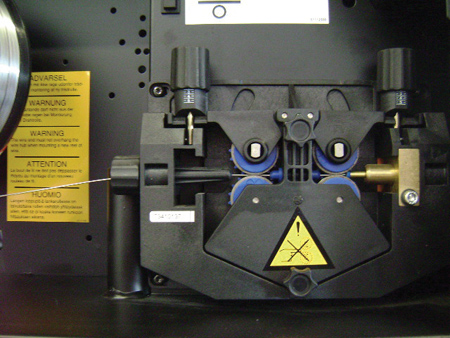
You’re welding along fine and then you begin to experience a jerky wire feed and blame it on the wire because you’ve heard of malformed wire (not round with irregular spots in it). You run some wire out of the contact tip, trim it off and try again. Same condition. Try this: Begin back at the source to eliminate a few things first. Remove the torch from the machine, leaving a foot of wire electrode on either end. This usually requires the loosening of a set screw knob and a wire stake. Stretch out the torch/hose on the floor and alternately pull on each end, one after the other. If there’s a lot of friction or resistance, it’s either the tip (which I hope you checked first) or the gun liner.
Keep one of the liners on hand; they’re easy to change. If there’s little restriction, move back to the drive rollers. There are feed tubes coming into and out of both ends of them, which get clogged with debris off the wire. Release the tensioner and the drive rolls, and pull on the electrode from the exit end of the drive rolls. If the wire spool doesn’t easily turn, your restriction is either in the feed tubes or the spool axle. Move the wire spool. If it turns beautifully, good. Take those filthy feed tubes out and either clean or replace. I found they didn’t keep these in stock, so I had to order them and clean the old ones out by soaking them in lacquer thinner and rodding out with a 1/16 welding wire (gas rod). A paint gun orifice brush would work, too.
Reassemble without the contact tip in place. Pinch the electrode wire with your thumb and forefinger with medium pressure as it exits the gun liner at the contact tip location. You should be able to stop the wire without bird-nesting on the exit side of the drive rolls. Don’t over-tighten the tensioner. Put in the contact tip and machine covers. Try it…smooth and stable just the way you like it.
Be Careful!
The modern automobile is loaded with computers, airbags, supplemental restraints and all kinds of electronics. Any of these can be damaged by errant electrical currents pulsing through the wiring and into the electronics. Always disconnect the battery (ground cable first) and disable the supplemental restraint system prior to MIG welding on a vehicle. Disabling the supplemental restraint system (airbags, seat belts) has different requirements for each manufacturer. Look up the manufacturer’s recommended process for disabling the system. These processes range from “disconnect the negative battery cable” to “disconnect each module in the vehicle, including seat belt pretensioners.”
Record the preset radio codes, and make sure that when the customer drops off the car you have the anti-theft codes of any radios that have theft deterrent systems. Reduce the friction.
If you’re going to be welding within 12 inches of a computer, remove the computer. Also, make sure the welding machine itself isn’t within a foot of a computer module. Usually, you can move your machine to accommodate this recommendation. If you can’t, remove the computer module.
When welding inside the engine, passenger or trunk compartment, avoid placing your cables parallel to wiring harnesses on the automobile. When you must drape cables across wiring, do it at a perpendicular angle.
Place welding blankets over glass, upholstery and anything you don’t want welding sparks or slag to come into contact with. This includes the vehicles next to the one you’re working on. Remember, “If it’s predictable, it’s preventable.”
What Are You Welding?
Some steels in modern late-model cars are strong, advanced high strength steels that can be seriously compromised by MIG welding. When replacing a welded-on part, check the manufacturer’s recommended procedures. Some of these parts are intended to be replaced only at the factory seams to avoid compromising the structural integrity of the vehicle and endangering occupants. These steels are much lighter but much stronger than conventional high strength steels. The sectioning of these parts and subsequent welding will seriously weaken and damage the structural integrity that was designed into the vehicle by the
auto manufacturer.
Finally, for your own assurance and pride, take the I-CAR steel weld quality test. When you and your fellow welders pass, you’ll know that your welds stand up not only visually but destructively, too. Passing this test shows customers and insurers that you’re committed to quality assurance and the safety of collision-damaged vehicles. For more information, I recommend taking I-CAR courses WCS01 and 02, with the welding test being WCS03. If you’re interested in welding aluminum, I recommend taking WCA01, 02 and 03.
Cleanliness Is Godliness
The cleaner you get the weld site, the more positive your end result will be and the less time your cleanup will be. A dirty weld site (paint, undercoat, rust) equates to porosity (holes in the weld), which leads to corrosion, bubbles in your paint, weak welds and uneven weld bead, which requires more grinding. Take the time to clean both sides of the metal at the immediate weld site. Yes, the backside too. I don’t care how much cavity wax/corrosion protection you inject on the backside of that weld site, if you’ve got blistering, flaky e-coat there, the corrosion protection isn’t going to have a lot of affect. Think about it. When it comes to welding, it’s like your momma taught you: “Cleanliness is next to Godliness.”
When welding aluminum, the above goes double. Aluminum naturally forms a coating called aluminum oxide on its bare surface, which begins forming immediately after cleaning. Every good aluminum welder cleans the weld site with a stainless steel brush dedicated solely to this purpose and for aluminum only, just prior to striking an arc on the weld site. Consider this: Aluminum oxide is invisible in many cases, melts at 3,800 degrees Fahrenheit and is the second hardest substance in the world. Does that sound like something you’d want on top of a soft metal that has a melting temperature of about 1,200 degrees Fahrenheit that doesn’t change color before it melts through? I think not.
Mike West, a contributing editor to BodyShop Business, has been a shop owner for more than 30 years and a technician for more than 40 years. His shop in Seattle, Wash., has attained the I-CAR Gold Class distinction and the ASE Blue Seal of Excellence.


