If we think we have it bad … tough competition,
controls by others outside the industry and liability exposure,
just look at the glass industry and its world.
Afterward, be happy you’re in the collision
repair business!
Unfortunately for us, the glass industry is
going through what our industry is apparently heading toward.
Consolidation will ultimately affect pricing of our services,
decrease our repair turn around times and increase competition
of convenience.
To think … some time long, long ago,
the retail list price for glass was really the retail list price
for glass.
If you’re thinking about doing your own glass
work and you’ve weighed all the factors, I have two statements
for you. If you answer "true" to both, then it probably
is a necessary strategy for your future:
- Your volume of glass work internally and/or externally makes
this venture profitable. - No one in your area has the proper skills, or they don’t provide
you quality service.
Business Decisions
Taking on glass installation would be no different than any other
business venture. You need to have a reliable and competitive
wholesale source, a staff with the proper skills and certifications,
up-to-date tools and materials, and the time to properly manage
the business. Without all of these in place, you surely wouldn’t
consider entering into this arena, would you?
Keep in mind, even if you elect not to enter the glass-installation
business, you still need to understand the procedures necessary
for proper installations and the liability you continue to incur.
Whether you actually do the work internally or sublet it to another
company, in most cases, you’re still liable. Unless the glass
installation is direct billed to and the contract is directed
by the insurer, the vehicle owner has a contract with you, not
with whom you elected to do the installation. For this reason,
it’s important that you’re very well informed – even when contracting
someone to perform the glass work for you.
To do this, let’s examine some areas of consideration.
The Source
Your first area of consideration is your glass source. It’ll be
difficult to achieve discounts on glass to a competitive level
with normal, small purchase volumes. In fact, most collision repair
facilities have found they can establish contracts with outside
vendors to do the complete job, including the cost of the glass,
for what they can buy the glass for. Their profit, then, is realized
through an acceptable mark up on the glass plus the installation
labor and materials.
This doesn’t solve the problem if the source is unreliable or
you just don’t receive the service you need. In these cases, you
may elect to re-examine your sources again. Send a bid letter
explaining your needs to all vendors, and ask them to bid on your
account. Include your last year’s annual purchases in glass replacement
and other glass needs, plus set a contract time frame, such as
one year. This gives vendors an idea of your anticipated volume
and some security in their investment for your account.
Glass Standards
The role of glass today is not just to stop bugs from getting
into our eyes. Glass plays an important structural role as well,
and this role is predicted to increase in the future.
To help ensure safe installations – along with safety in general
– The National Highway Transportation Safety Administration (NHTSA)
develops Motor Vehicle Safety Standards (MVSS) for vehicles sold
in or imported to the United States. The windshield and its installation
method (original manufacturing) must be able to pass two performance
standards: MVSS 212 and MVSS 216. These two tests, even though
they’re designed for vehicle manufacturers, have also become the
standard for aftermarket repairs since we are – by default – contracted
to restore the vehicle to pre-accident condition.
- MVSS 212 – Commonly called the windshield retention test,
MVSS 212 requires the windshield to keep the front-seat occupants
from exiting through the windshield in a frontal collision. The
test is performed at 30 mph into a fixed barrier. The windshield
must maintain at least a 75 percent perimeter after unrestrained
occupants hit the windshield. - MVSS 216 – Commonly called the roll-over test, MVSS 216 requires
the windshield and A-pillar area to withstand 1.5 times the weight
of the vehicle directed downward at the front of the roof without
crushing more than 5 inches during the two-minute test. Since
roll-overs vary greatly, this test is performed with a crushing
panel applied to the front of the roof. The vehicle must be secured
so the suspension isn’t a factor, and all other windows are closed,
such as sunroofs and doors. - MVSS 208 – This is another standard that indirectly affects
the replacement of windshields. Although this standard is designed
for passenger air-bag deployment, in the specification it acknowledges
that the passenger air bags designed to rebound off the windshield
for proper positioning will do so with a force of 300 pounds per
square inch. Therefore, for proper placement of the passenger
air bags, the windshield must be able to withstand this force
without being pushed out.
The preparation, method of installation, adhesives used, temperature
and humidity during installation, and the proper cure time all
directly affect whether the installation will meet the above three
safety standards. For these reasons, it’s very important to distinguish
between glass installations from the past and what’s required
today. Even auto manufacturers have specific requirements that
differ from each other.
The Tools
Today, specialty tools have become commonplace for glass installations.
Electric or pneumatic power cutting tools, inflatable bags and
suction cups have replaced the cold knife and piano wire in many
applications. These methods allow for the removal of some very
difficult glass designs, but they require training and practice
– otherwise, the glass and interior trim may be damaged.
Even with conventional tools, training and understanding are needed.
One common mistake made when using the common cold knife is not
properly sharpening the blades before using them. It’s also important
that the blade be positioned properly when pulling it through
the urethane. The cutting blade section should rest as close and
parallel to the glass surface as possible when cutting. When this
isn’t accomplished, the blade or glass breaks and pulls through
the urethane like you’re pulling against a team of horses.
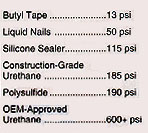
Materials and Preparation
Before windshield retention standards were implemented, most windshields
were installed with butyl tape or set in a rubber gasket. The
primary purpose of these methods was to keep the windshield from
leaking and to set it in something flexible so when the vehicle
body flexed, the windshield didn’t crack.
Butyl tape supplies a bonding strength of approximately 13 psi.
This, of course, is far from the passenger air-bag deployment
pressure placed on the windshield in the MVSS 208. However, it’s
possible for a butyl tape installation to pass the MVSS 212.
Since the Motor Vehicle Safety Standards don’t provide a minimum
strength for adhesives (except by indirect means), auto manufacturers
have their own standards or OEM specifications. The OEM-approved
urethane adhesives today supply more than 600 psi of tensile strength,
and there hasn’t been any adverse effect identified with using
an adhesive that’s too strong, just too weak.
Unfortunately, there are other factors that affect the installation
besides the adhesive specifications. These include surface preparation,
curing time, temperature, humidity and the size of the bonding
surface. As it’s been stated, "A chain is only as strong
as its weakest link." Any one of these can easily cause the
installation to fail.
Installation Method
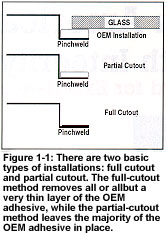
There are two basic types of installations: full cutout and partial
cutout (Figure 1-1). Note: Auto manufacturers may have specific
recommendations for the type of installation they approve, and
it’s important to follow these recommendations as outlined.
The full-cutout method removes all or all but a very thin layer
of the OEM adhesive, while the partial-cutout method leaves the
majority of the OEM adhesive in place.
Generally, auto manufacturers will have guidelines regarding whether
a partial-cutout method is approved for their vehicles but, in
many cases, the condition of the pinchweld area will dictate a
full-cutout method, even though the manufacturer allows otherwise.
If the pinchweld area is damaged, it’s likely the adhesive will
be removed completely in the repair area. This then requires a
full-cutout method.
Using the partial-cutout method (if approved) is best advised
immediately after cutting out the old windshield. This ensures
a very clean surface for bonding. If the windshield isn’t installed
immediately, it’s best to cut another layer to expose a freshly
cut urethane bonding area or perform a full-cutout method.
A special note should also be made in regard to repair work in
these areas. All metal work areas where an adhesive will be applied
should be "metal finished." In these areas, no plastic
filler should be used since its adhesion characteristics are lower
than urethane adhesive. Also during refinishing, pinchwelds should
be primed with the appropriate epoxy or self-etching primer but
generally not topcoated or cleared. Again, the paint system could
be considered the weakest link.
Surface Preparation
Proper preparation before installation is critical. The glass
surface where the adhesive is to be applied must be properly cleaned
– or the adhesive won’t be effective. This includes using a complete
system designed by the adhesive manufacturer. We’ve finally learned
not to intermix systems with our refinishing products, and it’s
extremely important to stay within a system when preparing glass
for installation too.
The cleaning begins with a glass cleaner designed for the system,
which won’t leave a film or residue. Even a finger print in the
adhesive area can cause the adhesive to fail during testing, so
this step must not be overlooked.
Some systems will require a special primer be applied to the glass.
This primer may or may not be the same primer recommended on the
pinchweld area. In some applications, an additional ultraviolet
(UV) protection coating may be called for if the glass doesn’t
already have it applied.
In the pinchweld area, special primers are designed for any bare
areas before application of the adhesives. Any loose original
adhesive must be removed, and the original urethane must be clean.
Since urethane can be porous, it’s not normally recommended to
use a solvent-type cleaner. Water can be used, but the area must
be dry before installation. Again, the adhesive manufacturer will
have specific recommendations for these conditions.
Curing Times
You’ve probably heard phrases such as "ultimate curing time"
and "safe drive-away time" when discussing adhesives.
But be very careful when considering what these phrases actually
mean; they may not be referring to what you think.
The ultimate cure time is simply the time it takes the adhesive
to fully cure. The safe drive-away time refers to the time it
takes to reach or exceed MVSS 212. Wait a minute, what about the
other two standards? Because these phrases are often used too
loosely, they may imply something you don’t mean. Make sure to
ask specific questions.
Also, the ultimate cure time and the safe drive-away time are
sometimes ignored to facilitate speedy delivery of the vehicle
back to the owner. Some adhesive advertising may even loosely
use these terms for a competitive advantage.
Keep in mind, if you install (or have installed) a windshield
and the adhesive isn’t totally cured or doesn’t meet all three
safety standards and you deliver the vehicle to the customer,
you’ve exposed yourself and the company to an extreme liability
situation.
If the customer (or employees, for that matter) has an accident
in the vehicle and the adhesive hasn’t properly cured to exceed
these standards, this installation could cause personal injury
or death. If this happens – whether you personally installed the
windshield, had an employee do it or had another company do it
– you are liable. You may be asking yourself, "What’s the
chance of the vehicle getting into another collision on the way
home?" It’s not worth the risk, believe me.
Temperature and Humidity
Different adhesives are designed for different weather conditions.
Some may be single component while others may be two component.
They all have a specific range of use for which they were designed,
so it’s important to know the specifics of all products in the
system and make sure they’re used accordingly. It’s also recommended
to allow adhesives to dry naturally unless specifically designated
otherwise. Heating units normally aren’t advised for most adhesives.
Not only is temperature a factor, but so is humidity. Urethanes
used today cure with the assistance of moisture in the air. So
even if the room temperature is above 70 degrees F, it’s possible
to have very low humidity, which will hinder proper curing times.
For situations such as this, it may be necessary to use running
water to increase the moisture content of the air.
Proper Bonding
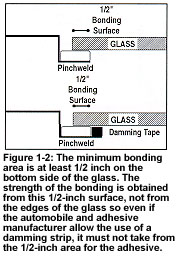
Even after proper surface preparation, the adhesive still must
have a large enough area to bond to the glass properly. The minimum
bonding area is at least 1/2 inch on the bottom side of the glass
(Figure 1-2). The strength of the bonding is obtained from this
1/2-inch surface, not from the edges of the glass.
Sometimes, a damming strip or tape is used as a backstop for the
urethane adhesive. This damming strip is placed down on the edge
of the pinchweld. Note: Using these damming strips may not be
possible on very narrow pinchweld areas. Even if the automobile
and adhesive manufacturer allow the use of a damming strip, it
must not take from the 1/2-inch area for the adhesive (Figure
1-2).
It’s also important to understand that these damming tapes or
strips don’t provide sufficient bonding for an immediate "drive
away." They assist in holding the glass in place during curing,
but this doesn’t meet all safety standards.
Documentation
Having a method of documenting or receiving documentation from
your vendor about these installation factors is also extremely
important. The following information should always be documented
when the installation takes place:
- Date and time of installation.
- Vehicle information (year, make, VIN number).
- Owner information (name, address, repair order).
- Installer information (name, company).
- Location of installation (where, inside or outside, temperature,
relative humidity). - Part information (name, part number/NAGS number, clips and
moldings replaced). - Adhesive (brand, part number, batch number, primer used).
- Installation method (full or partial, dam type used).
- Release (date and time).
- Additional notes.
Without this documentation, you have no proof of the method or
products used if there’s ever a question regarding proper installation.
Many pre-made forms are available to document this, but what’s
important is that you do it consistently. Whether you do the glass
work internally or sublet it, you need documentation for every
job.
Managing the Business
The collision repair portion of your business requires proper
management to perform and be successful. And, if you elect to
venture into the glass business, you need to have the management
skills and knowledge for this industry too. There are national,
state and local associations for the glass industry to help you
do this, just as there are for the collision industry. I’ve had
the opportunity to speak with these glass-specific groups in the
past, and they offer a valuable service to their membership.
The key here is to not take for granted the skills and investment
required to perform this service. And don’t forget the liability
issues involved, which can be extreme; some of the awards given
by the courts in the last several years have been in the millions
of dollars.
If you thought auto glass installation was easy and that anyone
could do it, think again. The knowledge and skills required today
for proper glass installation equal the knowledge and skills required
to properly repair collision damage on today’s vehicles. And,
as with collision repair, glass installation isn’t for everyone.
The question is: Is it for you?
Contributing editor Tony Passwater is a long-time industry
educator and consultant who’s been a collision repair facility
owner, vocational educator and I-CAR international instructor.
He’s taught seminars across the United States, Korea and China
and is currently an industry consultant. He can be contacted at
(317) 290-0611 or [email protected].
|
Training and Certification Proper training and certification are extremely critical today when it comes to proper glass installation. The days of just "short cutting it" and using a bead of urethane are gone!
Major suppliers generally have their own internal training and
National training organizations dedicated to the auto glass industry
For certification, the National Glass Association (NGA) offers
If you wish to become informed but still want to sublet your glass |


