The term sectioning makes some of us regress into our memories to a time when we lived to cut and splice automobile bodies to such an extent that they became unrecognizable as to their original make or model. Come on, admit it, at least half of you are looking back, somewhat reverently, thinking about the first car you decided to display your not-yet-refined talents on.
I know that at least to some of us, these memories rank right up there with some of our other memorable firsts: our first love, our first car (which could’ve been one in the same).
Many of these so-called sectioning projects were so extensive that they brought new meaning to the word redundancy. The countless hours of hammer welding, metal shrinking and smoothing those seemingly mile-long section lines were actually great practice for learning some techniques that can still help us today with the everyday chores we face in the modern collision repair industry.
But I’m not here to talk about custom cars, although I could easily get sidetracked into a deep, meaningful conversation on such a subject. The topic at hand is sectioning, something that most all of us who’ve been in this industry for a good while have done repeatedly. Many of us learned the methods we use by mirroring others we’ve worked with or trained under. It’s also a good idea to heed manufacturers recommendations, which are easy to understand and help to ensure a repair of such quality that even the most critical observer would be forced to love it.
Why discuss sectioning? Because as any of you who’ve been in the industry for more than a week have likely realized, on many occasions, sectioning is the only realistic approach to a repair.
Take, as an example, the door opening and rocker assembly. On many vehicles, this panel is installed during the assembly process before the roof, fenders and quarter panel. So to install this piece in its entirety, you have to remove each of the panels that were installed after the piece in question was put in place at the factory. Fenders are relatively easy, but the roof and quarter panel are normally things you remove only when you’re throwing them away. In order to make a realistic and reasonable repair, you need to find an acceptable method that allows you to replace the damaged portion of these (and other) panels without disturbing any more of the undamaged body than necessary. This method (you guessed it) is sectioning.
One thing that’s caught my attention over the last several years, however, is that unibodies and full-framed vehicles are becoming more and more similar. In the not-so-distant past, if a unibody manufacturer recommended sectioning, there’d be lots of precautions and stipulations. On the other hand, its full-framed counterpart seemingly had a much more relaxed set of sectioning rules.
Not so these days. As body characteristics and construction of modern full-framed vehicles become more like unibodies, the precautionary measures we must take to repair them are also becoming more alike. I’ve even heard at least one manufacturer use the term “body on frame and unibody dual construction,” emphasizing the best of both worlds in their sales pitch: the safety of a unibody, which has crumple zones to protect passengers, combined with the strength of a full-framed vehicle.
What this gives us in the repair industry, however, is a new set of rules for this hybrid of late. Not only do we have the advantages of both, we also have to take the precautions associated with both.
New Materials, New Techniques
Now, admittedly, sectioning today’s vehicles involves a few techniques that differ from what we used in the ’70s on those multi-hued customs of yesteryear. But some techniques are the same, and the properties of metal you learned about during some of those projects are invaluable (whether you learned them yourself or heard horror stories from the old pros).
Some of the materials we’re working with today, however, are altogether different from the materials we used to work with. And these new materials require our using some methods and practicing some precautions that were unheard of when I started in this business back in the ’70s.
Still, the new materials and designs aren’t that hard to deal with. I’ve resolved myself to treating all of the sectioning I do as if it were being done on a unibody. I also treat the steel components as if they were all HSLA steel, keeping the heat to a minimum and staying away from the historical magical brazing rod. I’ve probably run enough brazing rod on the old cars to stretch half way to the moon, but there’s really very few places on today’s vehicles that brass would be tolerated, let alone preferred.
I can sense you’re preparing yourself for a step-by-step on sectioning a vehicle, but I’m not going to do that because you’d most likely forget the details before you got a chance to put them to use. After all, each individual vehicle typically has its own specific instructions. Instead, I’m going to pass along some general useful rules and tips for sectioning that have helped to keep me and some of my mentors out of trouble.
Service Manual: Try It, You’ll Like It
When contemplating a repair using sectioning techniques, consult a service manual for the make and model you’re preparing to work on. In the not-so-distant past, there was very little information specific to individual vehicles available for collision repair shops. You had to hope the technician you assigned to the vehicle had a clue about metal-to-metal joining and had been given more than his deserving share of common sense.
Today, there are so many things designed into these components that we can’t just shoot from the hip. We have to do our part by letting the manufacturer do their part designing repair methods and testing said methods to confirm the integrity of the repair. In fact, many of the parts we receive these days come with an instruction sheet detailing sectioning procedures when they’re applicable.
When you get into the directions for sectioning these components, you’ll be amazed at how detailed they are. Some of the repair procedures listed will give you exact dimensions of where to make your section joint and what kind of joint is required. The exacting directions (when available) are a real confidence builder for me. I know I certainly couldn’t begin to do the testing that’s involved in making those directions.
This reminds me of the countless hours I spent as a kid putting together model cars. When building my first few model cars, I scoured the directions, following every detail. But after building a few of them, I got lax in reading the directions. I don’t recommend this – especially when it comes to reading sectioning directions. Updated information can help you to do a quicker and safer repair.
Directions Not Included
Occasionally you’ll run into a vehicle for which the OEM doesn’t recommend against sectioning, but doesn’t supply directions either. Although I believe nothing beats the manufacturer’s directions, they’re not available in every circumstance. And as we work on some of the older cars, we run into this circumstance more often and need to keep in mind some basic rules:
-
- Perform all of the pulls and any inner structure straightening that’s required before you even consider where to make a cut.
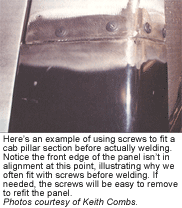
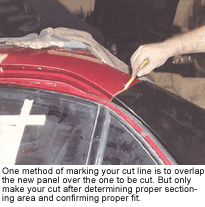
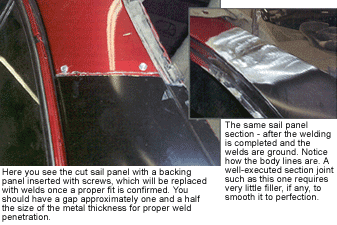
- When planning your sectioning location, try to duplicate the strengths and weaknesses that were designed into the vehicle at hand. If the area where you’re planning to make your section line has many layers, you might want to find somewhere that can be more easily sectioned. If you find yourself cutting into crumple zones or even holes, take a step back and give thought to another location. Common sense is the best tool you’ve got.
- Execute the plan. Measure, measure and measure. And when you’re sure the measurements are correct, measure again! As simple as that seems, it’s surprising how many times it trips up some of the best intentions.
That reminds me of a repair that a friend did early in his body repair career on a total he’d bought to rebuild. Seems this well-intentioned novice decided the best way to repair this aging station wagon was to install a used quarter panel section. After measuring out the parts and carefully making his section joints, he feverishly cut, welded and finished his welds, making good time. The only problem was that when the door was shut, it overlapped the quarter panel by about a quarter of an inch. In the words of Maxwell Smart: “Missed it by this much, Chief.” After I jokingly told him that he’d have to cut the door down to fit the hole, he knew right away what he had to do. I went back to his shop the next day and guess what? He actually took three eighths of an inch out of the middle of the door, saying that “the window will be no problem because it’s tapered and it just won’t roll up quite as far.” That left just enough room for the gap. I have to admire his ambition, but his execution was a bit lacking. I’m sure it drove fine though, since most of his turns to get home were to the left anyway.
- Be sure to practice your welds before you start welding the vehicle you’re working on. Excellent welds are mandatory. It doesn’t matter how well it fits if it falls off.
- After welding, get out the magic wand to make sure you get sufficient corrosion protection materials into every nook and cranny. I call rust the “anti-weld.” As slow as rust eats away at metal, it eats fast enough to start compromising structural integrity within a short time. If you don’t go to the extra lengths necessary to retard that ever-so-present corrosion beast, it’ll start eating its away around those spots that are susceptible to such problems.
Use Your Head
Use every bit of information that’s been tested and made available to you. If the OEM doesn’t have specific recommendations for sectioning (or against it), then find other recommendations. Check out I-CAR’s Uniform Procedures for Collision Repair or Tech-Cor’s recommendations to see if they apply to the circumstance at hand. And remember that when you check out such directions, they’ll almost always tell you to follow the manufacturer’s recommendations when doing these repairs. (Easier said than done.) I said it before, but it’s worth repeating: Use the most valuable tool you have at your disposal – common sense. It’s rare to find, but worth the search.
Writer Keith Combs is the body shop manager at Bill Roberts Chevrolet in Bolivar, Mo., and a GM/ASE Master Collision Repair/Refinish Technician of the Year. He’s been in the collision repair industry for 23 years.


