 Without a doubt, bonding is becoming a more important and prevalent tool in the hands of auto manufacturers and collision repairers alike. OEMs are taking advantage of the increased design flexibility, improved ride dynamics and reduced variability offered by adhesives, while repairers are becoming more profitable and improving their Key Performance Indicators.
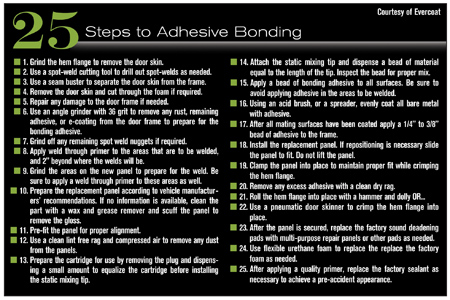
Glue Magic
If you’re just getting started with adhesives in your shop, it can seem a bit daunting. “Glue” may seem more appropriate to the school room than the shop floor. After all, you understand nuts and bolts, and you trust welding. Adhesives, though, can seem a little like magic. However, the pass/fail rates of most welding certification programs show that welding doesn’t always deserve that trust. A repair process that includes the best of both philosophies, where appropriate, offers the best solution.
Luckily, despite the large number of products and applications available out there, the general procedures for using adhesives are fairly universal and not all that different from anything else.
When and How
As with any new process or tool, the first task is to understand when and how to use it. Just like your tool box contains impact wrenches, screwdrivers, hammers and pry bars, your adhesive cabinet will contain different products useful in a variety of situations: tapes for attaching body side moldings, sprays for adhering carpet and cartridges for bonding panels. But just as you can’t afford to buy every option from the tool catalog, avoid loading up your shop with too many different adhesives. While there are many that can be purchased, generally, a smaller subset will get most jobs done. Work with your supplier to identify just what repairs you’re interested in starting with and then grow your portfolio from there.
Work with your local jobber and manufacturer’s representative to learn how to use these new tools. Depending on your interest and needs, your training options can range from a 10-minute, one-on-one introduction to a four-hour seminar. Get hands-on with the rep during training and take the time to practice the new techniques a few times before you expect perfection.
Getting Organized
Before you start a repair that will require adhesives, do yourself a favor and make sure that you have all the components you’ll need to complete the repair. If you’re using a fast-curing product that measures its working time in seconds rather than minutes, unexpectedly needing to spend time looking for something could have dire consequences. The first few times you perform the repair, review the instructions provided in the charts and directions for use before you start. They will help you remember all the necessary accessories – from applicator guns and nozzles to abrasives and clamps.
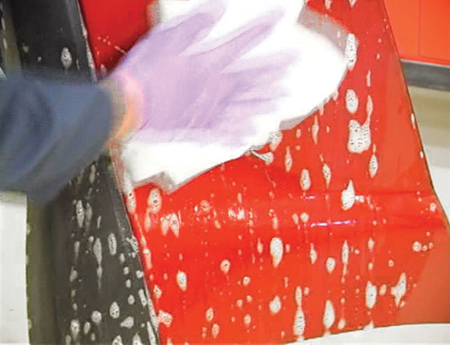
The first step in any adhesive repair involves preparing the surfaces of your workpieces. Start by washing them with soap and water to remove dust and dirt. Follow that up with a good surface cleaner that can remove any remaining wax, grease or tar, all of which can disrupt the adhesive’s ability to bond to the surface. Also, make sure to remove other items such as paint overspray, rust, scale or mold release agents that may not have the same bond strength as your adhesive. Choose a bond foam tape that will adhere well to the paint overspray on the back of a piece of trim molding. However, if the bond-line gets stressed, the paint overspray is likely to release from the molding and take the tape with it. Non-woven scuff pads work well for removing this overspray.
At this stage, dry-fitting the parts is a good idea. Don’t assume that the parts are going to come together and fit perfectly, even if they’re new. Before you start applying anything, make sure that you know how you’re going to install the part and hold it in place during the curing process. This is especially important for larger panels, such as truck bedsides and quarter panels.
Once the part has been fitted and is clean, refer to the adhesive manufacturer’s directions for use to see if additional surface preparation is needed. Adhesives typically use a combination of mechanical and chemical forces to create the bond needed. Abrasive scratches (typically in the grade range of 36 grit to 180 grit) give the adhesive more surface area to grab onto. In the case of plastic repair, adhesion promoters can modify the surface energy of the workpiece to encourage the creation of bonds at the molecular level. Depending on the repair type and the materials involved, both abrasive and chemical treatments may be required for a robust repair. Again, your adhesive supplier can provide you with the appropriate recommendations.
Finally, make sure that the parts are brought up to a reasonably warm temperature: 75º F is generally recommended, but anything above 60º-65º F will most likely be okay. Heat allows adhesives to flow into the nooks and crannies of a surface and energizes the activity at the molecular level. If the temperature of your parts and adhesive is too low, the final bond may be compromised and thus will take longer to cure.
Time for Adhesive
Now that the parts are ready to go, it’s time to move on to the adhesive. Depending upon the delivery format of the product, you may have some additional steps. Removing the liner from a strip of foam attachement tape is pretty straightforward, as is shaking the rattle-can of aerosol spray adhesive. However, these steps are no less critical than the equalization steps for a two-component cartridge. Again, the manufacturer’s directions for use will lay out what needs to be done and the accessories needed to be successful.
For instance, let’s take a look at that two-component adhesive cartridge. Before it can be used for the first time, the plunger seals at the back need to be equalized before the mixing nozzle is installed. This is accomplished by placing the cartridge in the recommended applicator gun and caulking a small amount of material to ensure both components of the adhesive are being extruded from the cartridge. If this isn’t done, the mix ratio of the delivered adhesive could be incorrect, causing the final bond to underperform.
Once the cartridge has been equalized, install the recommended mixing nozzle. Small differences in the flow characteristics of different nozzle models can impact the mixing of the components. Since the adhesive was developed for use through a specific mixing nozzle, substituting just any mixing nozzle can have disastrous effects. Similarly, disregarding the nozzle and trying to mix the product by hand will most likely cause defects. This is one instance where you will most likely not be rewarded for your thrift. Use the recommended mixing nozzles and make sure that you won’t have to experience a costly re-do due to poor mixing.
Now that both the surface and the adhesive are ready to go, it’s time to bring them together in a step called “wet-out.” Adhesives need intimate contact with the surface – if they’re not touching, they’re not bonding. For a tape, this usually involves firm rolling pressure. For a liquid or paste product, this means using a brush or spreader to force the adhesive into any and all surface scratches and pores.
Once the surface has been “wet out,” additional adhesive can be added to create the bridging or bonding layer between the two parts. Align the parts and bring them together using firm, even pressure along the entire bond line. Depending upon the clamp or set time of the adhesive, the parts will need to be fixtured together for a period of time until the adhesive’s handling strength has been reached.
When replacing a door skin, fixturing can generally be accomplished by hemming the door outer about the door inner, avoiding the use of clamps. Similarly, the increasing availability of Squeeze Type Resistance Spot Welding (STRSW) equipment allows for the self-fixturing process.
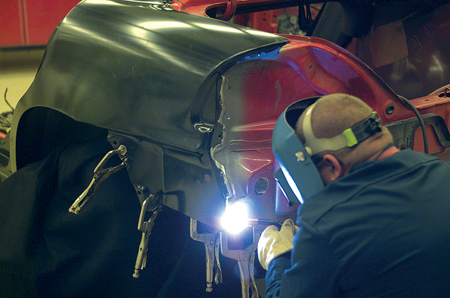
Weld Bonding
Weld bonding refers to the practice of using both adhesives and STRSW along the same joint. Auto manufacturers have long acknowledged the benefit of bonded joints, but have struggled with the need to allow for the adhesive to cure before moving the structure. Weld bonding offers the best of both worlds: the instant handling characteristics of a spot weld with the continuous seal and joint stiffness inherent in an adhesive bond.
When using weld bonding, it’s important to take into account the conductivity and thickness of the adhesive between the panels. If the adhesive layer is too thin, it will be difficult to wet out to both sides. If the adhesive layer is too thick, an appropriately sized weld nugget will not form. Either way, the joint strength could be damaged rather than reinforced. Look for adhesives that identify their suitability for weld bonding and include spacer beads to provide optimum bond line thickness.
Once the adhesive has cured long enough to reach its handling strength, any fixturing devices can be removed and the job can move on to the final refinish steps. With a bit of practice, any shop can enjoy the benefits of adhesive bonding.
Jason J. Scharton is the global marketing manager for the 3M Automotive Aftermarket Division. He can be reached at (651) 733-2569 or [email protected].


