A valued customer has just returned her 2005 Chevrolet Trailblazer to your shop with concerns about the way the rear tailgate is opening and closing. Recently, your shop repaired a large dent in the tailgate and performed the necessary steps to refinish and reassemble it properly.
As you inspect the vehicle, you notice that there are several cracks around the upper hinges of the tailgate. A couple questions cross your mind: Is this due to the accident, and how should I approach this situation?
In this instance, the manufacturer has published a procedure to identify and correct this situation. If you’re not aware of a manufacturer’s published Technical Service Bulletins, you may perform unnecessary additional repairs to correct a condition that may or may not be a factory defect. This article will explain a published procedure to correct a binding liftgate and/or liftgate glass on 2002 to 2006 Chevrolet Trailblazers, Trailblazer EXTs, GMC Envoys and GMC Envoy XLs.
Condition
Some customers may comment that the liftgate or the liftgate glass doesn’t fit properly. In some extreme cases, the rear liftgate glass may have broken.
The reason this may have happened is that a couple of welds may have broken around the upper liftgate hinge(s) or a crack may have formed around the inner two welds. Remove the liftgate and inspect the inner to outer panel welds at the upper hinges.
Caution: Exposure to isocyanates during paint preparation and application processes can cause severe breathing problems. Read and follow all of the instructions from the manufacturer’s line of painting materials, equipment and protective gear.
IMPORTANT: The basecoat/clearcoat paint is factory applied in the following four layers in order to give the finish a high-gloss look:
- A cathodic immersion primer.
- A primer/surfacer.
- A basecoat.
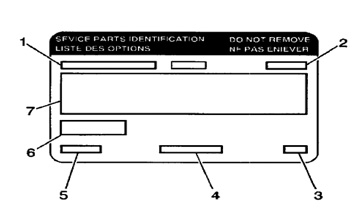
- A clear top coat (clearcoat). Refer to the Service Parts ID Label (figure 2) to identify the type of top coat on the vehicle. This label contains all paint related information for the vehicle, including paint technology, paint codes, trim level and any special order paint colors. It’s located inside the instrument panel I/P compartment and is used to help identify the vehicle’s original parts and options.
Parts Required
Part # – 11562552
Description – Bolt with rubber bumper 2006-2007
Part # – 11588626
Description – Bolt with rubber bumper 2002-2005
Service Procedure
Always refer to ALLDATA® for safety procedures, identification of material types, recommended refinish materials, removal and installation procedures.
Always refer to General Motors for questions relating to applicable or non-applicable warranty repair information.
Procedure
Step 1
• Remove the liftgate trim and electrical wiring from the
liftgate.
Step 2
• Remove the liftgate and liftgate glass from the vehicle.
Step 3
• Straighten the sheet metal at the hinges. (Figure 1)
Step 4
• Drill four 5/16” holes through the inner panel at the four
locations shown in the illustration above.
Step 5
• Prepare the sheet metal around the four holes for weld-
ing.
Step 6
• Clamp the inner and outer panel together.
IMPORTANT: Do not use oxyacetylene welding equipment. MIG weld only.
Step 7
• Weld the crack/four holes that were drilled
through the inner panel using the appropriate welding
technique.
Step 8
• Clean and prepare all of the welding surfaces.
Step 9
• Return the surface to its original contour.
Step 10
• Spot paint and clear the area around the hinges.
Step 11
• Reinstall the liftgate.
Step 12
• Replace the upper two bumpers and inspect the lower two bumpers. Replace as necessary.
Writer Dan Espersen is the ALLDATA CollisionConnectSM Program Manager. Espersen is I-CAR Platinum Certified, a Gold Pin Member of the Collision Industry Conference (CIC) and holds an AA degree in Automotive Technology. He has 15 years of experience in the collision industry and 17 years of experience in the automotive industry.
© 2007 ALLDATA LLC. All rights reserved. All technical information, images and specifications are from the ALLDATA Product. ALLDATA is a registered trademark of ALLDATA LLC. All other marks are the property of their respective holders. General Motors, GMC, Chevrolet, Trailblazer, Trailblazer EXT, Envoy and Envoy XL are registered trademarks of the General Motors Corporation and are being used solely for reference and application purposes.