Your technician is installing a brand-new OEM rear bumper cover on a 2010 Ford Mustang but is struggling to properly fit the cover to the quarter panel. He or she has spent several frustrating hours trying to make sure the fit is acceptable and will pass final inspection.
Upon completion, you find that the new bumper cover is still in need of alignment. It just doesn’t quite meet your expectations and exacting standards.
Another hour or so later, after your tech tries again to make the cover fit properly, it still appears misaligned. Some critical questions now come
into play:
• Should you deliver this vehicle to the customer as is, knowing that you and your staff have done everything you could to achieve the best fit possible?
• Should you order a new bumper cover from Ford, knowing that this may possibly hold up the repair for another day or so?
• Is there some underlying damage that the technician may not have seen?
Your shop has spent valuable production time on a repair that could have been reduced or eliminated by performing a little research prior to production. Technical Service Bulletins (TSBs) are a valuable tool to help fix problems just like these.
Here’s a TSB from Ford that would have helped you and your technician resolve this issue.
Service Information
Always refer to ALLDATA Collision for safety procedures, identification of material types, recommended refinish materials, and removal and installation procedures. Always refer to the vehicle manufacturer for questions relating to applicable or non-applicable warranty repair information.
Application
2010 Ford Mustangs built on or before Sept. 15, 2009.
Condition
Some 2010 Ford Mustangs built on or before Sept. 15, 2009, may exhibit a rear bumper cover fit/alignment issue along the edge of the quarter panel. Improved bumper brackets are available to correct this condition.
Repair Procedure
Prior to performing any repairs, ensure that the vehicle is clean. Any dirt or debris must be removed from the bumper cover to prevent paint damage. The bumper cover will be reused, and special precautions need to be taken to prevent damage. Locate a suitable place to put the removed bumper cover for the time being. It needs to be placed on a soft surface to prevent any damage to the exterior surface.
1. Follow Workshop Manual (WSM), Section 501-19 for Bumper Cover – Rear Removal.
2. Remove the right (RH) and left (LH) side plastic bumper brackets, three per side.
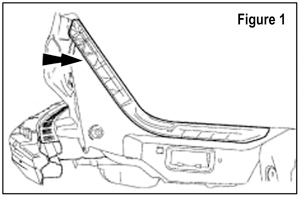
3. Attach the latest level service dog leg bracket. Push the dog leg bracket toward the quarter panel and secure the top bolt, followed by the lower. Torque the bolts to 18 lb.-in. (2 N.m) (Figure 1).
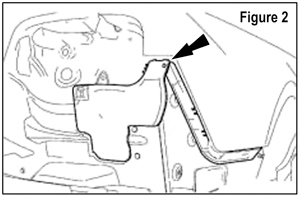
4. Install the RH/LH rear bumper bracket. Secure the rear bumper bracket to the dog leg bracket first followed by the remaining bolts. Torque all bolts to 18 lb.-in. (2N.m) (Figure 2).
5. Install the lower bumper bracket. Torque bolts to 18 lb.-in. (2N.m).
6. Install the rear bumper cover.
NOTE: This repair/service procedure is excerpted from a TSB published by the vehicle manufacturer and is intended for use by trained, professional technicians with the knowledge, tools and equipment to do the job properly and safely. This procedure should not be performed by “do-it-yourselfers.” A
Dan Espersen is the ALLDATA Collision Senior Program Manager, a Gold Pin Member of the Collision Industry Conference (CIC) and holds an AA Degree in Automotive Technology. He has 17 years of experience in the collision industry plus 17 years of experience in the automotive industry.
© 2010 ALLDATA LLC. All rights reserved. All technical information, images and specifications are from ALLDATA Collision. ALLDATA is a registered trademark and ALLDATA Collision is a mark of ALLDATA LLC. All other marks are the property of their respective holders.
© Ford and Mustang are registered trademark names and model designations of Ford Motor Company. All trademark names and model designations are being used solely for reference and application purposes.