
A customer returns to your shop to compliment you and your crew on another job well done, and you jokingly ask if the quarter panel you installed stayed on. After seeing a blank look form on your customer’s face, you tell him that you’re just asking so you can write down which glue you used since the quarter panel actually stayed on for more than two weeks.
I’m just kidding! Don’t say this to your customers!
Still, it’s true that, over the years, we’ve all witnessed cases where the adhesion just wasn’t sufficient to keep something … for lack of a better word … adhered. (Of course, I’m referring to things we’ve all seen from shops across town – never things that have gone haywire in our own shops since everything goes smoothly ’cause we always follow manufacturers’ recommendations and never push our luck.) For example, I’ve had vehicle owners bring in chunks of body putty that were 3 to 4 inches thick, asking if we could reinstall the part because the guy who originally “fixed” their car had either gone out of business or moved to an undisclosed location.
And this same problem – lack of adhesion – will occur when metal bonding if you improperly use the product, leaving you with a sticky situation regarding customer relations.
Let me clarify one thing before I go on. I’m not insinuating that metal bonding products will fail you. On the contrary, I believe these products aid us in doing repairs better than ever before when they’re used properly and in the capacity for which they were designed. In fact, OEMs use adhesives extensively when building new cars because they’re far more durable than any kind of welding. Welding burns away protective coatings, even in OE assemblies.
Many in the industry also contend that there are lots of problems associated with the traditional, OE-approved method of MIG welding panels on a car, saying that the welding on the street today is often unsafe and unreliable. In fact, says one repairer, “the failure rate on the I-CAR welding certification is scandalously high.” Don’t get me wrong. There’s nothing wrong with welding – as long as it’s done properly.
Despite the car manufacturers extensive use of adhesives, I don’t know how many OEMs advise you to use these materials in the capacity I’m about to describe. If the OEM doesn’t have recommendations for you to follow regarding this procedure, follow the adhesive manufacturer’s recommendations. Keep in mind that if you decide to use the methods discussed here, it’s up to you to decide if these products give the kind of performance that you’re willing to back up. Regardless of whether the method you use is “OE approved” or warranted by the adhesive manufacturer, in the end, it’s your reputation and your responsibility for the repair you do.
Ready to take the big plunge and actually give this method a try? If so, you’ll need to take some of the usual steps involved in any panel replacement – along with a few new ones:
- Remove the old panel after doing any “rough in” pulls or straightening required to ensure the panel will have a stress-free, semi-smooth surface to adhere to.
- Position the vehicle as to simulate curbside stress on the suspension so there’s no abnormal stress on the inner structure.
- Fit the panel to a point so you can position and reposition it on the body with repeatable accuracy. It’s no time to find out the panel isn’t quite lined up once you have the panels coated with adhesive or, worse yet, the next day after the adhesive is set up. We all have different methods of ensuring a panel fits before we actually “nail” it in place. You can use strategically placed screws along with clamps (you’ll need plenty of clamps) in key areas to ensure the repeatable placement required for this method, or you can just use clamps. Experiment until you find the method that allows you to comfortably place the panel where it belongs without error and without too much delay.
- Plan the areas that need to be welded and the areas that need to be glued. Not all adhesive manufacturers agree about welding. Some say welding is the only acceptable method to adhere metal to metal in a high-stress area, such as the quarter to rear panel, and across the sail panel area. When in doubt, weld it. Others rely on their adhesive in all but the most abused stress areas. Follow the adhesive manufacturer’s recommendations if the OEM doesn’t have any. Also, each adhesive manufacturer recommends locations where the welds need to be made. Since the adhesive manufacturer is guaranteeing the panel to stay on, I use whatever they recommend.
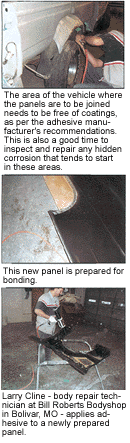
- Prep the panels for adhesion. Depending on what type of weld you’re going to make and the manufacturer’s recommendations, prep the weld areas as directed. Cleanliness is critical when using adhesives for metal bonding. Adhesives will stick to dirt, but the dirt will then separate from itself – causing the panel to come loose.
- Grind the mating surfaces of the new panel and the structure to receive the new panel. This is necessary to ensure a sound bond. Keep in mind that you should only grind as much area as you’re prepared to cover with adhesive. Remove all coatings where you want the adhesive to bond, as per the adhesive manufacturer’s directions.
- Perform additional masking to protect the interior and adjacent panels. This will take a little time, but the time you save by not removing all these things is much more than the time it takes to mask them. A word of caution: If you need to do any welding after the adhesive application, remove the paper and replace it with welding blankets since the paper is very flammable. (Seems obvious, but we learned this the hard way in our shop. Oops!)
- Prepare to have an extra hand around to help position the panel once you’ve put the adhesive on it.
- Put on some gloves since this stuff is really messy and sticky.
- Apply the adhesive to the new panel and to the prepared surfaces on the body. Using a spreader, smooth the adhesive to cover all the bare metal and to give a wide enough and tall enough layer to ensure proper squeeze-out showing the mating of the panels is complete. When applying the adhesive, be sure to cover all of the bare metal. Don’t leave any exposed.
- Position the panel in that perfectly fitted position you practiced earlier while the adhesive is still wet. It’d be ideal if you were able to set the panel directly where it belongs on your first stab – but that’s unlikely. In the event you need slight repositioning, try not to pull the panel back loose. Instead, if possible, just slide it to the position where it belongs. If you pull it back loose, you increase the chances of creating additional air pockets and poor adhesion.
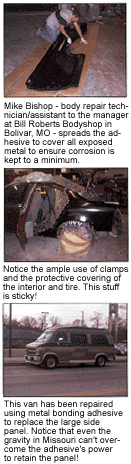
- Place the alignment screws (if used) and clamps in as many locations as possible. Don’t be shy; use all the clamps you can gather. You have little to worry about concerning too much pressure when clamping, since most products of this type have “glass beads” that prevent pressure from becoming a problem. Early in the research stages of this technology, excessive clamping pressures caused too much squeeze out, causing poor adhesion. Then came along the glass beads, which hold the space open enough for adequate adhesive retention. If the product you’re using doesn’t contain glass beads, adjust accordingly.
- Remove all the excess you can before the adhesive sets up. This stuff is a bear to get off after it’s dried, so spend some time here or you’ll have to chisel and grind the excess that you missed. Also, the adhesive will minimize the seam sealing you have to do later since it seals as it bonds.
- Look at all the seams, even the ones you have to stand on your head to see. Missing a void at this point could cause you to have to get out more sealer later when your hands are clean or, worse yet, cause a water-intrusion problem that can ruffle the feathers of even the most tolerant of customers.
- Follow the recommendations for – or against – welding. It’s at this point that some of the manufacturers disagree if, when and how the welding should be done. Some advocate spot welding through the adhesive while wet, while others suggest leaving a void in the adhesive and welding after the adhesive dries. Again, the theme here should be to stick (no pun intended) to the recommendations.
- Remove the clamps.
- Fill any screw holes and open seams, and smooth any sectioning lines. Each manufacturer recommends specific products for this. After applying the filler on the sectioning line, it’s time to do that monotonous, but ever so important, chore of sealing seams and screw holes. When you’re finished, the filler on the sectioning line should be dry enough for you to finish with conventional methods and materials to ready the panel for paint.
That’s pretty much the gist of it. Just be sure to follow the recommendations, and the repair will likely go without a hitch. These products have all been tested by various sources, and the companies marketing them boast of “compliance to FMVSS 301 fuel system integrity” or to surviving the “Federal Motor Vehicle Safety Standard (FMVSS) 208 Occupant crash protection.” As for my experience, I’ve used this type of product on a number of repairs and have yet to see any drawbacks.
Most of the makers of the adhesive products offer a lifetime warranty to cover about any problem that might arise in relation to adhesive repairs. That’s real confidence on their part. I’ve yet to hear of a welder manufacturer that will guarantee my welds.
And I’ve yet to see a situation where any panel that’s been replaced is covered by a warranty other than the repair shop’s (except the rust-through guarantee that comes with new OEM panels from most of the OEMs, and I don’t believe that using adhesives would void that warranty). Once the panel has been replaced, the only real warranty a consumer can count on is that of the repair shop.
The OEMs haven’t approved wide use of these products as of yet, but I’ve seen some recent bulletins that make me think they’re slowly coming around, if only in limited cases. It wouldn’t surprise me if, some day, they build a complete vehicle using nothing but adhesives to join it together.
Until then, people outside the industry are discovering their own unique ways to use adhesives. I’ve seen adhesives used to make worn pulleys fit shafts, and a friend of mine reattached half of a broken hot tub using adhesives. He even filled out the warranty card and sent it in (hot tubs have serial numbers). Even though the repair will likely last the lifetime of the hot tub, it’d be interesting to see how the paperwork would be written up on that claim if the job ever did fail: 10 days car rental, hotel room with hot tub.
Writer Keith Combs is the body shop manager at Bill Roberts Chevrolet in Bolivar, Mo., and a GM/ASE Master Collision Repair/Refinish Technician of the Year. He’s been in the collision repair industry for 23 years.


