 Perhaps no aspects of a collision repair are of greater concern to you and your customers than the systems designed to protect drivers and passengers.
Insurers, vehicle owners and repairers have a vested interest in a safe repair. The only surefire way to ensure a proper repair of seat belt and airbag systems is to comply with OEM procedures. After all, who is better qualified to supply the information you need than the vehicle manufacturer?
Here are the OE removal and replacement procedures for the service, repair, removal and replacement of the inflatable restraint side impact sensor on a 2011 Cadillac Escalade.
Service Information
Always refer to ALLDATA Collision for safety procedures, identification of material types, recommended refinish materials, removal and installation procedures. Always refer to the manufacturer for questions relating to applicable or non-applicable warranty repair information.
Model
2011 Cadillac Truck Escalade AWD V8-6.2L
Repair Procedure
Warning: When performing service on or near the SIR components or the SIR wiring, the SIR system must be disabled. Refer to SIR Disabling and Enabling. Failure to observe the correct procedure could cause deployment of the SIR components, personal injury or unnecessary SIR system repairs.
Warning: Do not strike or jolt the inflatable restraint side impact sensor (SIS). Before applying power to the SIS, make sure that it’s securely fastened. Failure to observe the correct installation procedures could cause SIR deployment, personal injury or unnecessary SIR system repairs.
1. Disable the inflatable supplemental restraint (SIR) system. Refer to SIR Disabling and Enabling.
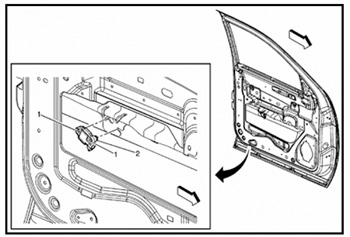
2. Remove the front side door trim panel. Refer to Front Side Door Trim Panel Replacement.
3. Remove the front side door water deflector. Refer to Front Side Door Water Deflector Replacement.
Parts Information
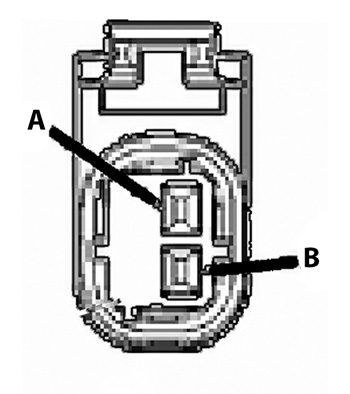
Inflatable restraint side impact sensor module bolt (Quantity: 2) (Figure 1)
Caution: Refer to Fastener Caution.
Procedure: Loosen bolts and slide sensor out of key hole slots.
Tip:
- When removing the bolts from the inboard side, the bolts are removed as having right-hand threads.
- When removing the bolts from the outboard side, the bolts are removed as having left-hand threads.
Repairs and Inspections
Required after a collision accident with side seat airbag deployment – component replacement and inspections.
After a collision involving driver/passenger side seat airbag deployment, replace the following components:
- Left/right side impact sensors on the side of the impact. (Figure 2)
- Left/right roof rail airbag on the side of the impact.
- Inflatable restraint sensing and diagnostic module (SDM), if SDM has DTC B0052 56.
- Inflatable restraint seat belt anchor and/or retractor pretensioner.
- Driver or passenger seat back cushion cover replacement.
 Warning: Do not repair or replace the seat stitching or seams in the seat back trim cover with an internal mounted seat side airbag module. Replace the complete seat back trim cover from the OEM. Non-OEM seat stitching may cause improper airbag deployment, which could result in personal injury.
Perform additional inspections on the following components:
- Mounting points or mounting hardware for the side impact sensors, and driver/passenger side seat airbags on the side of impact – Inspect for any damage, and repair or replace each component as needed.
- Mounting points, mounting hardware, headliner and trim pieces for the left/right roof rail airbag on the side of impact – inspect for any damage, and repair or replace each component as needed.
- Mounting points or mounting hardware for the SDM and seat belt anchor and/or retractor pretensioners – inspect for any damage, and repair or replace each component as needed.
- Seat cushion frame
- Seat recliner and cover, if equipped
- Seat adjuster
- Seat back frame
- Door trim assembly
- Impacted seat cushion side covers and switches
NOTE: These repair/service procedures are excerpted from information published by the vehicle manufacturer, and are intended for the purpose of promoting OEM collision repair information to trained, professional technicians with the knowledge, tools and equipment to do the job properly and safely. Before attempting the repairs described, refer to the complete article in ALLDATA Collision S3500.
Dan Espersen is ALLDATA’s senior collision program manager, holds an AA degree in automotive technology, and has 46 years of experience in the automotive industry, 19 in collision.