It’s Friday afternoon, and Sam’s busy shop is running behind schedule. The detailer is just putting the final touches on a BMW that was scheduled for delivery at 4 p.m. Glancing at his watch, Sam notices it’s 4:30.
Trying not to squirm in her chair, the car’s owner waits patiently in the office. She’s been without her prized possession for a week and is eager to have it back. To pass the time, she mentally plans her itinerary for the weekend. Oh, the places she’ll go once she has her “baby” back.
Finally finished, the detailer drives the car around to the front of the building, enters the office and hands the keys to the customer. Bidding Sam a hasty goodbye, she hurries outside, anxious to be on her way. Watching from inside, Sam notices that as she looks at the newly repaired fender, her forehead develops wrinkles and her eyes narrow.
“Uh, oh,” Sam thinks.
He quickly exits the office to investigate. The customer – who only moments ago was one cool cucumber – is transforming into one hot potato. Her finger is pointed accusingly at the front edge of the hood.
“What are all these chips still doing here?” she belts out in an icy tone. “I thought they’d be fixed and painted when you fixed the fender! Your estimator said the paint would all be blended to match and everything would look as good as new. And the color on this fender looks funny to me – the ‘sparkles’ in this paint don’t match the ones on my car. Is this what you people call quality work? Why are you doing this to me? I need my car for the weekend!”
At this point, sparks are practically flying off her tongue, and Sam is fighting the urge to flee the scene and filet his estimator. Bracing himself, Sam tries to explain what should’ve been explained by the estimator about the repair and blending process. He apologizes for the “visible blend” and offers to re-do it for free, resigning himself to the fact he’s just lost his tail on this job.
Although this scenario isn’t a true account (that I know of, at least), it illustrates how a repair job failed in the area of blending – a task that requires not only technical know-how but proper communication.
Communication Gap
Daily communication at the shop plays an important role in the blending process. When a job arrives at your shop, is there a policy for communicating with the vehicle owner so he has a firm grasp of what’s going to be done to his car and how it will look when it’s finished? There should be.
Discussing the repair procedure with the customer helps you to clarify what will be done to the vehicle. It’s also the time to specify what work is and isn’t covered by the customer’s insurance company. This not only eliminates future confusion – “What are all these chips still doing here? I thought they’d be fixed and painted when you fixed the fender!” – but presents an opportunity for you to upsell the job. If the customer doesn’t want to foot the bill for additional repairs, make it clear to him how the vehicle will look when repairs are completed. Explain that those little chips on the hood and door won’t be sanded out and refinished just because you’re fixing a fender and doing a blend (a communication step obviously forgotten at Sam’s shop).
Believe me, it’s less painful to educate the customer before you begin the repairs. What the customer has in mind and what will actually be done to the vehicle are often two very different things. It’s easier to deal with this fact beforehand as opposed to backpedaling after the job goes awry. Sam’s irate customer is proof of that.
Equally important to an efficient and profitable repair process is communication among a shop’s crew members. Like the customers, everybody on the crew should be made aware of what damage will be fixed and what will be left as is. Some shops hold a brief staff meeting each morning to discuss jobs, answer questions and air concerns. This allows the team to form a clear game plan before repairs start – and reduces the risk of mistakes due to miscommunication later.
In addition, estimators need to know the estimating system they work with and understand differences in language used and what’s required by insurers. Some insurers will pay for blending, but not for tinting. Others pay for tinting but not blending, so it’s important for the estimator to know the specific lingo each insurer uses to expedite payment. Use the language and format appropriate to whoever you’re dealing with, not a blanket one-size-fits-all approach. The more difficult it is for the insurance company to work with your shop, the longer it will take to get paid for what you do. Once again, it’s a matter of communicating.
The bottom line: The goal of an invisible blend can’t be achieved without good communication skills within the shop and with customers.
Proper Prep Work
In researching the technical side of blending, I interviewed several veteran painters in my region to get their views and ideas on what it takes to create the perfect blend. For the purpose of this article, the focus on the repair area begins after it’s been primed and blocked and is ready to receive paint. I should also clarify that when I refer to blending in this article, I’m referring to working with the basecoat/clearcoat refinishing process. We’ll save single-stage blending for a future article.
Once the repair area is blocked out and ready for painting, the preparation process for the blend panel(s) begins. All the painters I interviewed emphasized proper preparation of the blend panel(s).
“Preparation is 90 percent of a paint job,” says George McIntyre, owner of G.M. Collision in Kent, Wash., and a journeyman-level combination man with 25 years experience. If you don’t use proper prep procedures, McIntyre and the others said, you’re inviting comebacks.
The prep process should always start with clean panels that are free of wax and grease. Have you ever heard of a job failing because it was overcleaned? The basic cleaning procedure should include washing the panel with soap and water, drying it well and then using the appropriate wax and grease remover for your paint system. Always follow paint manufacturer guidelines for basic cleaning and prep procedures.
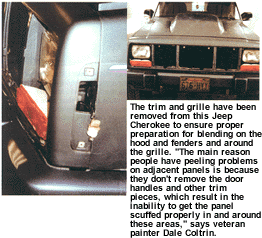
The next step is to remove trim, which is an important issue because it relates directly to proper adhesion of the color and clearcoat. According to Dale Coltrin, a veteran painter at South Hill Collision in Puyallup, Wash., the main reason techs have peeling problems on adjacent panels is because they don’t remove door handles and other trim pieces, which makes it impossible to get the panel scuffed properly in and around these areas.
Products such as lifting tape can be used to raise trim off the surface. However, the painters I interviewed advised that trim should be removed whenever possible.
When prepping for a blend, it’s extremely important that the blend panel(s) are scuffed thoroughly. And it’s more than just a matter of lightly running some sandpaper or a scuff pad over the surface. We all know that procedures vary, sometimes drastically, from shop to shop, but there are key elements that remain the same – such as a thorough scuffing – regardless of what paint system you’re using.
Some techs sand, and some use scuff pads with an abrasive prep paste compound or with a scouring product like Ajax. Some still employ the old-school method of using heavy-duty machine compound with a buffer followed by a scuff pad. The more common method is to use a gray (fine) scuff pad and blend prep paste, abrading the panel(s) until there’s no gloss left. It might be helpful to know that the clearcoat hardness varies from OEM to OEM, as does the effectiveness of blend prep paste from brand to brand. I’ve learned through experience that some of the “economy brand” pastes are really weak, so be sure to choose quality products.
It’s also important to use the correct grit scuffing pad or sandpaper. “I’ve seen guys prep for color blends with too coarse a grit of scuff pad. When the color goes on, you can see all the lines left behind from the scuff pad,” says Troy Hopkins, a painter at Southtowne Auto Rebuild in Tukwila, Wash., with 21 years of painting experience and 13 years of teaching experience.
In addition to the usual scuff pad and paste routine, David Walsh – head painter at Stewart’s Collision Centre in Burien, Wash. – uses 1,200 grit paper to smooth out the area that will receive color and beyond. He says that if a panel is a repair area, finish it nice and smooth because “the smoother the surface is, the flatter paint lays.”
Masking is the next step and is done differently by everybody. The painters I spoke with suggest using a technique like reverse masking, also known as back masking, which leaves a soft tape edge. Soft edge foam masking tape, commonly known as dart tape, can be useful in preventing tape lines in jamb areas, but it isn’t foolproof, says Coltrin. “It’s hit and miss. Sometimes it leaves a rough edge that you have to hand massage to make smooth,” he says.
Plastic masking tape is helpful when you need a softer edge than what regular crepe masking tape can provide. Whatever method is employed, use quality masking materials to prevent overspray and bleed-through.
Mix and Match
Always mix paint materials according to manufacturer instructions and keep reduction consistent. Once a color is mixed, how close does it really need to be to the existing color to be blendable? The painters I interviewed recommend that a color be no more than one or two shades off.
But they also said the type of color and the location of the blend area play roles regarding how close a color must match for blending purposes. Darker colors are more forgiving and can be quite a way off if you’ve got enough panel to blend on. On the other hand, the shorter the distance you have to work within, the more critical the color match becomes.
“It really depends on the nature of the repair,” says head painter Brian Robinson, a 13-year veteran who works at Murray’s Collision Center in Kent, Wash. “Say you’re replacing the hood, repaired a fender and must blend the bumper, too. [The different panels involved] all have to color match. It’s more critical because the bumper is next to the fender, which is beside the hood. So a color difference would be obvious.”
Spray out cards for testing color match before painting can be helpful in preventing mismatch headaches. McIntyre uses putty knives, cleaned between each use, as reusable spray out panels. He noted that some colors change radially as they dry, so painters should let the spray out panels dry thoroughly, preferably under heat, prior to checking for color match.
Which colors are more difficult to work with when doing a color blend? Silvers, light golds and light metallic blues were all mentioned. Blending metallic, pearlescent and specialty colors, i.e. tricoats, presents additional challenges for the painter because metallic orientation and flop must be dealt with; tricoats also offer the “joys” of dealing with multiple color layers.
“Without question, the lighter, brighter metallics are the most difficult to work with,” says Walsh. “The larger the metallic [flake in a color] is, the more difficult it becomes to blend the color out because of flop.” Flop is when a color takes on a different appearance when viewed from different angles.
These “problem” colors are spray sensitive and more prone to mottling. Factors like reduction, air pressure and the number of coats applied must be paid close attention. Reduction and air pressure both affect metallic lay out and orientation.
- Using a reducer that’s too fast for the temperature conditions or spraying at higher air pressure will make the metallic orient itself closer to the top of the surface or “stand up,” causing the color to appear lighter. Using a slower reducer and lowering air pressure can help correct this.
- Spraying color at too low an air pressure tends to make metallic sink more toward the bottom of the paint film, which can make the color appear too dark.
When spraying these difficult colors, be attentive to reduction, air pressure and gun technique. It’s critical that the metallic be oriented the same way on both the existing finish and the newly refinished areas for the color to really blend in.
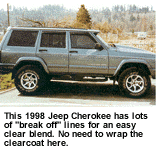
Of course, no discussion about difficult-to-blend colors would be complete without mentioning tricoats. Can a tricoat truly be blended? The general opinion of those interviewed is that often it’s more feasible to panel paint or even re-paint the whole side of a car than it is to try to blend off. If you need to blend off, utilize peaks and rolls in the body lines as places to make the blend disappear.
“I used to work at an Audi dealership where tricoats were prevalent, especially white ones, ” says Robinson. “I’ve done quite a few tricoats and instead of blending off, I panel paint. They can be blended, but for [efficient] throughput, it’s easier to panel paint.”
What about blending colors with multiple variance formulas? Which one of those five color choices is the one you need? The best ammunition to be armed with are the variant color swatches for whatever paint system you’re using. Why tint every mix when you can probably choose a blendable variant color from the chips, mix it up and be good to go?
Apply Yourself
Webster’s New World Dictionary of American English, third college edition, lists one definition of the word blend as, “To pass gradually or imperceptibly into each other, as colors.” That’s what a painter must accomplish when applying color to the repair area. Color must be applied to full coverage on the repair area itself, and then color must be applied so it fades out gradually beyond the repair area and imperceptibly into the existing paint finish.
Every painter I interviewed said it’s imperative to set up the spray gun properly for the material being sprayed. Often, painters who switch from using regular-solids paint to a high-solids system make the mistake of using a fluid needle, fluid tip and aircap setup that’s too large because they’re unaware that high-solids material requires a smaller setup so the paint can be atomized properly.
When blending, a painter needs to be on his toes. If he can’t keep all of the variables in check, he risks ending up with a color that doesn’t match, a heavy dry blend edge or a shadow effect because of flop. When it comes to blending metallics, Walsh says he relies on gun technique and body styling lines.
Good gun technique and proper spray gun setup are crucial. Color must be applied to full hiding on the repair area, then carefully faded out to extend beyond the repair area – not to full hiding but just enough to blend the new color into the existing finish.
Each painter will use his own individual painting style and color application techniques to get just the right look. There are no black-and-white rules on where to begin and end the color application – it varies by job and by painter. The trick is to know your material, your equipment, your environment and the demands of the specific job you’re going to be painting before you’re standing in the paint booth with a gun in hand.
Clearcoating with regard to the blending operation is a saga unto itself. Some OEMs and insurers have their own requirements regarding blending and the way clearcoat is to be applied. Know them. Live by them.
The days of solvent blending to melt in a clear blend are long gone. Today’s urethane paint systems don’t lend themselves to it because they dry very hard and solvent blending doesn’t achieve proper adhesion, which can cause peeling and other problems.
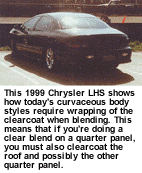
Because of the way today’s vehicles are shaped, many of them have no place to “break off” the clear blend. So it’s become necessary to apply the final coat of clear to the nearest panel edge, a technique known as wrapping. This means that if you’re doing a clear blend on a quarter panel, you must also clearcoat the roof and possibly the other quarter panel.
Painters I interviewed said wrapping is the most durable method for a clear blend and is becoming more prevalent. However, it’s used on a case-by-case basis, which is dictated by what the insurer will pay and the age, make and condition of the vehicle.
The painters agreed that at the minimum, panels should always be cleared to the edge of the panel on the last coat. Remember, too, that you don’t have to load clear onto the surrounding panels because they have factory clear on them.
“I don’t like to cut blends,” says Coltrin, referring to the process of ending the clear application before the end of a panel. “It looks OK but doesn’t provide the proper UV protection. We have a lifetime warranty on our work, so I prefer to clear all the way to the nearest panel edge. [It’s] extra protection to guarantee no problems.”
The Perfect Blend
Want to avoid the kind of situation Sam encountered with his customer? Want to avoid losing your tail on a blending job by re-doing it for free? You can – if you remember that blending requires not only technical know-how but proper communication as well. Communication among all parties involved in the repair – customers, estimators, technicians and other shop staff – is key to any successful job. Mix in knowledgeable and skilled painters, and you’ve created your own blend for success.
Writer Kelly Skahan is the office manager and a prep technician at Patrick Enterprises in Pacific, Wash.
Looking for more information on today’s paint techniques? Visit www.bodyshopbusiness.com to read the article, “Blending Tips for Today’s Vehicles.”

