Whether you’re using the most advanced computerized measuring system on the market or a tape and a tram gauge to verify structural repairs, you need to be aware of some important points that will save you hours of frustration and cut down on — maybe even totally eliminate — comebacks.
Three such points to keep in mind, regardless of the type of measuring system you’re using:
- Use its potential as designed by the manufacturer (and beyond);
- Keep it well maintained;
- Document information for future use.
Let’s take a look at each of these specifically, and examine how doing each of them will reflect positively on your bottom line.
Use It — Or Lose It
Too often, training regarding the use of a measuring system is handed down from technician to technician on an informal basis. And, again, too often the "new" technician doesn’t ask for guidance because he believes it may reflect poorly on his abilities. These two situations guarantee that techs will "learn from their mistakes" — meaning that comebacks and internal re-dos surely will follow.
What should be done? First, have the manufacturer hold at least a yearly in-house training class for anyone who uses the equipment. I’ve performed this type of training for a number of shops, and the biggest challenges I had to overcome with technicians was to convince them the equipment would save them time and not to be scared if they don’t understand it (at first).
My five basic hints to them were:
Hint No. 1: Use it, use it, use it. Many technicians say the reason they don’t use the system is that it takes too long to set up and use. But the only way someone can get good and efficient at anything is to practice.
Whether it’s minor or major structural damage, setting up the measuring system will reduce the overall time spent repairing the vehicle. It also provides assurances that it’s right, so you don’t get that telephone call from the alignment shop saying it won’t align.
Hint No. 2: Measure before pulling. Let the measuring system develop the pulling plan. Too often, secondary damage is missed when a technician begins pulling without properly identifying all the damage first.
An experienced technician once asked me what his most important tool was, while pointing to a milk crate filled with all types of air and hand tools. Being fairly "green" at structural repairs, I didn’t have an answer. He then said: "The milk crate. It allows me to sit and think about what happened in the collision instead of clamping, pulling and hoping it will work."
Along with that milk crate, having the specifications and the current readings before pulling will provide the necessary information to make good decisions.
Hint No. 3: Begin pulling and then re-measure to verify that the pulling plan is correct. Even the best structural technician won’t choose the best area to begin the pull every time, which is why it’s important to check and re-measure the movement of the damage (especially secondary) to verify that it’s moving correctly and as planned. If this isn’t done, it’s probable the metal will tear before the secondary damage moves.
Hint No. 4: Check the measuring system for proper attachment to the vehicle. Any measuring system used must be properly mounted to the vehicle and must remain properly mounted during the pulling process. It’s very important that the setup charts are used properly and that the system is checked during the pulling process for shifting or movement. If the system shifts or moves, it must be remounted before accurate measurements can be taken.
It’s also extremely important to find an undamaged section of the vehicle so you can mount the measuring system. It takes at least three undamaged control points to mount most measuring systems, and some may require four undamaged control points. Without verifying an undamaged mounting area, your readings in the damaged area will be inaccurate.
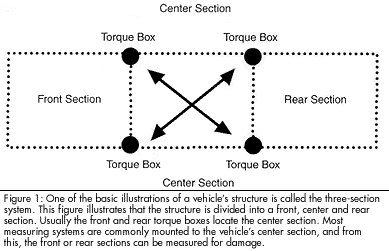 Depending on the severity of the collision, damage will carry through the vehicle as it’s designed, which may cause control points away from the impact to move. One of the basic illustrations of a vehicle’s structure is called the three-section system (Figure 1). This figure illustrates that the structure is divided into a front, center and rear section. Usually the front and rear torque boxes locate the center section. Most measuring systems are commonly mounted to the vehicle’s center section. From this, the front or rear sections can be measured for damage.
To ensure proper measuring, begin by checking the center section of the vehicle with a tram gauge. Simply "X" measure the center section to determine if it’s square. This is done by measuring the front control point of one side to the rear opposite control point and comparing it to the other angled measurement. If these two measurements don’t match, then it’s possible the center section has damage, too.
Before concluding that it is damage, look at the specification sheet to make sure the control points are designed to be symmetric. Also look to find other center-section control point that could be square and could be used for mounting the measuring system. If damage in the center section is as serious as either the front or rear section, then the measuring system mounting should be moved to an undamaged section. If there’s no undamaged section, pull the least damaged section to specifications to mount the measuring system.
Hint No. 5: Understand overhang. When a vehicle is raised off its suspension, the weight of the vehicle’s engine will cause the front section to sag down. And this causes the upper-tower measurements to also lengthen.
It’s very important to identify when this situation is occurring before measuring.
Even when a vehicle is mounted on a pulling system’s pinchweld clamps, it’s possible — depending on how high the vehicle is raised or if the wheels are removed — to cause an overhang condition. Measuring diagrams, unless otherwise noted, are measurements with the vehicle suspension loaded and the mechanicals in place.
If an overhang condition is present, each system has a method of correcting the condition. It usually includes using a small hydraulic ram to lift the vehicle’s front section until it starts to raise the vehicle out of the pinchweld clamps. This ensures the weight is distributed as if it were on the suspension.
Specific System Hints
• Centerline/Datum Gauges: The use of centerline/datum gauges is often misunderstood. For one thing, it’s important to have them mounted in a section without damage to create the proper references for the datum plane and the center pins for centerline alignment. These two base gauges, when mounted properly, become the gun sight for centerline alignment and the top of the bars become the datum reference.
Once the base gauges are established, using multiple gauges in the damaged area can be very difficult to sight during pulling. If your gauges have the two-color option (each side is a different color), make sure to alternate colors to allow for better viewing.
Also, once the damage has been analyzed and a pulling plan established, removing gauges in the primary damage area will allow for better viewing of the gauge(s) in the secondary damage area. This technique can help you walk out the repairs as intended (last in … first out).
Another very basic step that’s often forgotten is to re-center the gauges (if they’re friction-type gauges) before each use. These gauges generally use a self-centering friction principle that can be changed to handle non-symmetrical vehicle designs. Re-centering the gauges usually requires snapping the gauges into the center until they’re both hitting the center stops at the same time.
The last hint for these gauges is to use them in areas and on items such as engine cradles and steering racks to center and level them to the structure. Even without dimensions, hanging a gauge can help ensure that the cradle is properly centered for alignment, that it’s level and that the steering rack is level so a "bump steer" condition isn’t present.
• Universal Systems: Since this category includes the largest cross-section of measuring systems used today, each manufacturer has a number of hints for its specific unit. The following are general hints for this system type:
- Check and re-check during pulling for vehicle shifting. If the measuring system shifts, measurements are inaccurate.
- Don’t weld or flame cut near the system, which allows welding sparks and slag to hit the unit.
- Drop pointers down and away from control points during pulling.
- Measure from the farthest point outward to the primary damage.
- Look for notes on mounting-location variances, and call the manufacturer when an unusual out-of-spec reading doesn’t make sense. It may be a misprint.
- Use the overhead bridge for more than the upper-tower locators. It can be valuable for taking symmetrical readings for a damaged side from the undamaged side (i.e., door-hinge pillar locations, B-pillar, window openings, etc).
The Importance of Maintenance
It’s a shame when I go through clients’ production areas and find measuring equipment (and other equipment) that’s poorly maintained. These shop owners have invested great sums of money for state-of-the-art equipment, yet it quickly becomes abused and poorly maintained. Part of the problem is they didn’t establish written expectations at the time of installation for those who would be using the equipment. Another part of the problem is a lack of training. In any case, the measuring equipment should function for years as it did when first purchased, and it’s everyone’s responsibility to see that it does. In fact, each piece of a measuring system should be checked and cleaned weekly, and any damaged or worn parts should be replaced immediately.
I’ve had the opportunity the last few years to work with a number of shops in China. During my second trip, I was surprised and impressed how a specific technician cleaned the alignment rack every evening before he went home and cleaned each attachment after each use while placing it back in its proper place. My third visit was six months later, and the original technician was no longer there. I was then equally surprised by the alignment rack’s condition. The new technician couldn’t find many of the attachments when he needed them and was also having trouble with calibration, which caused improper alignments. All this because of poor maintenance.
The following are some important considerations and hints regarding storing the many measuring system components:
• Shadow boards and cabinets are fine as long as they have a very secure place for every piece.
• Any piece that’s mounted across a span on two pegs must be done carefully. Chains cannot be hung from gauges or tram bars. Even their own weight over time can cause the bar to warp. It’s also not advised to allow tram bars or any bar unit (ladders or transverse beams for universal systems) to lean against a wall. There are too many direct possibilities for damage, as well as the warping problem.
• All systems that have moving or sliding mechanisms must be cleaned and lightly greased for smooth operation. Allowing units that use plastic inserts to dry out will shorten the life expectancy and may cause inaccurate readings due to binding.
These hints may sound very basic, but they’re not done in most of the operations I’ve been in over the years.
Documenting Information
It’s amazing how painters spend the time to do a spray out card for a difficult color match only to find the card(s) in the trash the next day. It’s equally amazing how dimensions on vehicles aren’t updated or stored. I’ve heard, "It’s not my job" so many times, and I really believe we need to quit using this excuse if we want to become as productive as the market is driving us to become.
There’s no law that prohibits us from taking readings on commonly damaged areas not listed in the dimension guides on a vehicle undamaged in those areas. Many times, cradle dimensions aren’t given, so before we install the new cradle, how about measuring and writing the dimensions in the dimension guide for the next time? The list can be endless: door pillars, B-pillars, rocker panels, window openings, spindle to strut-tube distances, etc. It sure could make future measuring easier.
A Pleasure to Measure
No matter what system you choose for your operation, it takes proper setup and maintenance to be — and remain — accurate. For example, if you have dirt and trash on the floor of your spraybooth, jobs will be dirty and unacceptable. The same is true with your measuring equipment. If it’s not properly maintained, jobs will end up having to be re-done. This, in turn, costs you time and money — whether you’re a technician or a shop owner.
Keeping track of dimensions will also allow you to improve productivity — which is the single most important area of improvement that our industry will be focusing on in the years to come. It’s estimated that efficiency improvements in production can be made in excess of 40 percent. Imagine what that means to the bottom line.
Now imagine what it means to your bottom line.
Contributing editor Tony Passwater is a long-time industry educator and consultant who’s been a collision repair facility owner, vocational educator and I-CAR international instructor; has taught seminars across the United States, Korea and China; and is currently an industry consultant. He can be contacted at (317) 290-0611 or [email protected].


