Does the process of replacing a door skin elicit fear? On the contrary, door skin replacement should be a fast and economical repair.
To make this often-dreaded task more appealing and profitable, a couple techniques and some special tools can be used to speed up the repair. But the first place to start re-thinking door skin replacement is with the estimating process.
Estimating Success
When estimating a door skin replacement, you should first R&I the glass if you’re performing any welding operations. (This is an included item in ADP’s system but not in Mitchell or CCC.)
Attached moldings, including the belt molding, usually aren’t included either (ADP and CCC). However, if you’re using Mitchell, belt molding is included.
Confused yet?
How about door mirrors? They’re included with ADP, but not with Mitchell or CCC. Nameplates and ornaments aren’t included with any system.
How about all the items for corrosion protection? Again, none of these items are included in the repair times. You need to look at each door skin job individually to find the necessary corrosion items. You might need weld-through primer, sealants, gravel guard, adhesives (to glue the skin to the intrusion beam), foams, self-etch/epoxy primer and cavity wax. Each of these should be an individual line item on your estimate because each door is an entity in itself. For example, not every door has gravel guard, so don’t charge for it if it isn’t needed. And for heaven’s sake, please don’t lump everything under the term “replace corrosion protection.”
A couple more items that aren’t included are a sound-deadening pad and the piece of plastic (moisture barrier) between the trim panel and the door shell.
It’s items like those that make it essential to know your electronic estimating system inside and out. Be sure you’re compensated for all the procedures you perform to bring a vehicle back to pre-accident condition by getting familiar with the procedure pages in your particular estimating system. If you were replacing a door skin on a late-model Chevy Camero, just adding the R&I of the door glass and mirror could add 1.2 to 1.5 hours labor to your estimate depending on the estimating system you use.
Tools of the Trade
Let’s turn our attention to some techniques and specialized tools.
My good friend Tony Passwater (a contributing editor to BodyShop Business) taught me a great trick. Take 80-grit sandpaper on a grinder or DA sander, and chamfer the outside flange of the door skin. By performing this operation, the lip will fold over much easier and you’ll have very little, if any, damage to the door edge. I had a technician who beat the edge over so badly that he had to put body filler on the entire edge of the new skin. What a waste of time and materials! (I terminated his employment shortly thereafter.)
Did you know there’s a special hammer designed exclusively for hemming the door skin. (See photo No. 1.) It has a special curvature for hard-to-reach areas, and the other side of the hammerhead is reduced at the end to put all its energy on the flange.
Here’s a sampling of other tools that can help speed and ease the process:
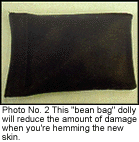
- Two dollies are on the market that prevent the outer skin from being damaged. The first one is made of a hard rubber compound and the second is a “bean bag” – leather covered and filled with lead shot. (See photo No. 2.) These two dollies will reduce the amount of damage when you’re hemming the new skin.
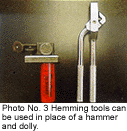
- Hemming tools can be also utilized in place of a hammer and dolly. (See photo No. 3.)
- Another tool that speeds up the repair process is a pneumatic caulking gun. Besides being faster, it produces an OEM-like finish.
- I also recommend a resistance spot welder. The price of these machines has dropped in the last couple years, so they’re affordable for most collision repair facilities. They have three benefits over traditional plug welds: First, they produce an OE-type of finish. Second, they’re faster than a plug weld. Last, there’s no clean up of the weld nuggets like with MIG plug welds.
The Work at Hand
Let’s look at a door skin replacement on a 1999 Toyota Land Cruiser.

1. Remove door from vehicle and remove all attached parts including the door glass (to prevent glass from breaking and/or being pitted by the welding sparks).
2. Note placement of sectioning positions of window openings.
3. Remove/cut/drill spot welds and/or brazing.
4. Grind off hemming flange with a grinder, being careful not to damage the door flange.
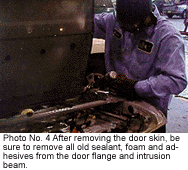
5. Remove the door skin. (See photo No. 4.)
6. Remove all old sealant, foam and adhesives from the door flange and intrusion beam.
7. Repair any damage to the door flange. (See photo No. 5.)
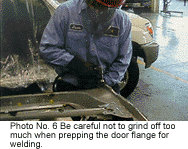
8. Prep the door flange for welding, being careful not grind off too much. (See photo No. 6.)
9. Apply weld-through primer to mating surfaces to be welded.
10. Restore corrosion primer to any exposed bare metal.
11. Cut and test fit new door skin.
12. Apply sealants, adhesives and/or foam to the intrusion beam.
13. Position the new door skin to the frame (partially hem the door skin).
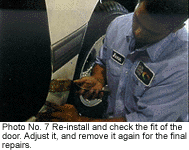
14. Re-install and check the fit of the door. Adjust it accordingly, and remove it again for the final repairs. (See photo No. 7.)
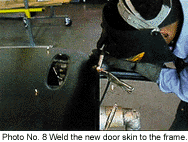
15. Weld the new door skin to the frame. (See photo No. 8.)
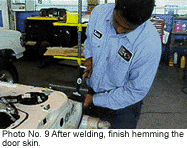
16. Finish hemming the door skin. (See photo No. 9.)
17. Dress all welded areas. Apply seam sealers and corrosion protection primers.
18. Apply gravel guard (if applicable) and install sound deadening pads.
19. Refinish interior door jambs.
20. Re-install door to body.
21. Refinish door exterior.
22. Apply cavity wax to door interior.
23. Re-assemble door.
You can obtain more detailed information on corrosion protection and door skin replacement from I-CAR’s Advantage Series and various vehicle manufacturers’ repair manuals.
Contributing editor Toby Chess, AAM, is director of technical training for Caliber Collision Centers. He’s also the Los Angeles I-CAR chairman, an I-CAR instructor and a certified ASE Master Technician.
| The mission of the collision industry today is to restore a damaged vehicle to its pre-loss condition. A properly repaired vehicle will have the same structural integrity if involved in another accident, the same paint warranty as the original equipment (OE) and the same corrosion protection as applied by the vehicle manufacturer.
The collision industry has developed products and equipment capable of duplicating OE conditions. By utilizing these products and equipment in conjunction with the repair procedures established by the manufacturers and I-CAR, the damaged vehicle will be returned to its pre-accident condition. Of the three areas noted above – structure, paint and corrosion protection – corrosion protection is the least understood. But before we look at this area, I’d like you to take a quick test. Review the following four scenarios that pertain to door damage and repair, and write down what corrosion items you’d use in each case. 1. Repair a grapefruit-size dent on a door. Now let’s look at corrosion and its effect on vehicles. (Don’t worry, you’ll find out the answers soon enough!)
Chemistry 101
How’d They Do That?
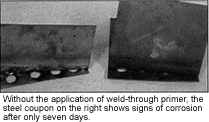
I plug-welded two pieces of steel together. On the first pair, I used weld-through primer; on the second I used none. After seven days, the coupon without the weld-through primer was covered with rust, but no corrosion had formed on the coated metal. (See photo.) A couple of items should be noted when using weld-through primer: First, it has poor adhesion qualities and shouldn’t be used over large areas. After using the product, any overspray should be cleaned up. Second, check with your paint system to see if its use is recommended. Third, weld-through primer can be either sprayed or brushed on.
Sealers work by filling gaps and sealing seams from air, moisture, exhaust fumes and road noise. They’re applied by spraying, brushing or pneumatic guns. Check your vehicle manufacturer’s repair manuals for the location and types of sealers necessary.
Here are the answers to the corrosion protection quiz. |