Long ago, in a land far, far away – a collision repair shop, circa 1970s – it was common to hear the sounds of clamps, chains and pieces of the vehicle coming loose and crashing through anything unfortunate enough to be in the way. Such occurrences made great folklore stories and have been passed down from generation to generation.
Occurrences like these were commonplace years ago because the strategy for repairing vehicle frames was to overpower the damage with heavy, single-direction pulls. This meant that force applied by chains, clamps and pulling equipment had to surpass the resistance given by the damaged vehicle.
Hiya! Take that, you Oldsmobile!
If you’re old enough to remember those days, you’ll also remember hearing the sound of the frame rack’s air pump “puffing” at intervals of one to two seconds between each breath. Naturally, you’d look to make sure you weren’t in the path of anything that could potentially come crashing down. At times, you’d even take a coffee break to get out of the area. And let’s not forget the – yes, I’m stereotypingl – heavyset “frame man” chewing on the end of a cigar and muttering, “Come on, baby – you can do it!”
Boy am I glad those days are gone. At least I hope they are because understanding proper pulling principles is vital to producing safe, quality repairs. What are the secrets for successful structural repairs? Analyzing the damage, holding, blocking, pressure monitoring and stress relieving (which must be done today – and should’ve been done back in the old days, too).
The Analysis: Sit on a Milk Crate and Think
It’s still very important to let the measuring system develop the pulling plan. Too often, secondary damage is missed when a technician begins pulling without properly identifying all the damage first.
An experienced technician once quizzed me on what was the most important tool he had. Being fairly “green” at structural repairs, I didn’t have an answer. He then pointed to a milk crate filled with all types of air and hand tools and said, “The milk crate. It allows me to sit and think about what happened in the collision before I clamp, pull and ‘hope’ it will work.” Along with that milk crate, having the specifications and current readings before pulling provides you with the necessary information to make good decisions.
But what you need today isn’t just vehicle dimensional specifications. It’s critical that you also get body repair information from the manufacturer through manuals, CDs and other industry sources. You also need vehicle design specifications. This includes knowing when a part should be repaired – and when it shouldn’t. Assuming what we’re allowed to do will only get us into deeper trouble.
Notice that I’m not using the words “can repair.” This is because it’s no longer a matter of whether we “can repair” it – whether we have the ability/talent to repair it. It’s a matter of whether the part is “allowed” to be repaired. I’ve seen many damaged structural components that weren’t designed to be repaired getting repaired anyway because an uneducated appraiser or shop estimator figured it that way.
Today, the use of new types of construction processes, such as hydroforming and the increased design of crush zones in conventional frames, makes vehicle repairs today an ever-changing world. This requires you as a shop owner, you as a technician, you as a shop estimator and, yes, even you as an insurance appraiser to know what the rules are. And if you elect to ignore the rules, then accept the liability that will surely come with the decision.
Holding: If It Moves, You Lose
Unlike football where you get penalized for it, holding is one of the most important of the five key elements to proper structural repairs. Holding also includes vehicle anchoring.
Keep in mind that whatever pulling force is placed on the vehicle is transmitted to the anchoring areas, too. The anchoring area needs to be secure enough to not allow vehicle movement but also needs to withstand the pulling force without distorting the anchor area. On most unitized structures, this involves the pinchweld space at the front and rear torque box areas. Since this space generally has some reinforcements and/or multiple layers of metal, it’s usually (but not always) the suggested anchoring location.
It’s always advisable to use all pinchweld clamps included in the system if damage isn’t in the center section of the vehicle. (Center section damage may not allow the clamping to be used and/or may hinder the return of the center section during repairs. This type of repair isn’t part of this article’s scope and requires more creativity and skill to be performed properly.)
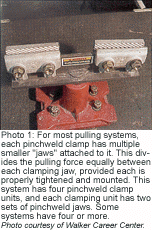
For most pulling systems, each pinchweld clamp has multiple smaller “jaws” attached to it. This divides the pulling force equally between each clamping jaw, provided each is properly tightened and mounted. See Photo 1. This system has four pinchweld clamp units, and each clamping unit has two sets of pinchweld jaws. Some systems have four or more.
Imagine that we’re going to apply 2,000 pounds of force to pull the damage back into position. Each area where these clamps are mounted needs to resist 250 pounds of pressure without causing distortion. How do I know this? Because the pinchweld jaws divide the force equally from the pulling process: 2,000 divided by eight jaws equals 250. But if only two clamping units are used or only one jaw is tightened properly on each clamp, the force doubles to 500 pounds at each clamp location. At this point, we’re getting very close to causing damage.
The terms properly mounted or tightened are important to define. If the pinchweld clamps aren’t properly tightened and the clamp jaws can slip, then the force is directed to the other mounted clamp jaws. For this reason, it’s very important to ensure the pinchweld clamps are free from anything that may interfere with a secure anchoring. Pinchweld clamp jaws should be inspected and cleaned regularly and replaced periodically when they become worn or damaged.
Some unibody vehicles either don’t have reinforced pinchweld areas or a pinchweld at all. These vehicles have special anchor adapters designed for the pulling system or require modifications to the structure for anchoring. This could include welding or removal of suspension parts to bolt the anchoring fixture. Regardless, it’s not suggested that you vary from these anchoring locations and make your own. Get the proper tools and equipment.
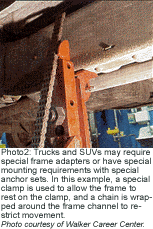
What about trucks and SUVs? They may also require special frame adapters or have special mounting requirements with special anchor sets. See Photo 2. Here a special clamp is used that allows the frame to rest on the clamp, and a chain is wrapped around the frame channel to restrict movement.
With many frame-type vehicles, a multiple-sized frame hole clamp can still be utilized if used properly. Otherwise, I’ve seen it become a very successful “can opener.” This is caused by the clamp being pulled downward rather than horizontally. If this happens, the clamp will use its leverage to act as a can opener during pulling.
To eliminate this from happening, keep the clamp horizontal. One way to do this is to place blocks under the clamp so it can’t pull down at the mounting hole. Another way is to place a small hydraulic ram on the clamp to keep it horizontal. Keeping the clamp horizontal is the goal, even if the chain is angled downward 45 degrees.
It’s also important to hold an area in place after it’s restored to proper dimensions and not allow it to stretch past its proper position while the repair process continues. This is sometimes accomplished with holding fixtures. One common type of holding fixture is called a “turn buckle.” This unit has small clamps on each end that can be mounted in a door opening and tightened to lessen the flexing of the upper body. If you’ve ever pulled the front structure with the door open or off, you probably know what I’m referring to. Even with the doors closed, body flex is present.
Blocking and Leverage: Concentrating Your Efforts
Blocking is a method that allows the use of leverage to ensure the pulling force is concentrated to the proper area of damage. It also allows the block or hydraulic ram to place force (normally upward) at a damaged area needing upward movement or to keep an area from moving downward during the pulling process of another area. As with anchoring clamps, the force the block places on its location is determined by the amount of force placed against it during pulling. A block placed under a cross member or structural member will exert the same force upward as the pull is directing downward. This is really useful when restoring datum misalignment.
During pulling, some of the pulling force is absorbed in the body due to the flexing of the unitized structure. The additional force needed to create movement in the damaged area from the loss when the body flexes can cause the pulling clamp areas to tear. Think of breaking a “green” tree branch verses a “old” one. The green branch requires more effort to snap because it flexes before breaking. Blocking can also assist in lessening flexing.
Pressure Monitoring: How Hard Is Too Hard?
I’m sure you’ve heard that a unitized structure should be pulled with a minimal amount of force. But if you don’t have a gauge to monitor applied pressure, how do you know? Counting the seconds between each pump beat isn’t a recommended method. It’s important to visually see what pressure each of your pulls places on the structure to know when your pulling plan is successful. If you have to use excessive force (usually anything more than 2,500 to 3,000 pounds), your pulling plan is probably incorrect. There may be times in very reinforced center section areas that this suggested limit is reached, but normally I’ve found that staying below 2,500 pounds is an achievable goal.
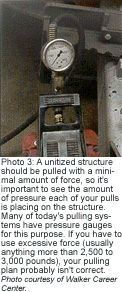
Many of today’s pulling systems have pressure gauges for this purpose. See Photo 3. If the pulling system uses foot hydraulic air pumps, these gauges have a tendency to become damaged since they’re often mounted at the pump base. It’s important to be careful with these gauges and keep them maintained. Other gauges are located on the frame rack and may be difficult to see during pulling. Still, it’s vital to use them to properly monitor pulling force.
Another hint for reducing the amount of force needed to pull today’s vehicles is to identify anything that may be restricting the damage from moving. This could include an engine cradle or cross member. It may be advisable to unbolt a front bolt of a damaged engine cradle so the rest of the structure can move. If the rear engine cradle mounting area is out-of-specs, then a pull can be added to the cradle itself to pull that location while the other structure is being pulled. Always take advantage of each situation.
It may be beneficial to cut away some of the primary damage to allow access to the rest of the structural damage. Using welded absorbers as pulling attachments normally doesn’t supply the proper pulling points and many times just pulls out the mounting bolts.
Stress Relieve: Producing Good Vibrations
Once everything is properly anchored and blocked and the clamps are mounted, it’s time to pull. But pulling – and continuing to pull – without relieving the internal metal’s state will commonly cause the structure to crack or tear.
Why? Because the metal, whether HSS or mild steel, has been work hardening at the damage and will want to crack or tear before it moves – unless proper techniques are used. This process requires stress relieving the metal around the damage.
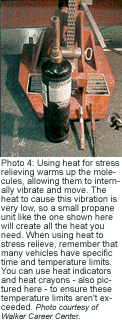
Stress relieving is accomplished with vibration (heat and/or mechanical). This is where another misconception has led to many organizations not recommending the use of heat. During stress relieving, heat is used to warm up the molecules to allow them to internally vibrate, causing them to move. We’re not “softening” the steel as many of us did on older conventional frames to ease the pulling load. The heat to cause this vibration is very low (generally less than 1,250 degrees and even much lower at times), so using the oxy/acetylene torch isn’t necessary. See Photo 4. A small propane unit creates all the heat you need for stress relieving. In fact, what’s wrong with using an air heat gun with a top temperature of 750 to 1,000 degrees?
Keep in mind that many vehicles have specific time and temperature limits. Heat indicators and heat crayons are a couple examples of methods used to ensure these temperature limits aren’t exceeded. Because of time and temperature limits, use of heat has always been my least recommended method to accomplish stress relieving.
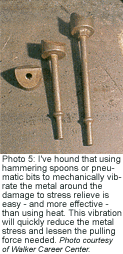
To accomplish the best vibration for stress relieving, I’ve found that mechanically vibrating the metal around the damage is easy – and is the most effective method. It can be accomplished with hammering spoons or pneumatic bits. See Photo 5. This vibration will quickly reduce the metal stress and lessen the pulling force needed. In fact, if a pull is held at 1,500 to 2,000 pounds and the pulling direction is correct, the pressure gauge should drop significantly during stress relieving (vibration). This verifies your pulling plan.
Note: Avoid hammering directly on a buckle until it’s ready to move and be straightened. Hammering directly on a buckle too soon can harden it further, making it almost impossible to straighten.
Got It Straight?
The process of pulling to a reasonable pressure, holding, stress relieving the area and repeating the process will achieve the most efficient pulling process with the lowest chance of tearing or cracking metal. This information may not be new to you, but I’m sure you’ve seen many a repair done by someone else who didn’t use any of these techniques.
It’s unfortunate, but there are still unsafe repairs being performed. We blame some of these repairs on “rebuilders” and some on hobbyists. But other poor quality repairs are the result of collision repairers – repairers who either don’t know, don’t care or can’t say “no” to an unwavering appraiser.
Don’t be one of these repairers. Let the frame-repair horror stories stay where they belong – in the past. When someone talks about you, let them be telling a success story.
Contributing Editor Tony Passwater is president of AEII, a consulting, training and system-development company. He’s been in the industry for more than 27 years; has been a collision repair facility owner, vocational educator and I-CAR international Instructor; and has taught seminars across North America, Korea and China. He can be contacted at (317) 290-0611, ext. 101, or at ([email protected]). Visit his Web site at www.aeii.net for more information.


